Skip to content
Dentora
العربية
  1. Home
  2. User guide
  3. Appointments

Appointments

Run the clinic’s schedule for every doctor, book with a click, follow each patient from arrival to the end of the visit, and send WhatsApp reminders.

Watch this topic on video
On this page
  1. The appointments calendar
  2. Booking an appointment
  3. Conflicts and working hours
  4. On the day: appointment status
  5. WhatsApp reminders
  6. Editing, moving or deleting an appointment
  7. A patient’s appointments
  8. Appointments on a phone

The appointments calendar

Open Appointments from the sidebar. The calendar opens on today in Day view: a column for each doctor, appointments as cards as long as they last, and a red line at the current time.

Switch views with Day, Week, Month and Agenda. The week shows seven days starting on Saturday, the month shows the first three appointments of each day, and Agenda lists 14 days from the chosen date; on a computer each unfinished appointment has its next-step button.

  1. Move a day, week or month with the arrows, come back with Today, or pick any date in the date box.
  2. Show one doctor or more by clicking their names, or click All doctors to see everyone.
  3. Filter by status from the All statuses button: Active only hides cancelled appointments and no-shows, or pick a single status.
  4. Click any appointment to see its details.
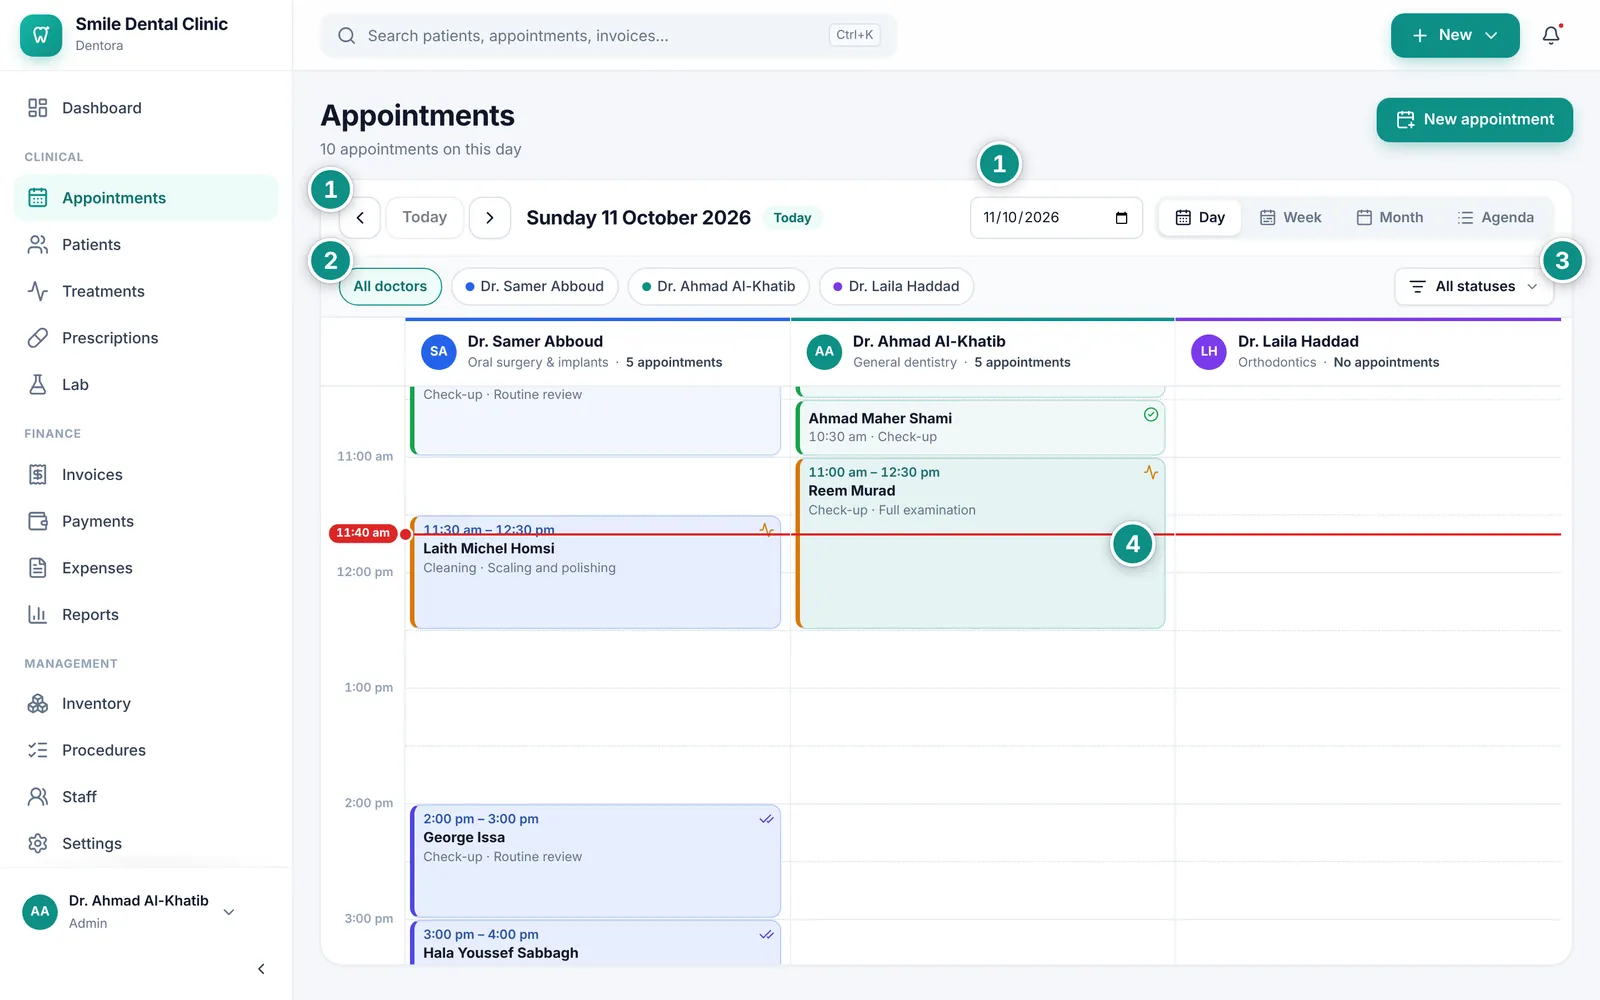
The appointments calendar in Day view: a column per doctor, appointments as coloured cards, and the red line at the current timeEnlarge the picture

Good to know

  • A card is tinted in the doctor’s colour (the same colour edges the top of the doctor’s column); its side stripe and small icon show the status. A cancelled appointment is struck through, and a no-show is greyed out.
  • In Week view, click a day’s heading to open it in Day view. In Month view, click any day to open it; a label such as +3 more means appointments that did not fit in the box.
  • Every active user whose role is Doctor or Admin gets a place in the calendar. An admin adds doctors and picks each one’s colour on the Staff page. See Adding a team member.
  • The calendar’s hours and closed days come from Working days & hours in Settings. A closed day is shaded, and you can still book an exception. See Working days and hours.
  • Dentora remembers the view, date and filters while you visit other screens, until you close it.

Booking an appointment

The quickest way to book is to click a free time in the doctor’s column: the doctor, date and time are filled in for you.

  1. Click a free time in Day or Week view (a + and the time appear as you hover), click New appointment, or press Ctrl+Shift+A on any screen.
  2. In Patient, type part of the name, file number or phone and pick the patient from the list. For someone new choose Add a new patient at the end of the list (or Add “name” as a new patient if you typed a name): a name and phone are enough for now; then click Add and select.
  3. Check the Doctor, Date and Start time. The time list shows every slot of the working day and marks the taken ones booked; you can also type any other time in the box next to it.
  4. Choose the Duration (the end time shows under it), the Type (Check-up, Consultation, Treatment, Follow-up, Cleaning, Emergency…), write the Reason for visit, and add Notes for the doctor or the front desk if you like.
  5. Click Book appointment. It appears in the calendar and in the patient’s file.
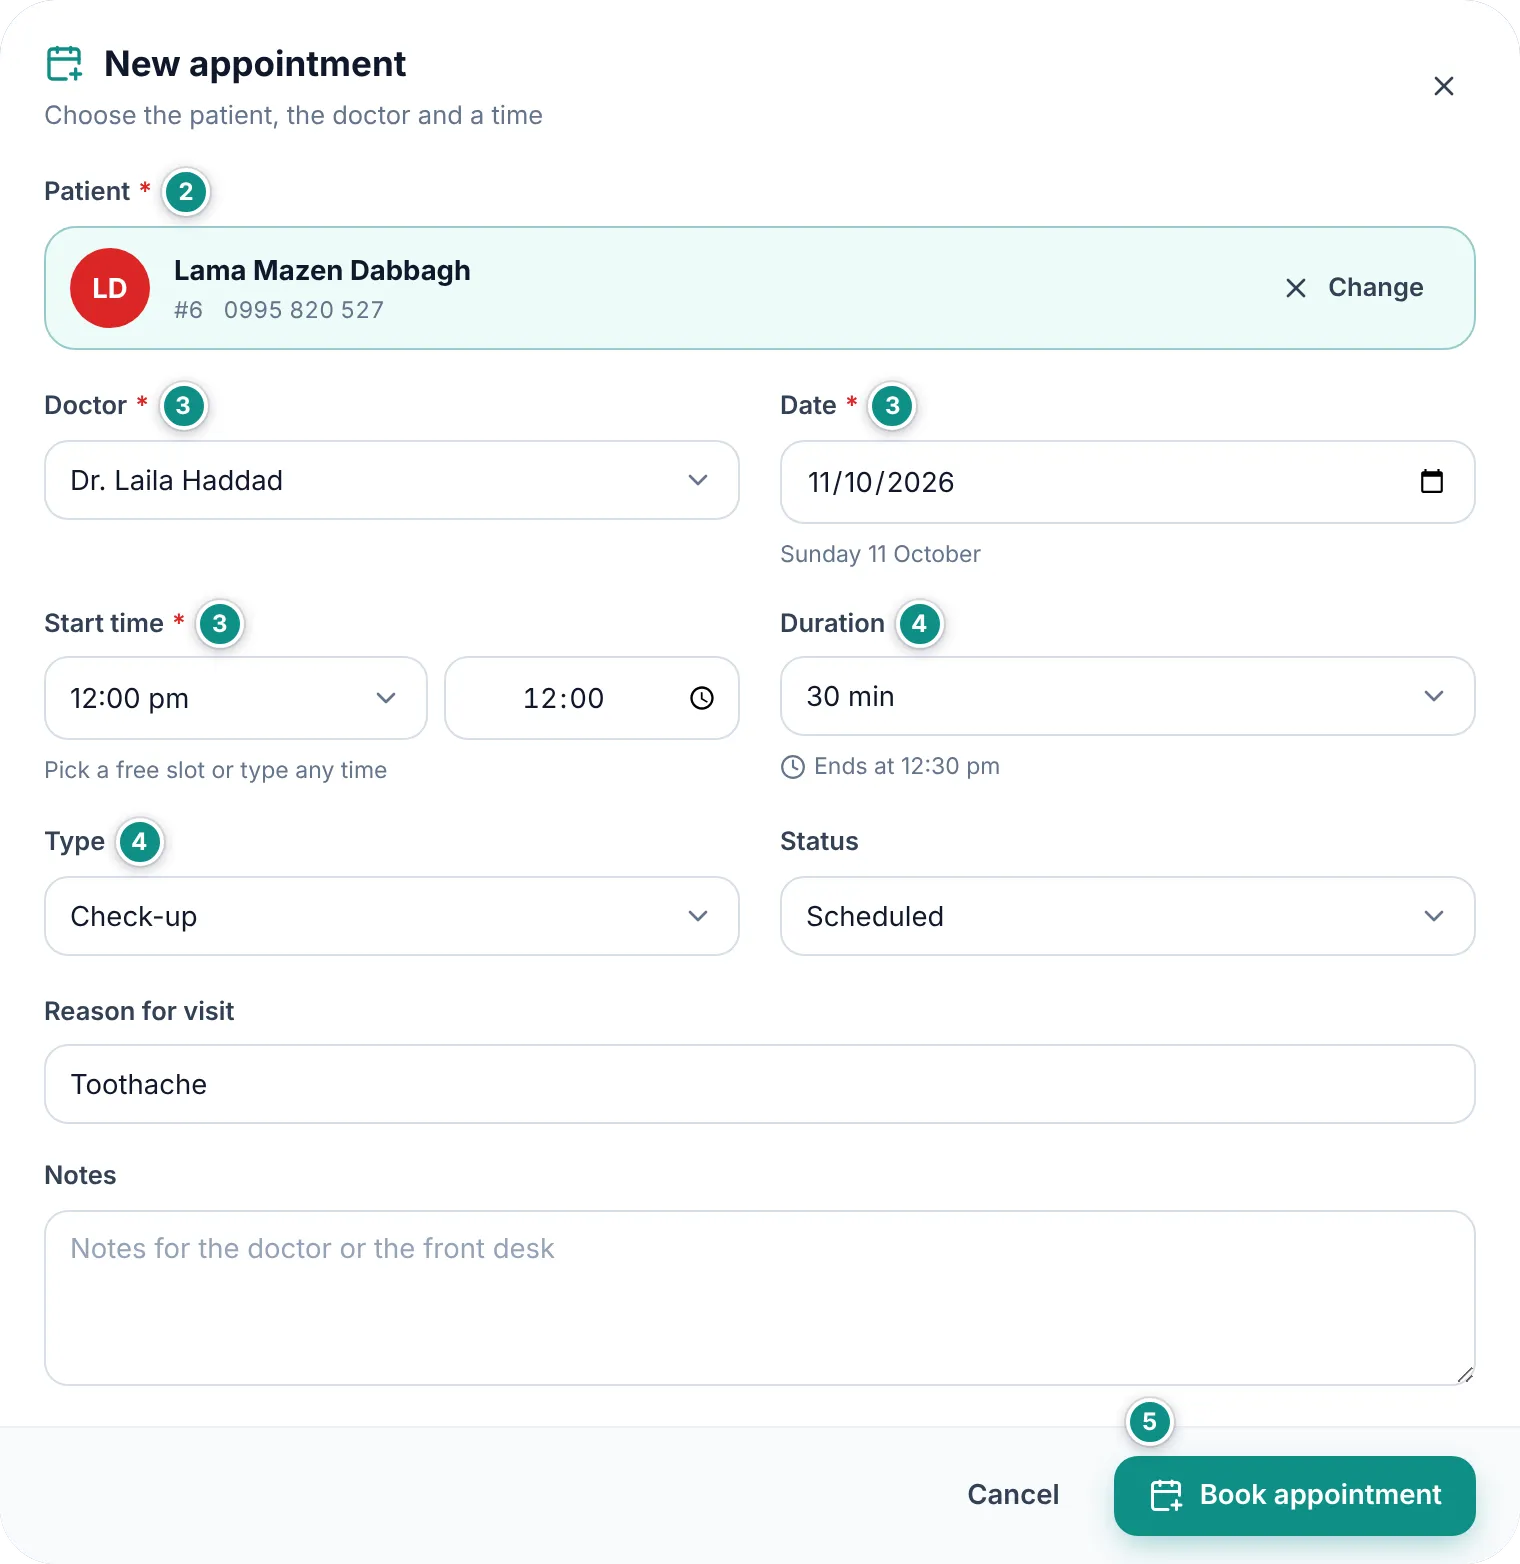
The new appointment form: the chosen patient, doctor, date, time, length, type and reason for visitEnlarge the picture

Good to know

  • If you open the form without a time, Dentora picks the doctor’s first free slot. The suggested length is the Default appointment length from Settings; lengths go from 15 minutes to 2 hours.
  • The Appointment button in a patient’s file opens the same form with the patient already chosen.
  • Move through the patient list with the arrow keys and pick with Enter. To change the patient after choosing, click Change.
  • If the patient confirms while you are booking, set Status to Confirmed straight away.
  • If you book on a day that is not on screen, the calendar moves to that day after saving.

Conflicts and working hours

The form watches the schedule as you book and warns you before saving, without stopping you:

Scheduling conflict: the doctor already has an appointment at that time, and the warning lists the overlapping ones. The patient has another appointment at this time: the same patient is booked with another doctor at that time. Outside working hours: the day is not a working day, or the appointment runs past the working hours.

  1. Read the warning that appears under the appointment fields, above Reason for visit: yellow for a conflict, blue for Outside working hours.
  2. Click Next free to move the appointment to the doctor’s first free time after the one you chose, on the same day, or choose another time yourself. This button comes only with the Scheduling conflict warning.
  3. Or save anyway if the overlap is intended, such as a short check between two appointments.
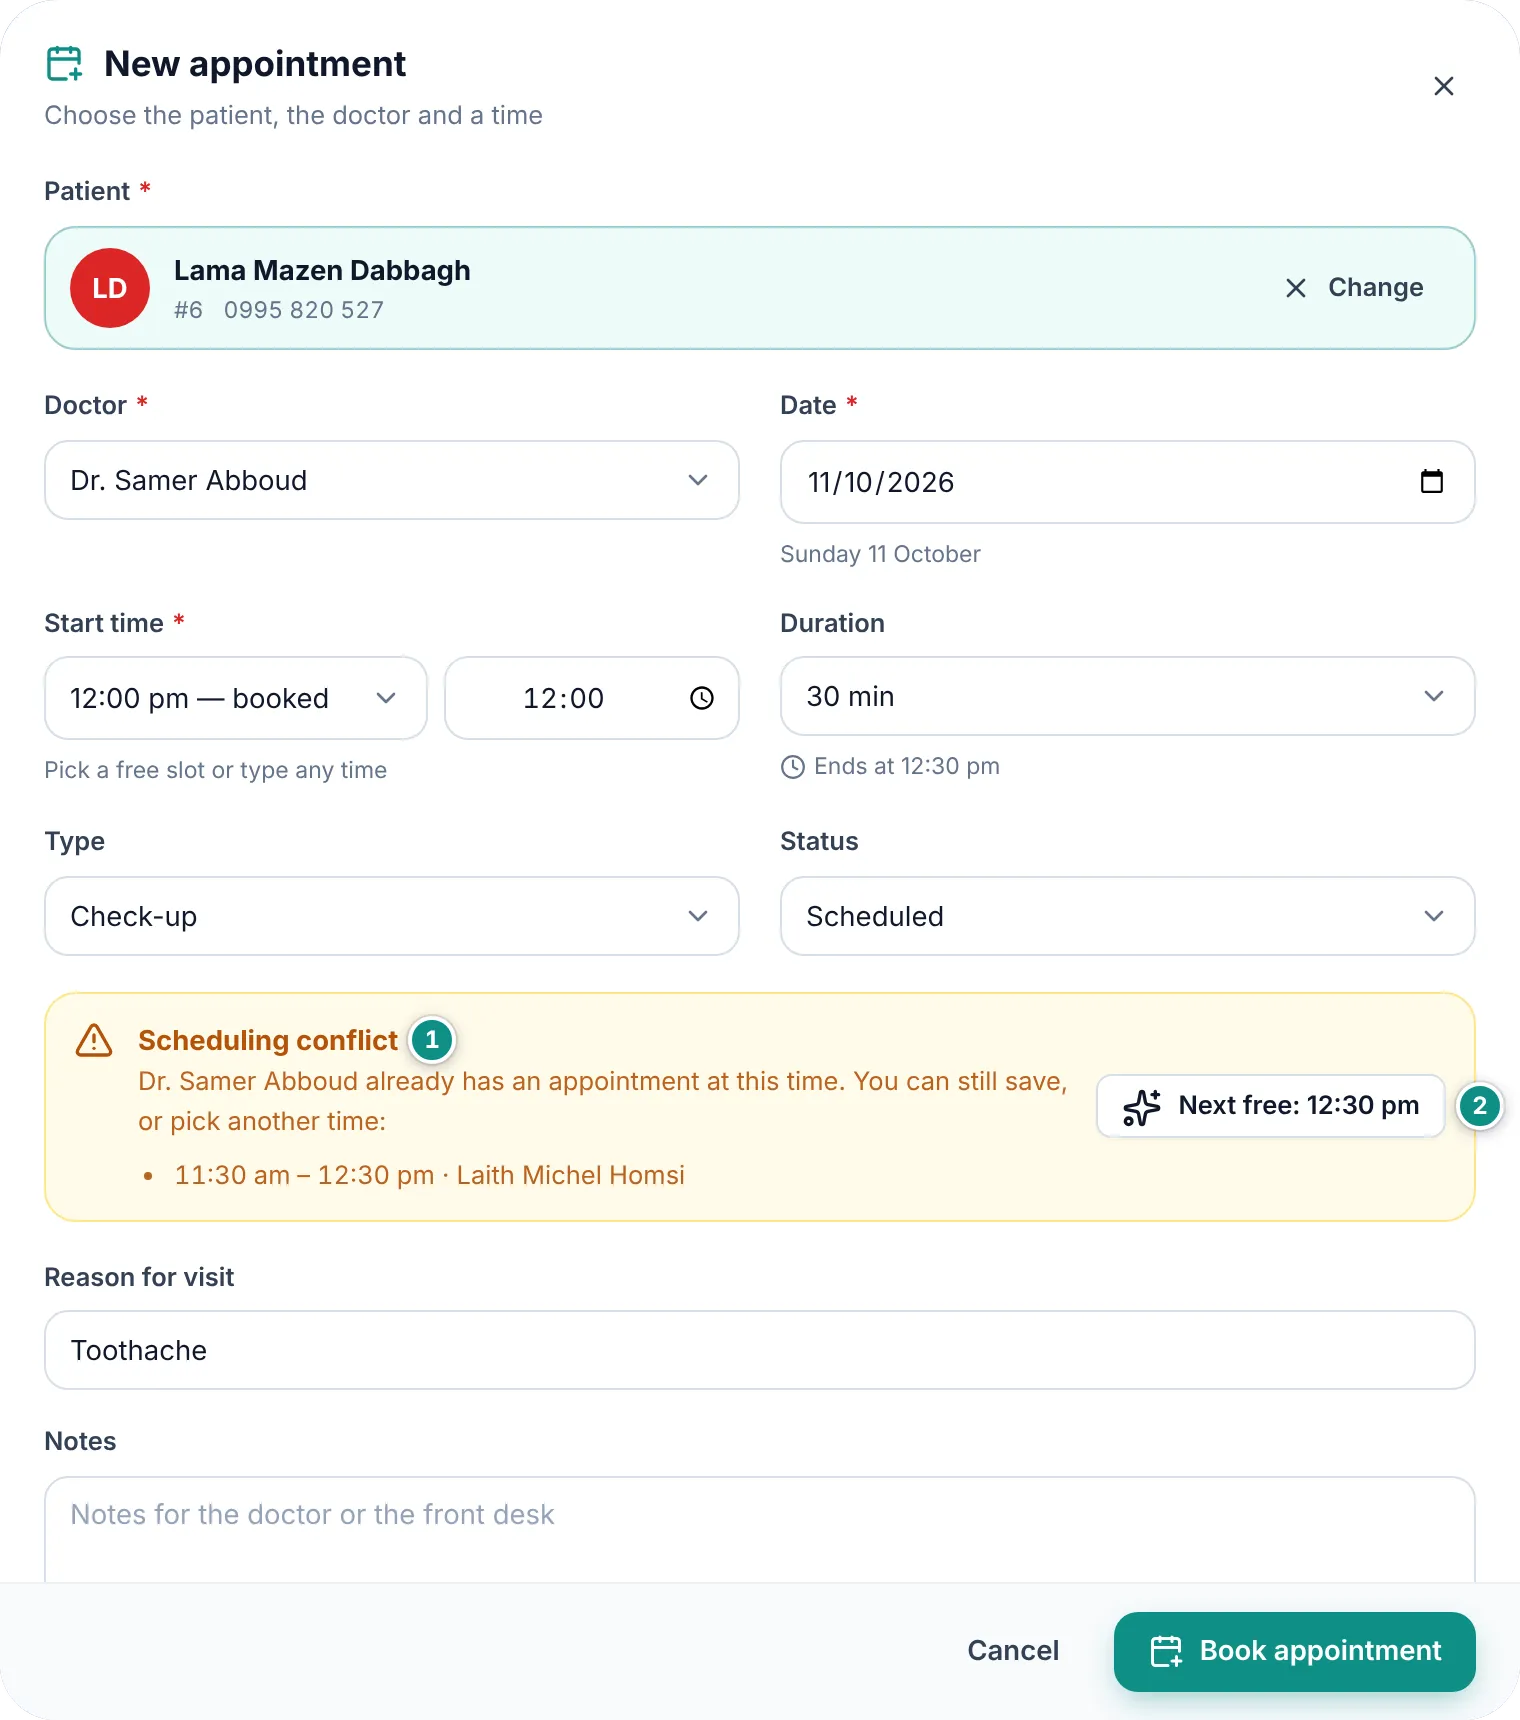
The “Scheduling conflict” warning in the appointment form with the overlapping appointment and the Next free buttonEnlarge the picture

Good to know

  • Cancelled appointments and no-shows do not count as conflicts, so their time is free to book again.
  • An admin changes the working days, opening and closing times, the Calendar grid step and the Default appointment length in Settings → Preferences → Working days & hours. See Settings.

On the day: appointment status

Follow every appointment from booking to the end of the visit: Scheduled, then Confirmed, Arrived, In progress and Completed, or Cancelled and No-show for those that did not happen.

  1. Click the appointment in the calendar to open Appointment details.
  2. Under Update status, click the next step: Confirm once you have spoken to the patient, Mark arrived when the patient comes in, Start treatment when the patient goes in to the doctor, and Complete visit at the end.
  3. For appointments that did not happen choose Cancel appointment or No-show; if you change your mind, choose Reopen.
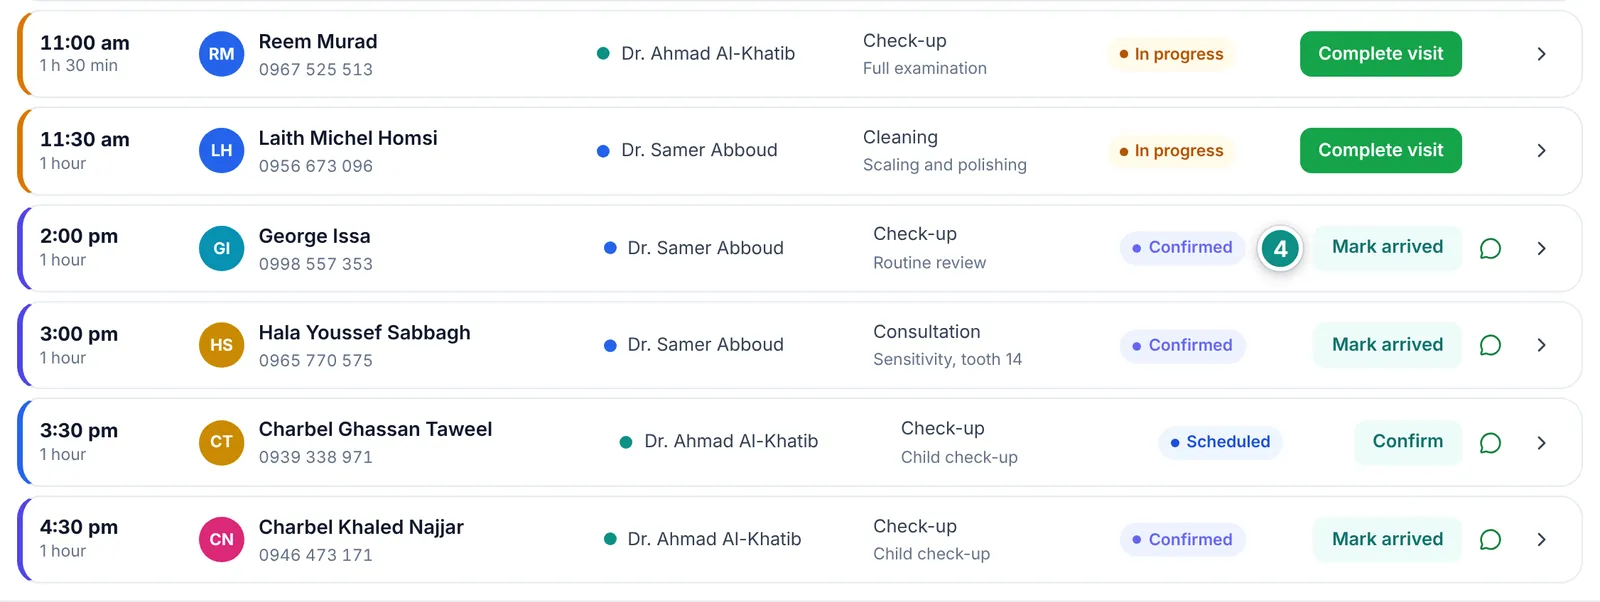
  4. On a computer, Agenda view puts the next-step button next to every appointment not yet completed, cancelled or marked no-show, so you can run the whole working day from one screen. On a phone the agenda shows cards only: tap an appointment and change its status in the details.
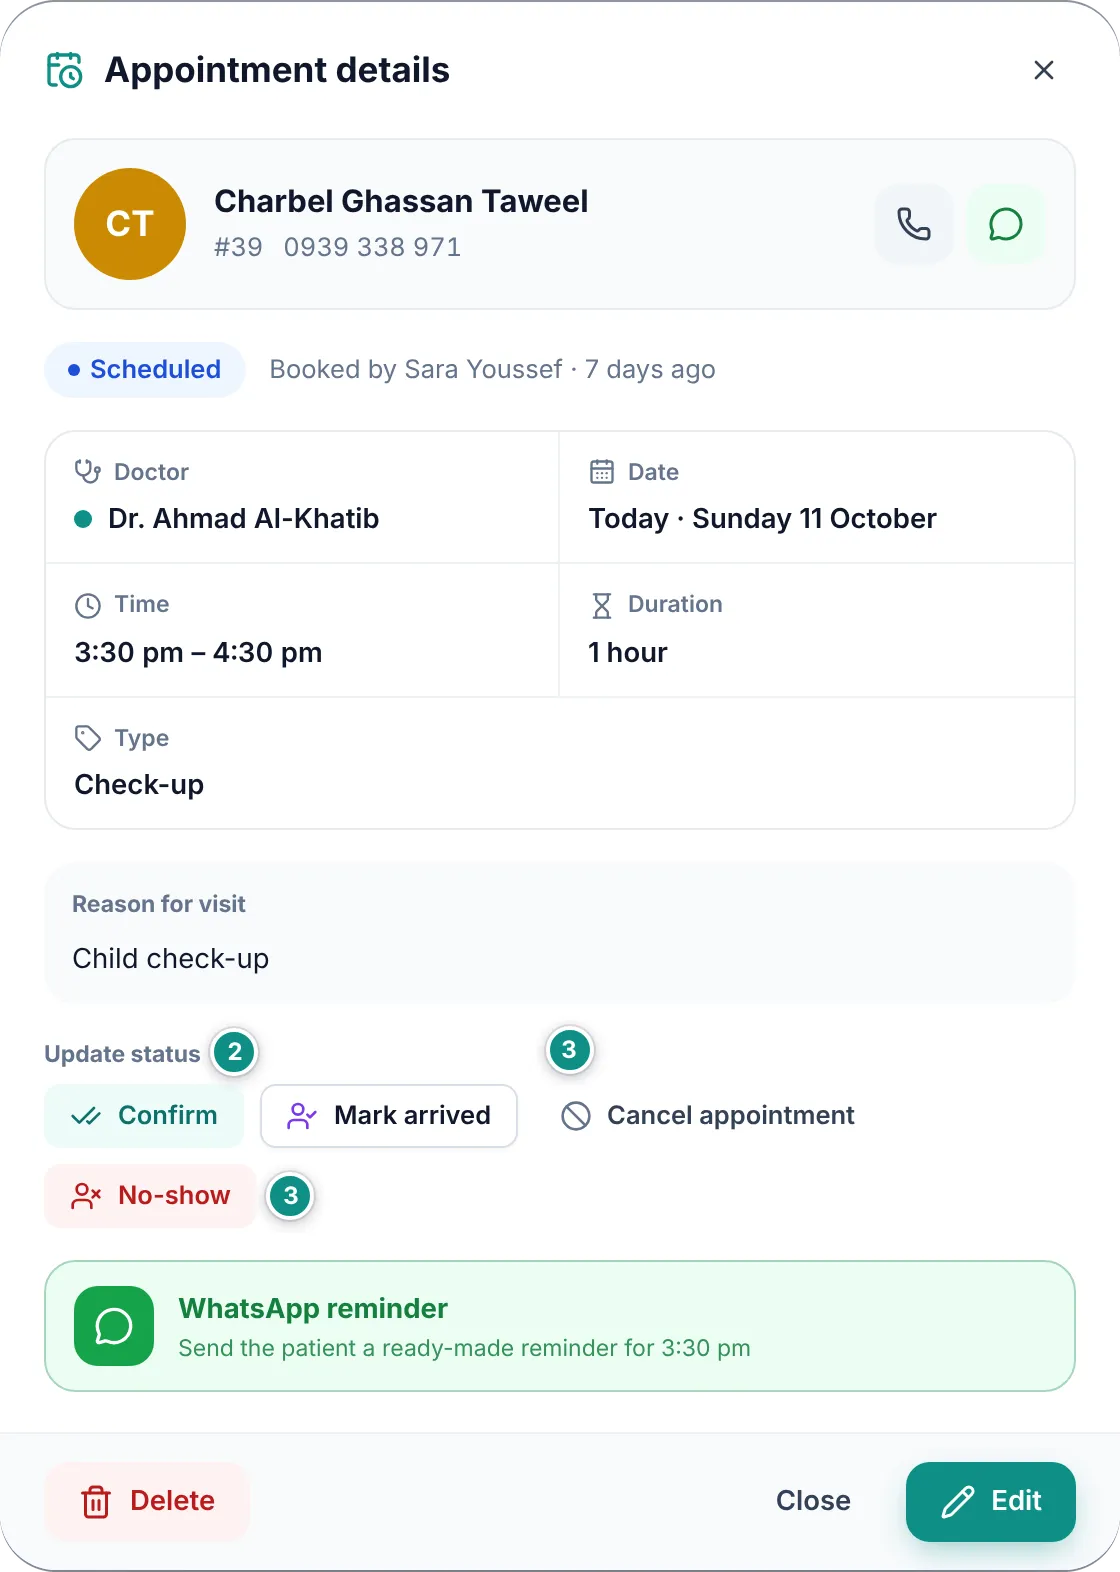
The appointment details window: patient, doctor, time, the status buttons and the WhatsApp reminderEnlarge the picture
Agenda view: today’s appointments as rows with the next-step button and the WhatsApp button next to eachEnlarge the picture

Good to know

  • Completing a visit updates the Last visit in the patient’s file.
  • The details also show the length, type, reason and notes, who booked it and when, and the call and WhatsApp buttons. Click the patient’s name to open the file.
  • Notifications list Unconfirmed for tomorrow, so you can call those patients, and Due for a recall: patients whose last visit was over six months ago with nothing booked. See Notifications.

WhatsApp reminders

Send the patient a ready-made reminder with their name, the clinic’s name and the day and time of the appointment, asking them to arrive ten minutes early.

  1. Open the details of an upcoming appointment that is Scheduled or Confirmed.
  2. Click WhatsApp reminder.
  3. WhatsApp opens on the patient’s chat with the message written. Check it, then press send.
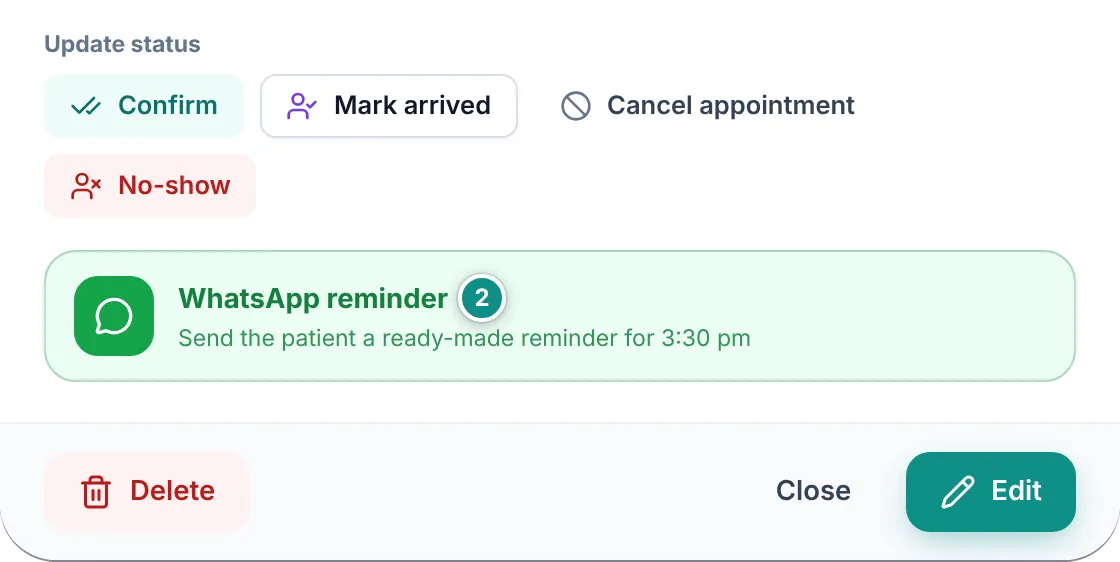
The WhatsApp reminder button in the details of an upcoming appointmentEnlarge the picture

Good to know

  • On a computer, the small WhatsApp button in Agenda view does the same, next to each Scheduled or Confirmed appointment whose patient has a phone number.
  • A reminder needs a phone number in the patient’s file and an internet connection. On Android the WhatsApp app opens; on Windows the link opens in the browser, where you continue in WhatsApp Web or the WhatsApp desktop app.
  • Local numbers such as 0944… are stored without the country code; Dentora adds it from Country in the Clinic settings. See Settings.
  • Dentora never sends a message on its own: you press send in WhatsApp. Opening the reminder is logged under Recent activity in the patient’s file, even if you then close WhatsApp without sending.
  • The message is written in the app’s current language, Arabic or English. You can edit it in WhatsApp before sending.

Editing, moving or deleting an appointment

  1. Open the appointment’s details and click Edit.
  2. Change the date, time, doctor or any other field. The same warnings appear if there is a conflict.
  3. Click Save changes. If you moved it to another day, the calendar follows it.
  4. To delete, click Delete in the details or in the edit window, then confirm.
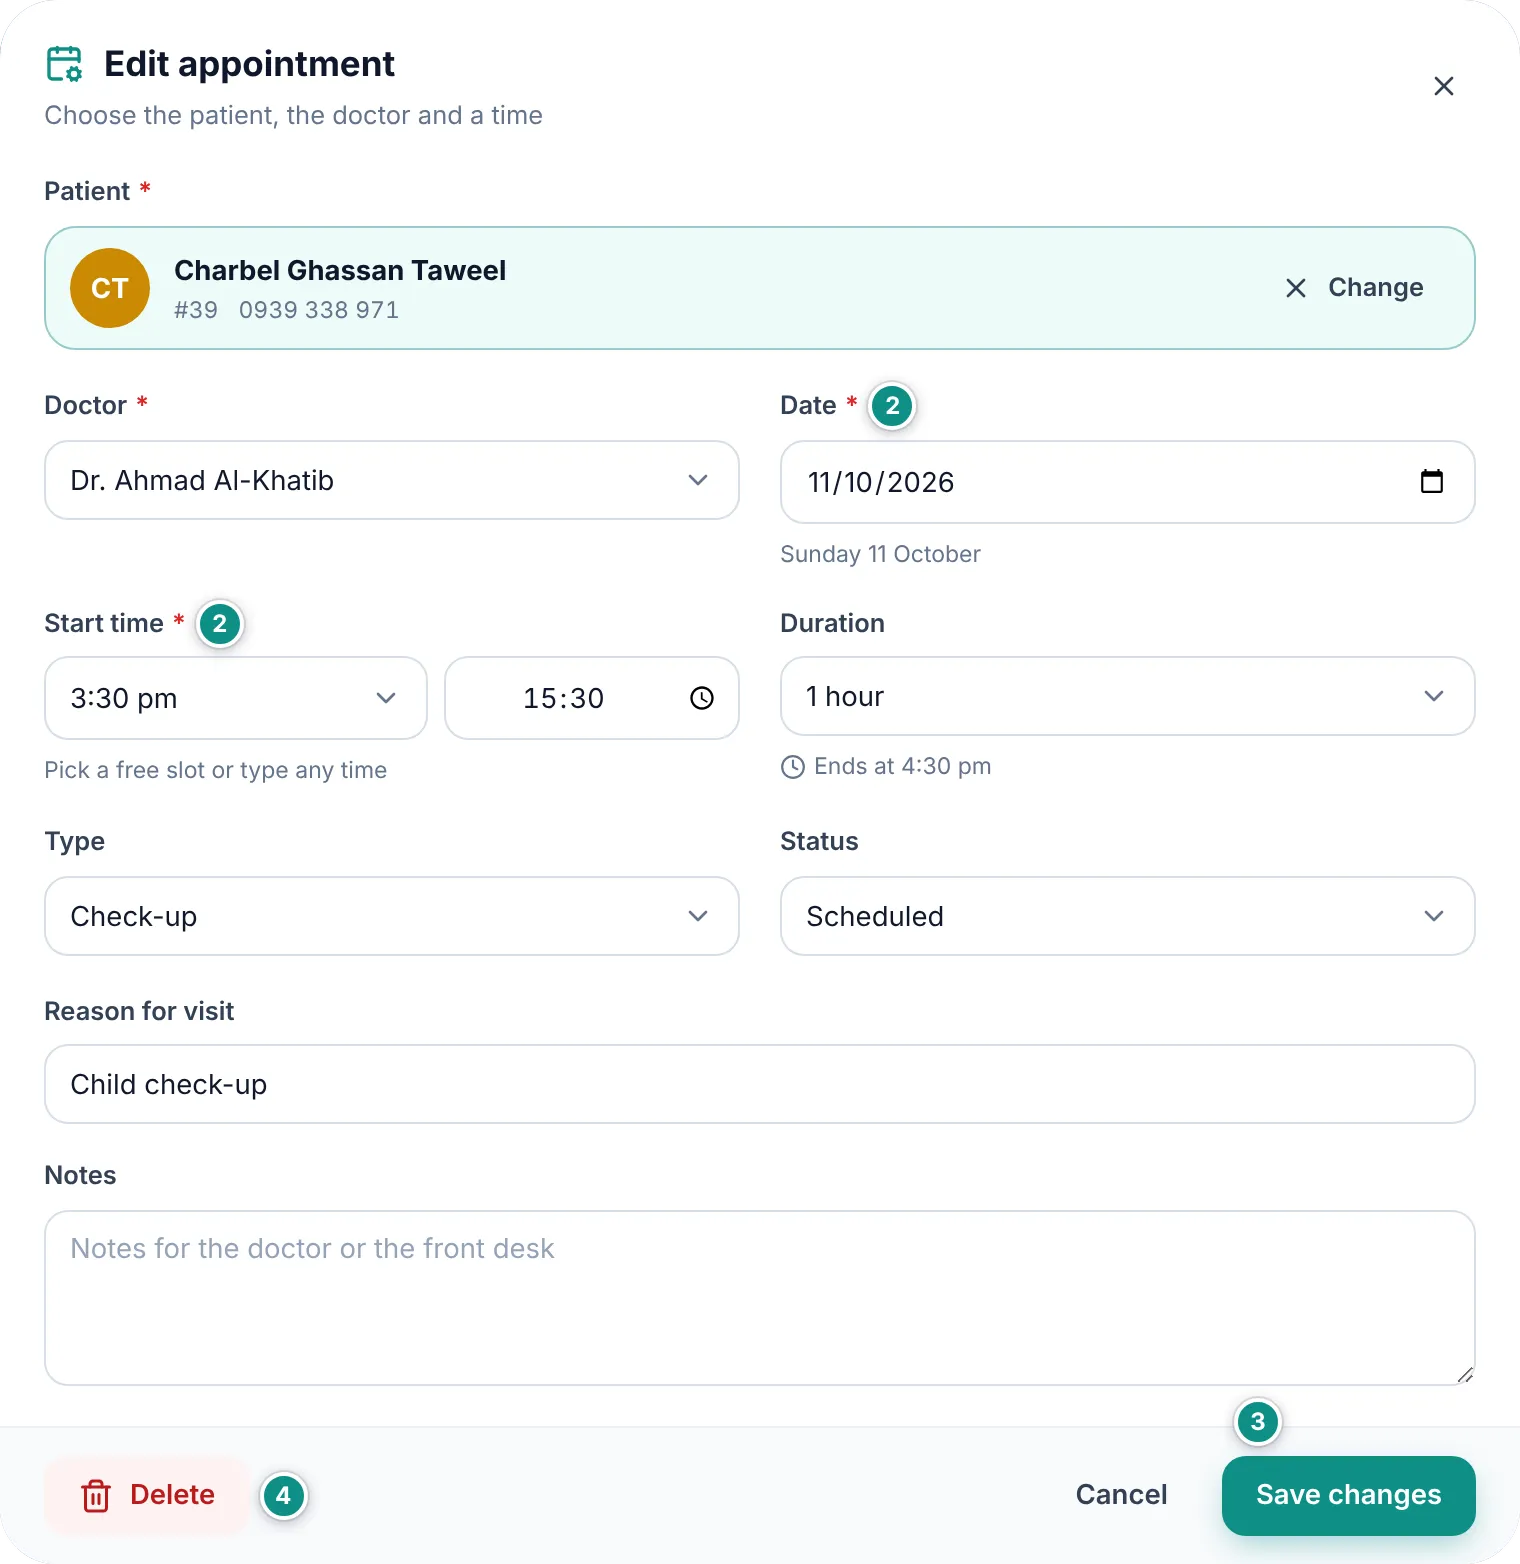
The edit appointment window with the Delete and Save changes buttonsEnlarge the picture

Good to know

  • Deleting is permanent and cannot be undone. If the patient cancelled or did not come, set the status to Cancelled or No-show instead, so it stays in their record.
  • To move an appointment, use the edit window; cards are not dragged around the calendar.

A patient’s appointments

The Appointments tab of a patient’s file shows their history with the clinic: the number of completed visits, upcoming appointments, no-shows and cancelled ones, then the Upcoming list with the nearest marked Next, then the History.

  1. Open the patient’s file, then the Appointments tab.
  2. Click New appointment to book for this patient directly.
  3. Click any appointment to open its details, and Show more to see older visits.
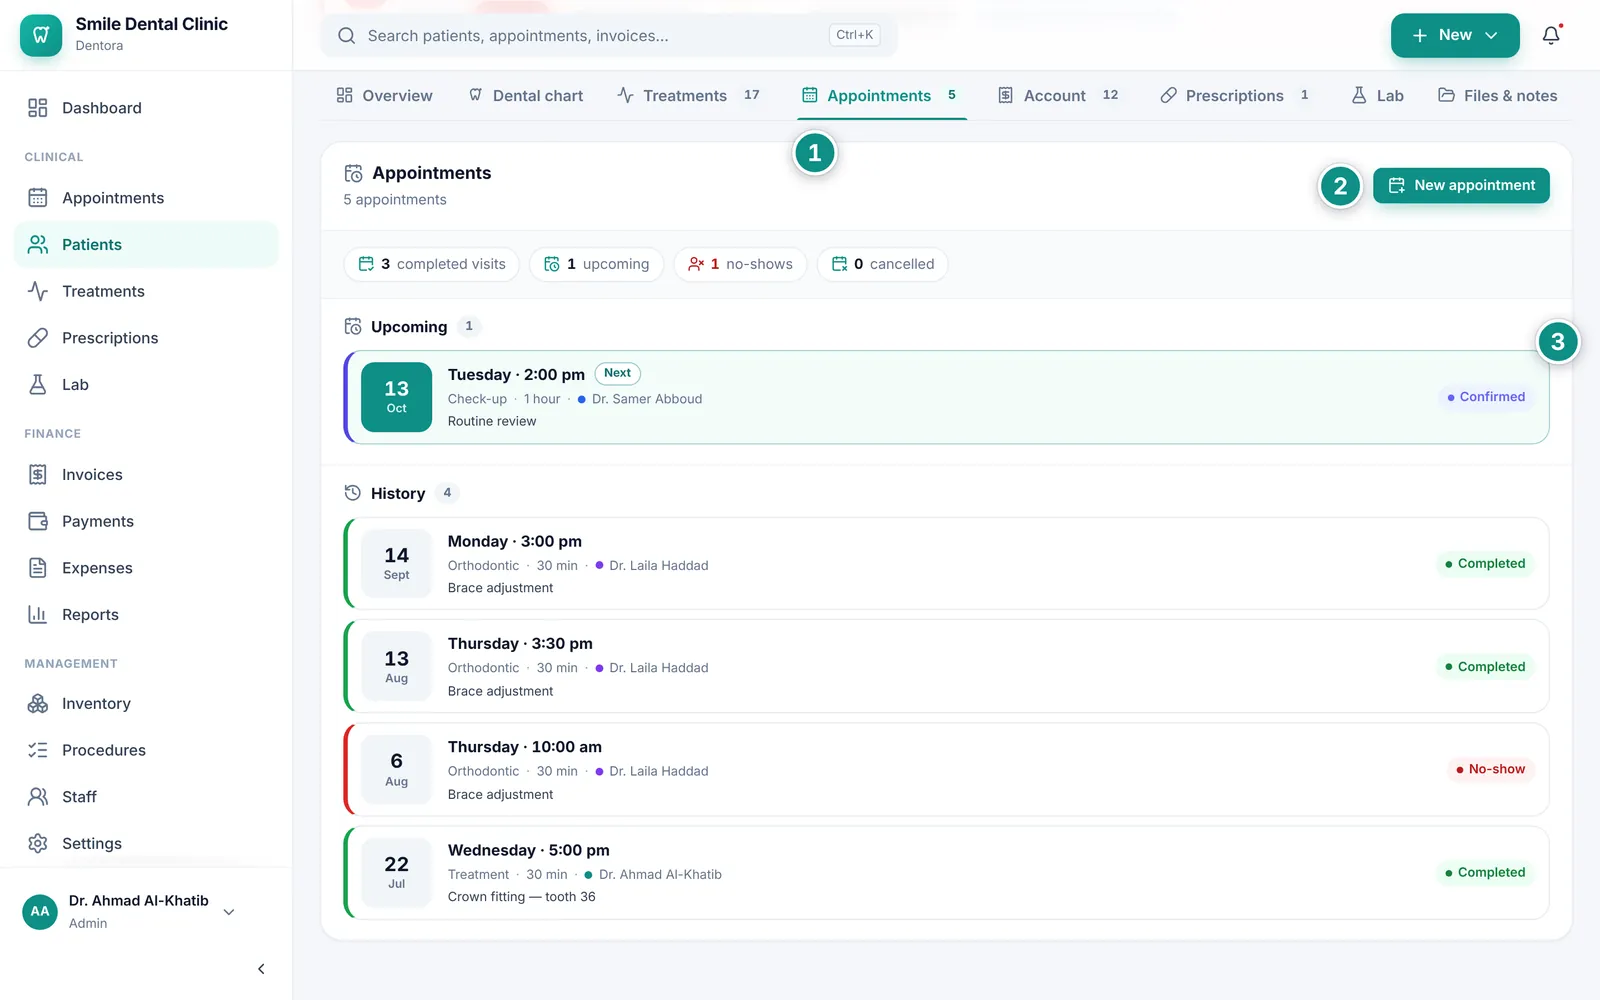
The Appointments tab of a patient file: the counts, upcoming appointments and historyEnlarge the picture

Good to know

  • The no-show count turns to a warning colour as soon as it is above zero, so you notice it at the next booking.
  • The next appointment also shows at the top of the file; clicking it opens this tab. See The patient file.

Appointments on a phone

On a phone, appointments are shown as a list of cards instead of columns, so you can work with one hand.
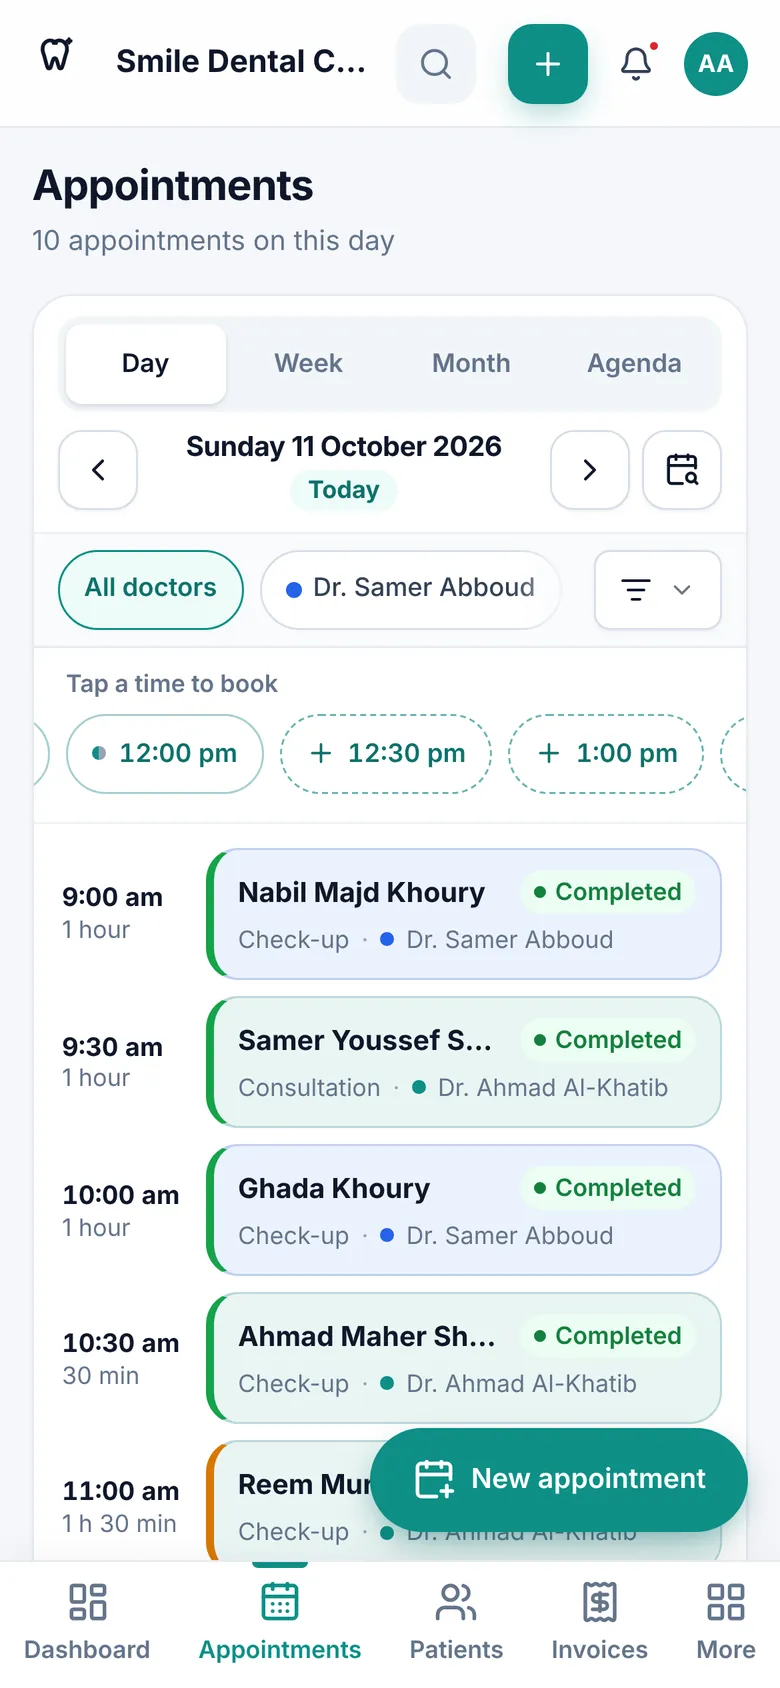
Appointments on a phone: view buttons, the date, the strip of times to book, the day’s appointment cards and the New appointment buttonEnlarge the picture

Good to know

  • In Day view a strip of times sits under Tap a time to book: a free time shows a +, and a dot means some or all doctors are booked then. The day’s appointments follow as cards; tap one to open its details.
  • The floating New appointment button at the bottom opens the booking form, and so does the + in the top bar.
  • The calendar button next to the date jumps to any day, and a Today button appears once you move away from today.
  • In Week view the days appear as a strip with the number of appointments under each; in Month view each day shows its number of appointments and coloured dots (up to four).
  • The Android Back button closes the open window first.
Previous topicDental chartNext topicTreatments and treatment plans

Need help?

If you did not find your answer here, message us on WhatsApp and we will help.

WhatsApp+963 996 489 504

On this page

  1. The appointments calendar
  2. Booking an appointment
  3. Conflicts and working hours
  4. On the day: appointment status
  5. WhatsApp reminders
  6. Editing, moving or deleting an appointment
  7. A patient’s appointments
  8. Appointments on a phone

Back to top

All topics

  1. Getting started
  2. Finding your way around
  3. The dashboard
  4. Patients
  5. Dental chart
  6. Appointments
  7. Treatments and treatment plans
  8. Invoices and payments
  9. Prescriptions
  10. Dental lab
  11. Inventory
  12. Expenses
  13. Reports
  14. Settings
  15. Staff and permissions
  16. Backup and moving your clinic
  17. Licence and activation
  18. Questions and answers

© 2026 Dentora. All rights reserved.

HomeUser guideVideosActivate a licencePrivacy policyTerms of use