Skip to content
Dentora
العربية
  1. Home
  2. User guide
  3. Invoices and payments

Invoices and payments

Issue invoices from completed treatments, record payments and refunds with printed receipts, and follow each patient’s account and the clinic’s daily cash.

Watch this topic on video
On this page
  1. The invoices list
  2. Issuing an invoice
  3. The invoice page
  4. Recording a payment and printing the receipt
  5. Refunding a patient
  6. Payments and the cash report
  7. The patient’s account and statement
  8. Printing, PDF and WhatsApp on Windows and Android

The invoices list

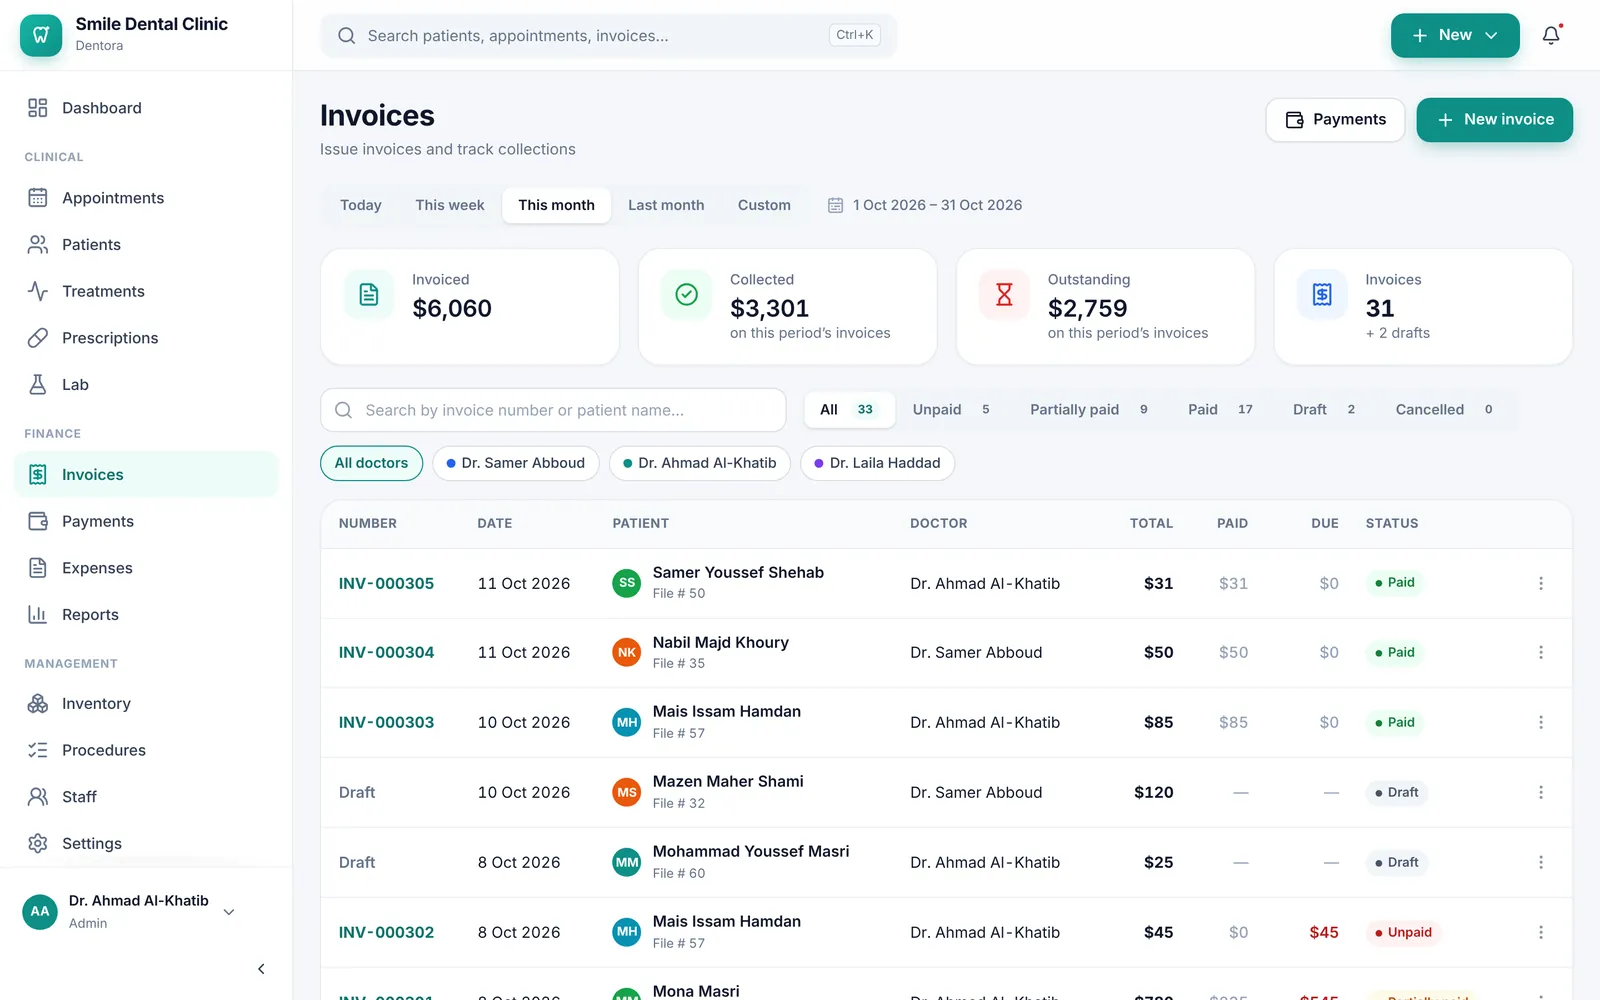
Open Invoices in the sidebar, or in the bottom bar on a phone. The page lists the invoices of the chosen period: Today, This week, This month, Last month or a Custom range.

The four cards sum up that period: Invoiced, Collected, Outstanding and the number of Invoices, with drafts counted apart.

Below them you can search by invoice number or by the patient’s name, file number or phone, and filter by status (Unpaid, Partially paid, Paid, Draft, Cancelled) and by doctor. Click any invoice to open it.

The invoices list: the period, the four cards, search, status and doctor filters, and the table of invoicesEnlarge the picture

Good to know

  • Dentora remembers the period you chose on this device.
  • Collected and Outstanding are about the invoices dated in the period, whatever day they were paid: a payment made today on last month’s invoice does not show here. For the money actually received in a period, open Payments.
  • Each invoice’s ⋮ menu has Open invoice, Record payment and Print invoice, then Cancel invoice or Delete draft.
  • An unpaid invoice shows in Notifications once its due date has passed, or 30 days after its date when it has no due date.
  • Invoices and payments are open to the admin, doctors and reception; assistants do not see them. See Roles and permissions.
  • In read-only mode you can still open and print invoices, but you cannot issue one or record a payment. See Licence.

Issuing an invoice

The quickest way to bill treatment is the Bill completed button in the Treatments tab: see Billing completed work. When you want to choose the lines yourself, use the new invoice window.

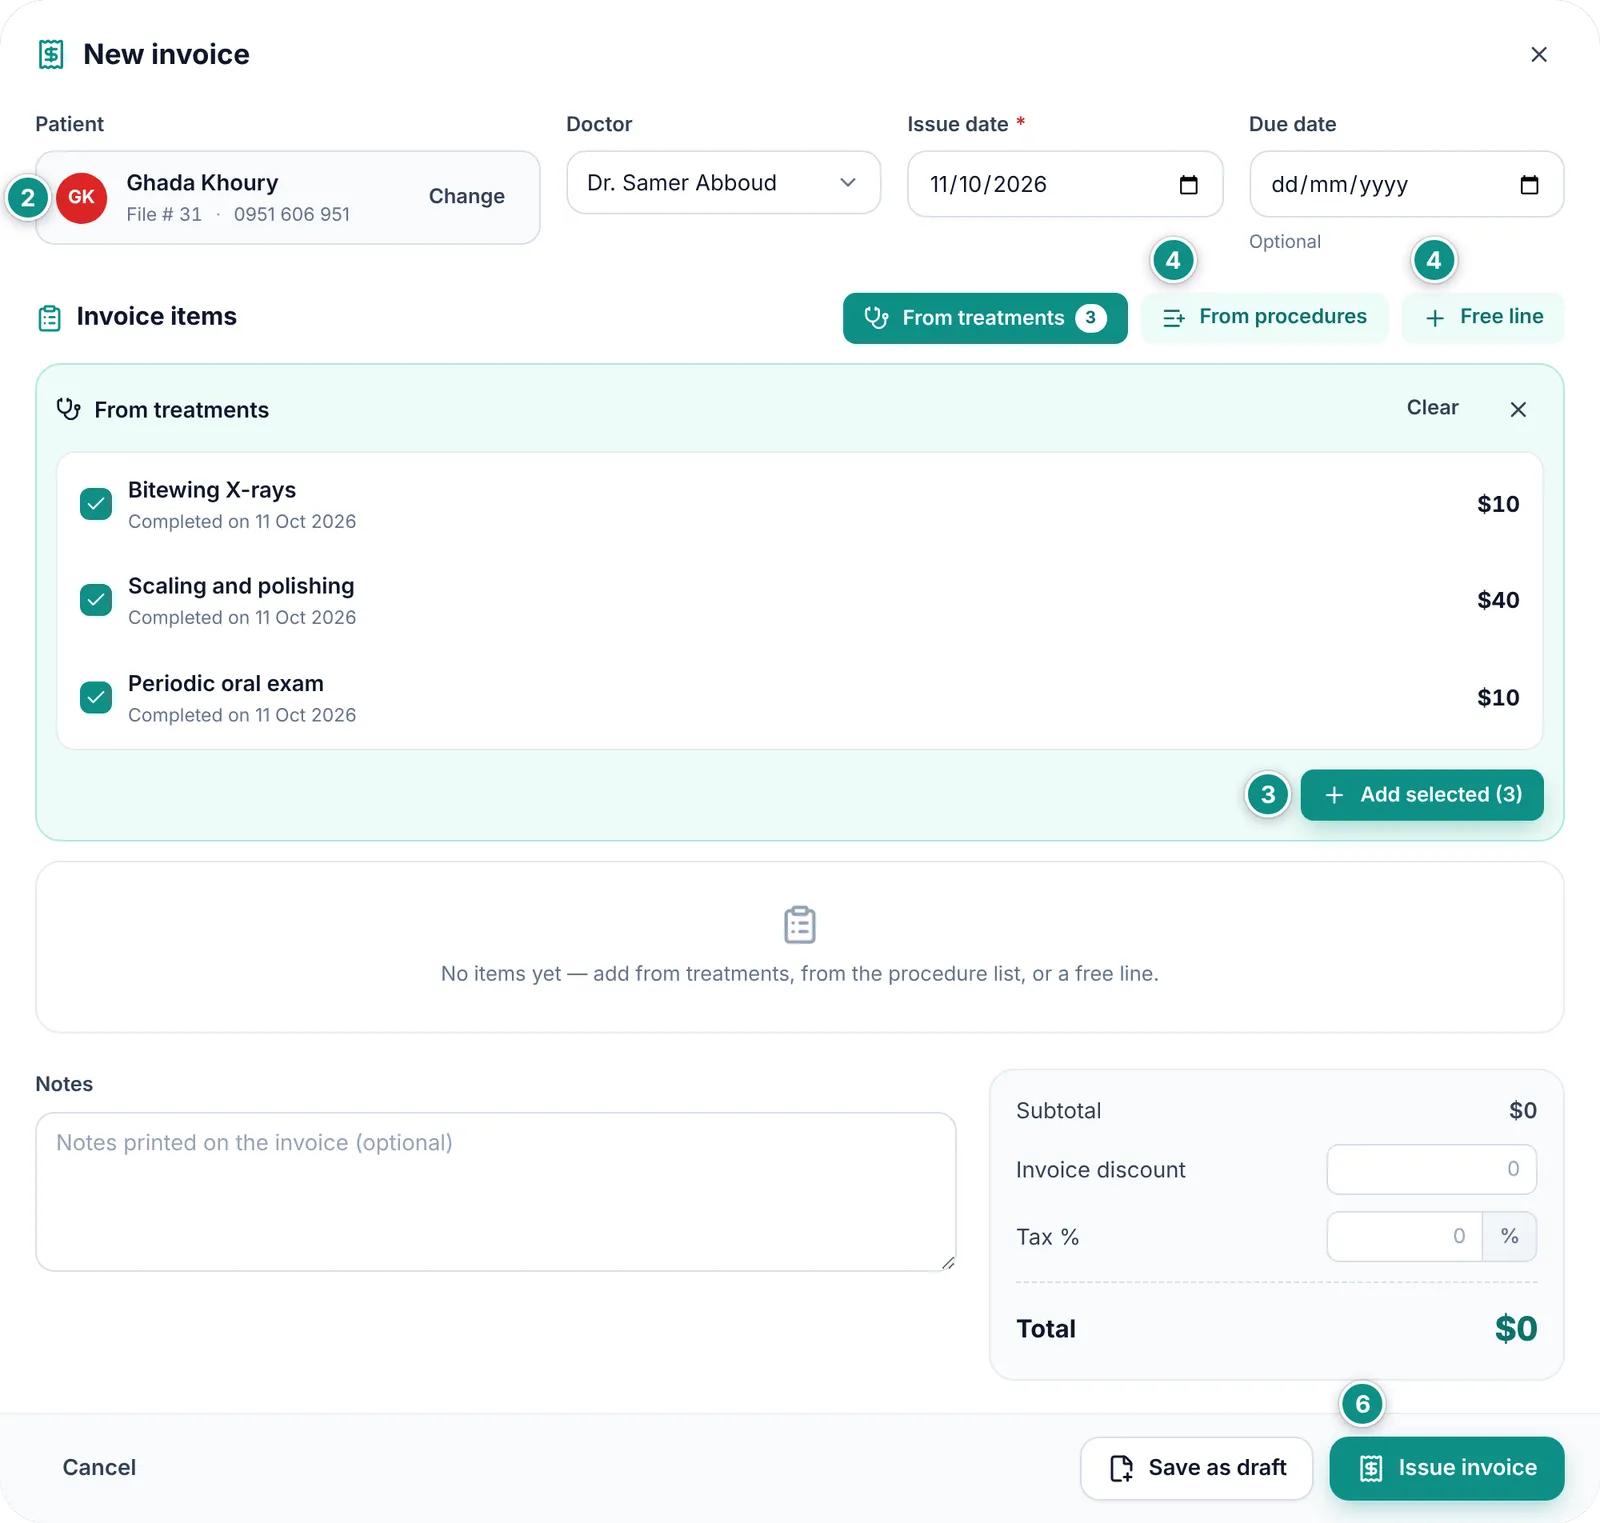
  1. Click New invoice on the Invoices page, or in the Account tab of the patient’s file.
  2. Search for the Patient by name, file number or phone and pick them. The Doctor is chosen for you; you can change it.
  3. The From treatments panel opens with the patient’s completed, unbilled treatments, all ticked. Click Add selected, which shows how many are ticked.
  4. Add other lines if needed: From procedures with one click on a procedure, or a Free line where you type the description and price yourself.
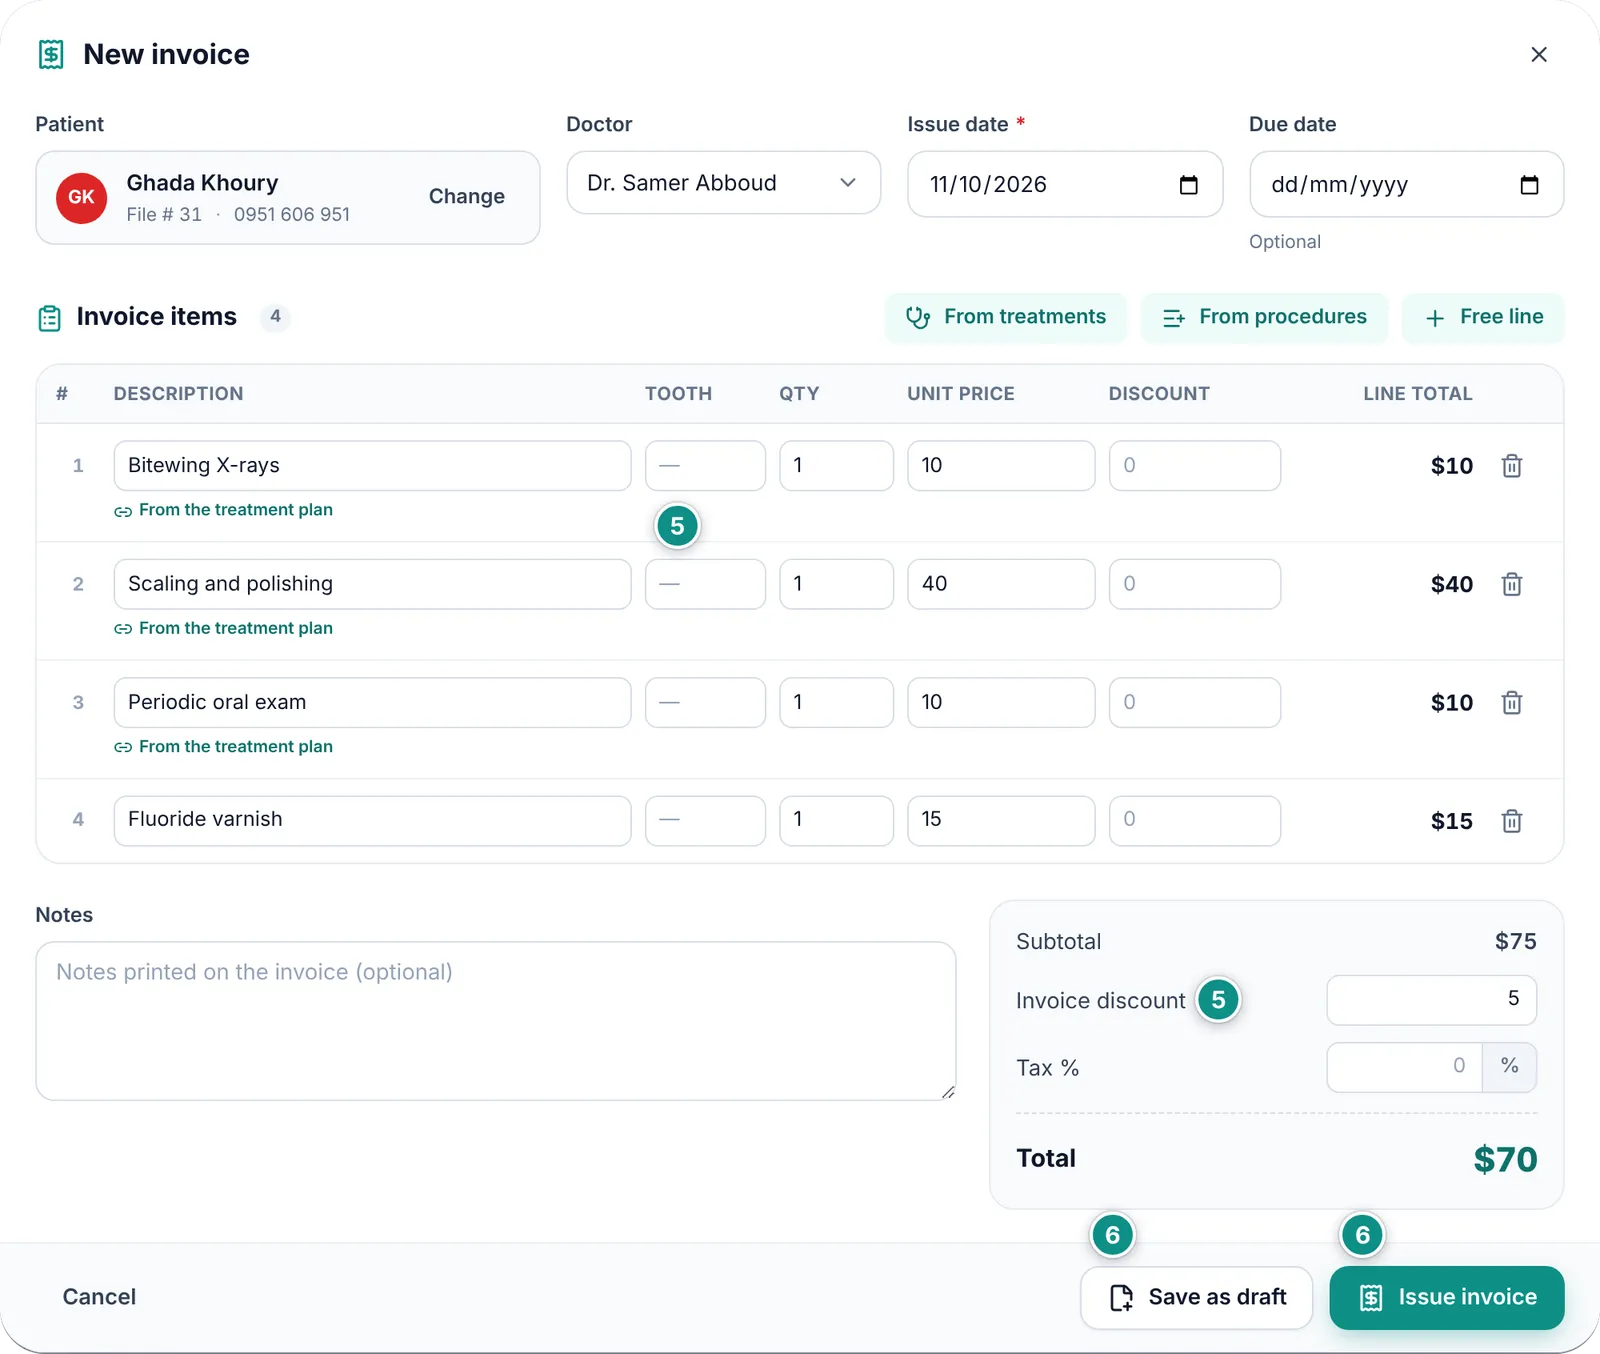
  5. Adjust each line’s Tooth, Qty, Unit price and Discount if needed. Add an Invoice discount and Notes to print on it.
  6. Click Issue invoice: it takes the next number and opens. Or click Save as draft to finish it later.
The New invoice window: patient, doctor and dates, and the From treatments panel with three completed treatments tickedEnlarge the picture
Invoice lines: three from treatments and one from the procedure list, and the totals with an invoice discountEnlarge the picture

Good to know

  • The Tax % box takes the clinic’s rate from Settings automatically; you can change it for this invoice.
  • A draft takes no number, shows as “Draft” until you issue it, and does not count in the patient’s account. But the treatments you put on it are held by it: they show as Billed in the Treatments tab and leave Bill completed. Do not leave a draft forgotten: open it and click Review & issue, or remove it with Delete draft to free its treatments.
  • A line taken from treatments carries a “From the treatment plan” tag and is linked to that treatment, so it cannot be billed twice.
  • The Due date is optional and cannot be before the issue date.
  • If you close the window with unsaved lines, Dentora asks Discard this invoice?; choose Keep editing to go back to it.
  • If the patient has credit on account, it settles part or all of the invoice as soon as it is issued.

The invoice page

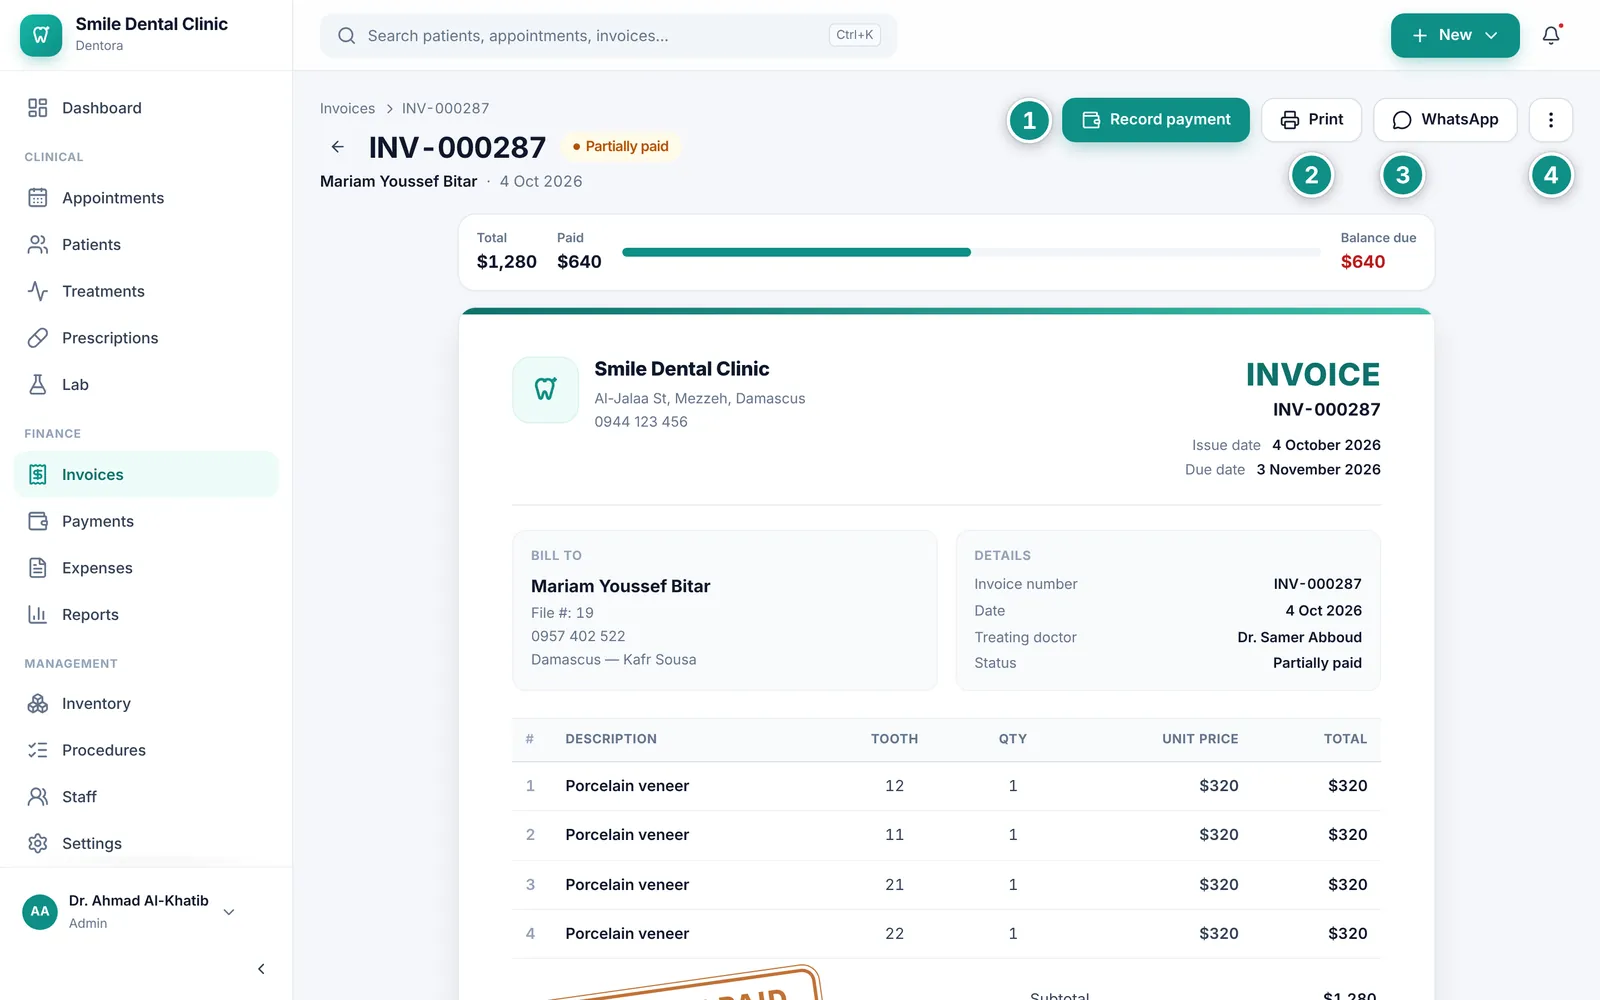
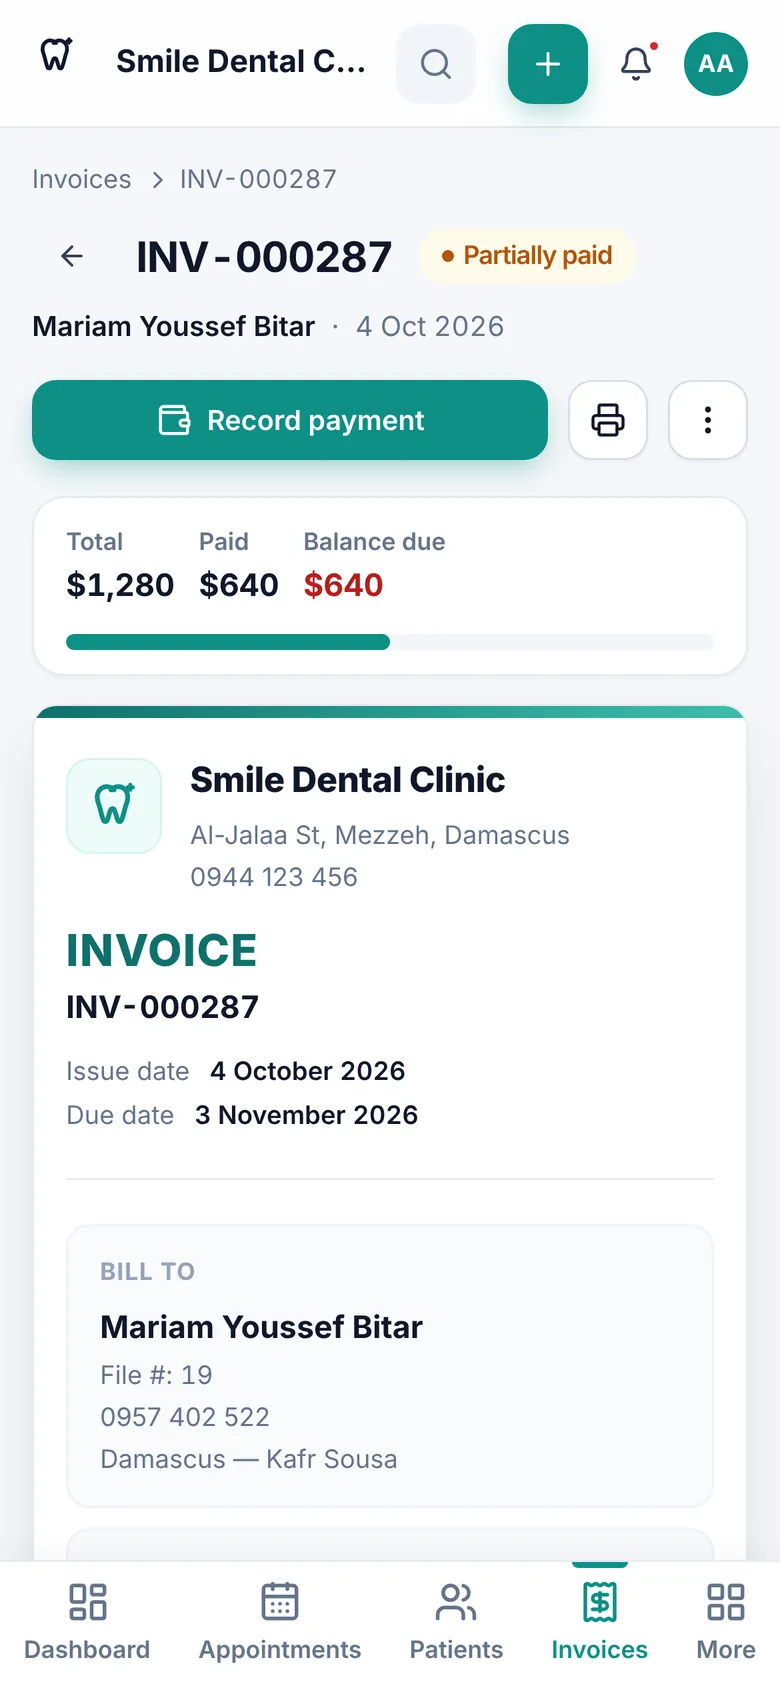
The invoice page shows the sheet as the patient receives it: the clinic letterhead, the patient and doctor, the lines, the totals, a payment-status stamp and the payments received. Above it, a bar sums up the Total, Paid and Balance due.

  1. Click Record payment to record what the patient paid on this invoice.
  2. Click Print to print the invoice or save it as a PDF.
  3. Click WhatsApp to send the patient a message with the invoice number, the total and the balance due.
  4. The ⋮ menu has Edit, Send via WhatsApp, Refund and Cancel invoice.
A partly paid invoice: the total / paid / balance bar, the Record payment, Print and WhatsApp buttons, and the invoice sheetEnlarge the picture

Good to know

  • An invoice with payments cannot be edited. When you edit an issued invoice, the patient stays fixed.
  • Cancel invoice keeps its number on record, and its treatments can be billed again. Payments on it go back to the patient’s account, where they settle the other open invoices first; the rest is credit. Only drafts can be deleted, with Delete draft.
  • The sheet is titled “Tax invoice”, with the clinic’s tax number, when the invoice carries tax and the tax number is set in Settings. The invoice footer is printed at the bottom, or a thank-you line if you left it empty.
  • The WhatsApp message is text only; it does not attach the invoice. To send the invoice itself, save it as a PDF and share that from WhatsApp.
  • The WhatsApp button works when the patient has a phone number, and is not offered for drafts and cancelled invoices.

Recording a payment and printing the receipt

Record every amount you receive, so the patient’s account and the clinic’s cash stay right. Each payment gets a receipt with a running number, such as R-000379.

  1. Open the Record payment window from the invoice page, from the Payment button in the patient’s file, or from New payment in the New button at the top on a computer, or on the Payments page.
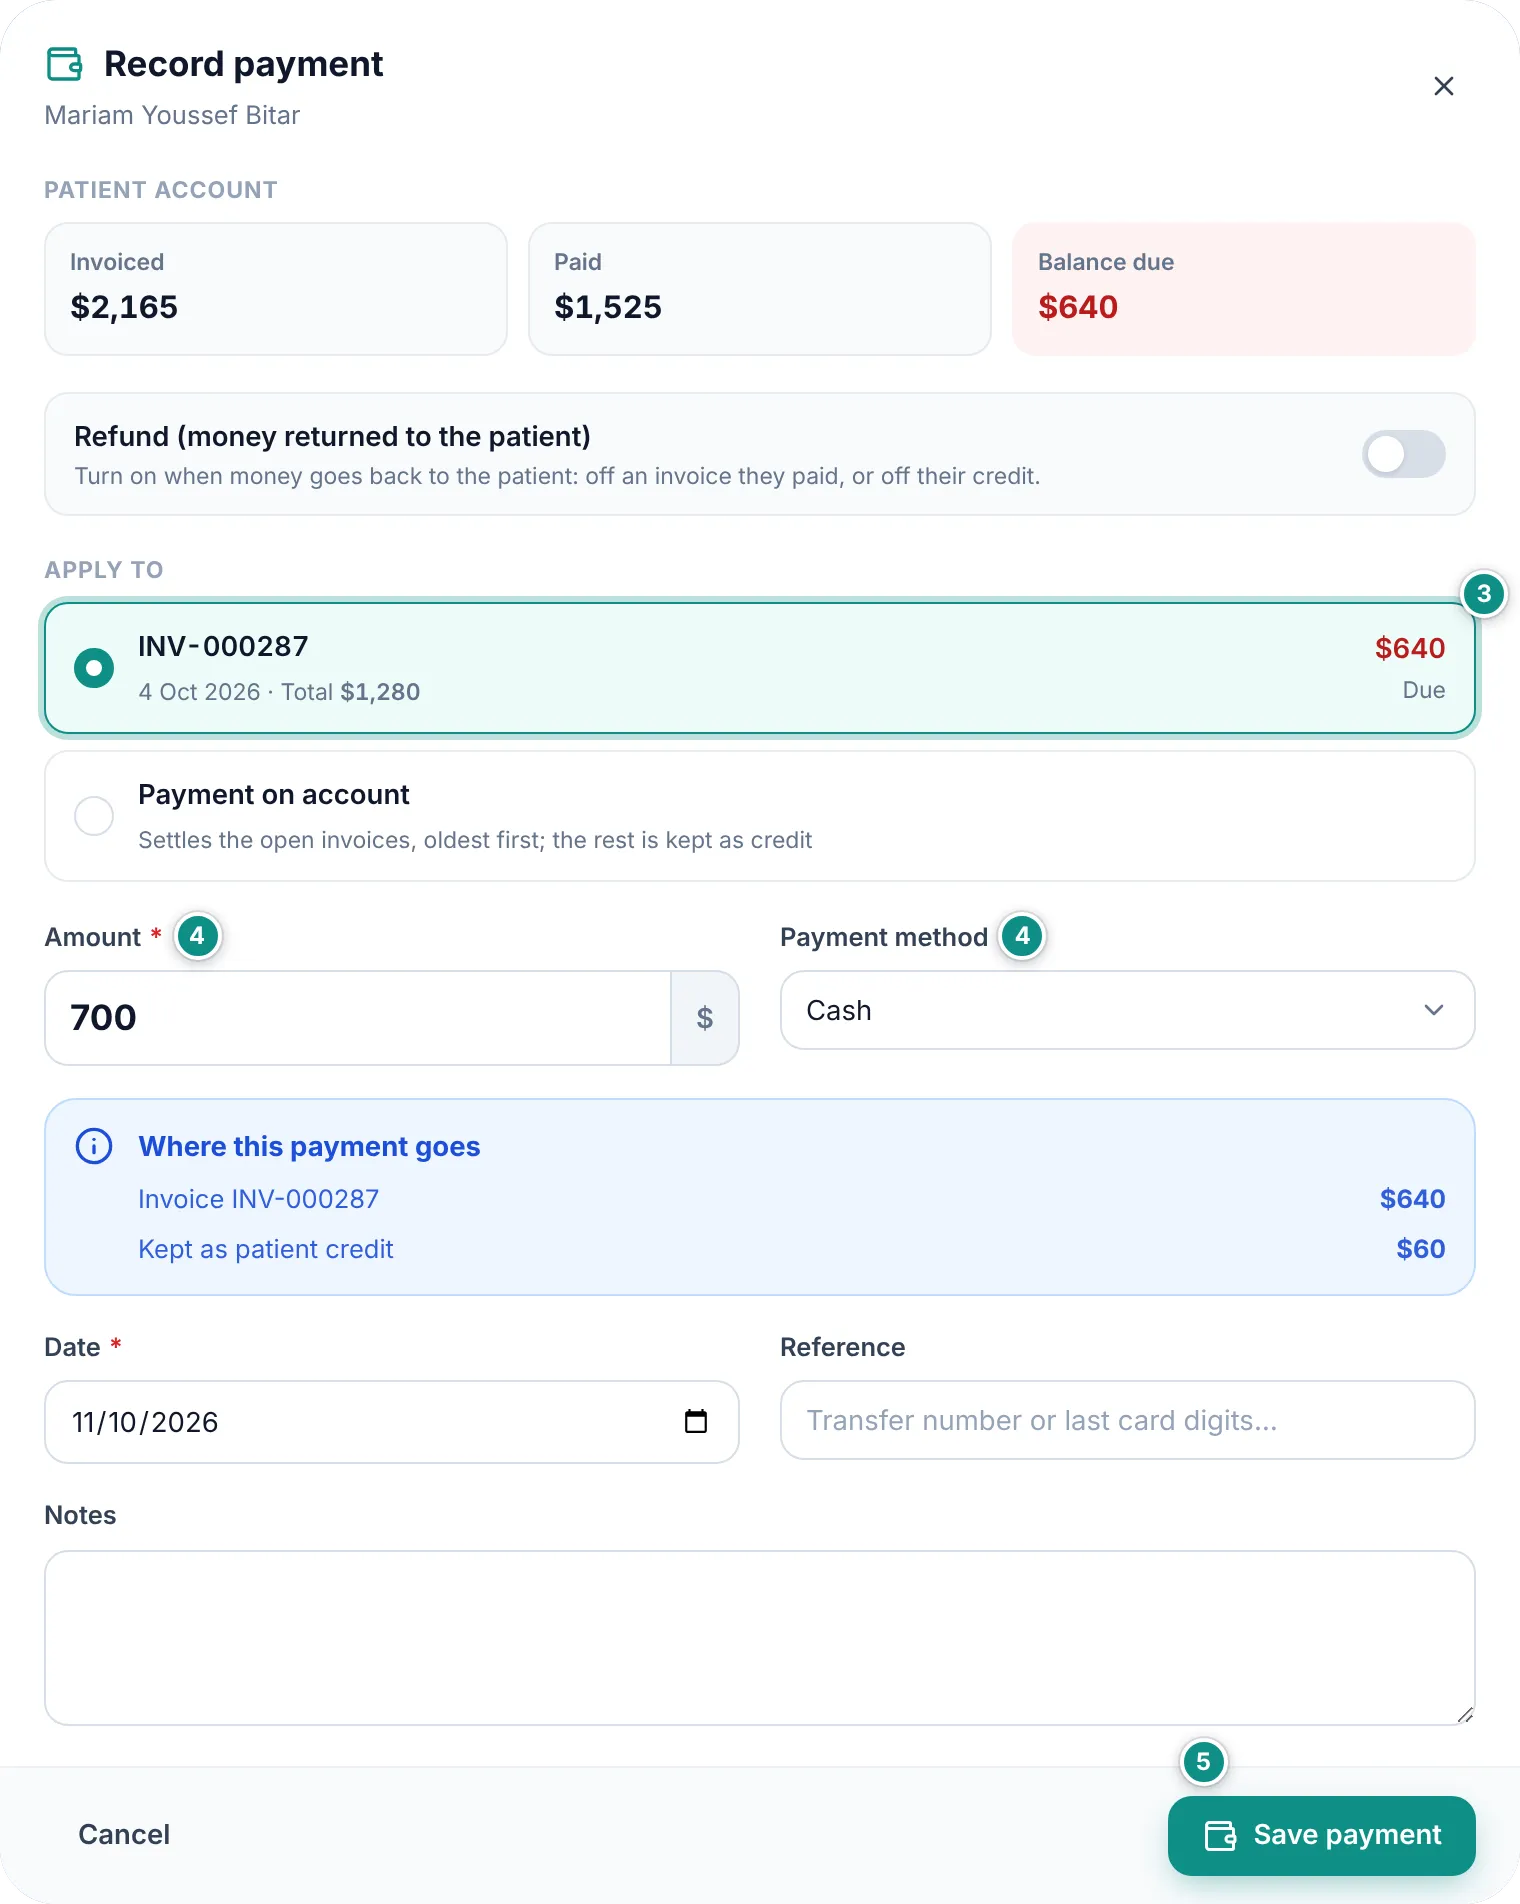
  2. Pick the patient if none is set. The Patient account shows what they were invoiced, what they paid and what they owe.
  3. Under Apply to, choose the open invoice, or Payment on account. When you choose an invoice, the Amount is filled with its balance.
  4. Change the Amount if the patient paid something else, and choose the Payment method: Cash, Card, Transfer, Insurance, E-wallet or Other.
  5. Add a Reference if there is one, such as a transfer number or the last card digits, then click Save payment.
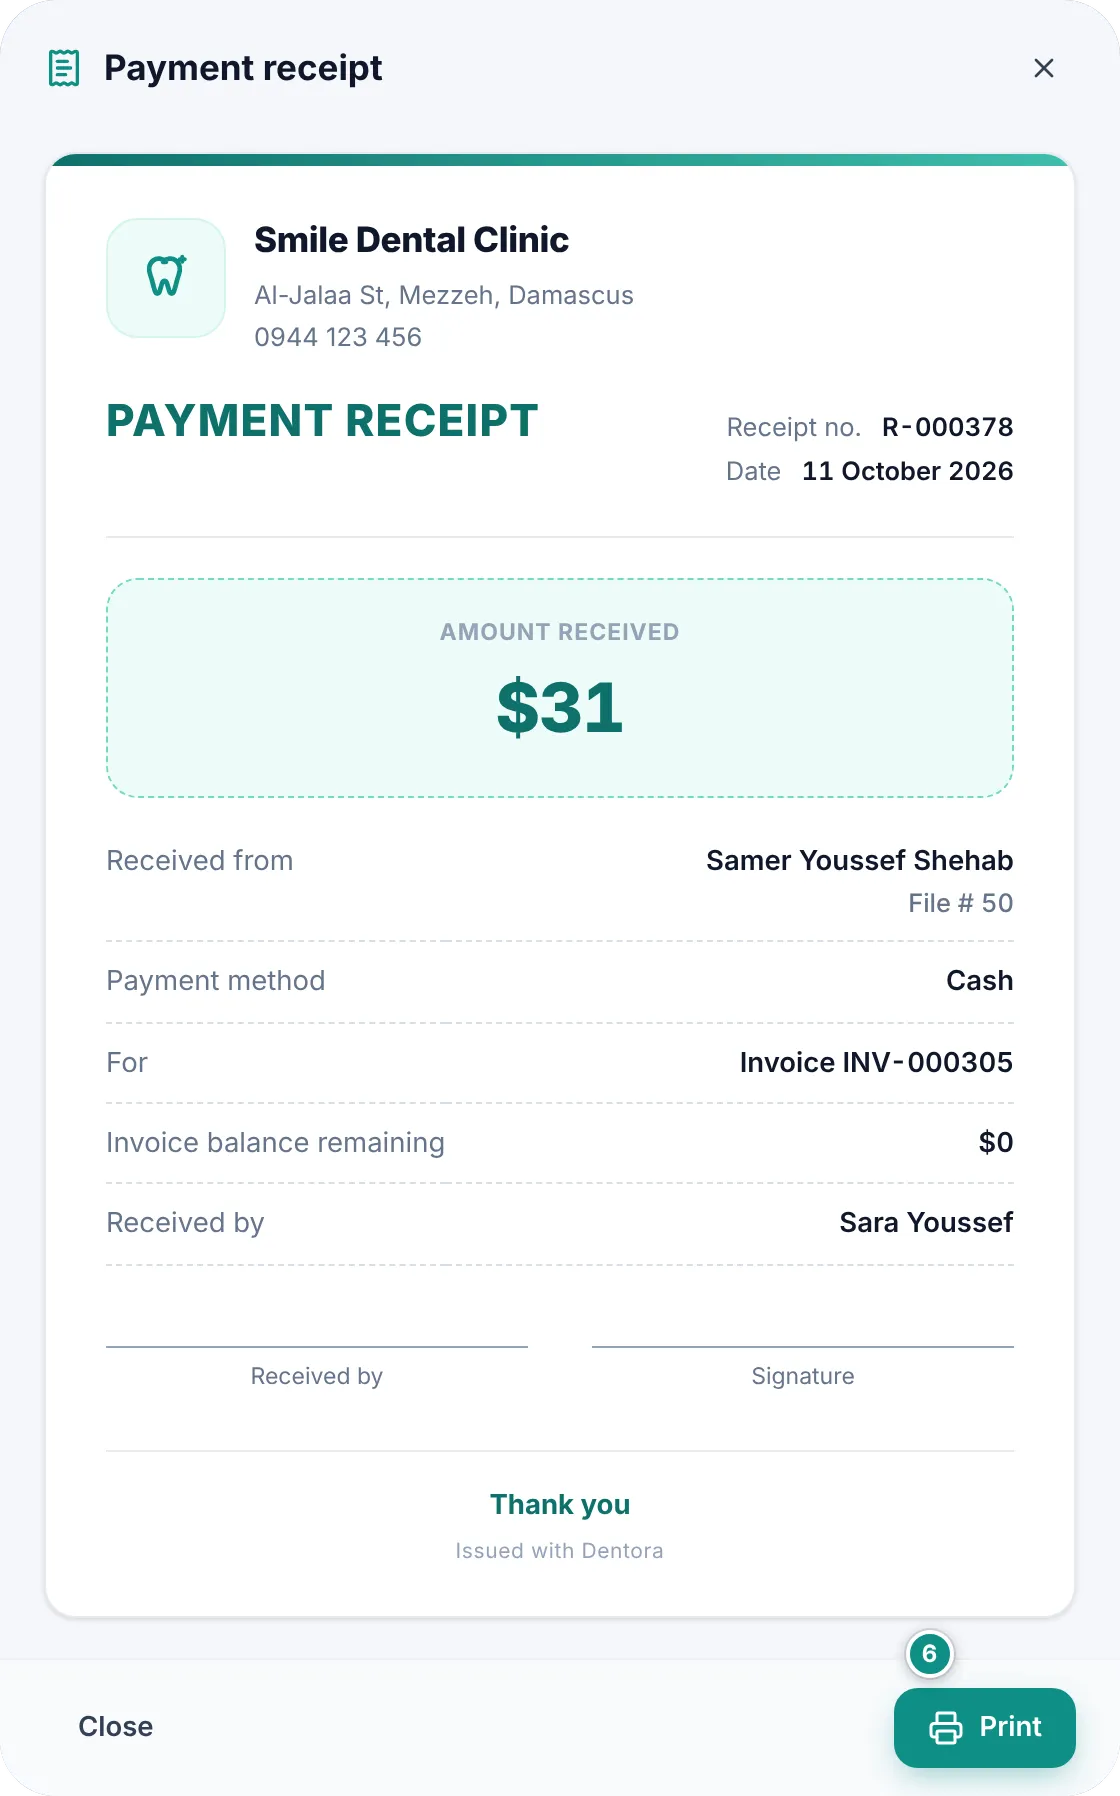
  6. A Payment recorded message shows the receipt number for a few seconds. Click Print receipt in it to see and print the receipt; if you miss it, the receipt is on the Payments page.
The Record payment window: the patient account, the chosen invoice, and 700 split between the invoice and creditEnlarge the picture
The patient paid more than the balance; the difference stays as credit.
A payment receipt: receipt number, amount, who paid, method and invoiceEnlarge the picture

Good to know

  • If the patient pays more than the invoice balance, the Where this payment goes box shows what goes to it, what settles their other open invoices (oldest first), and what stays as credit.
  • Credit settles the patient’s next invoices automatically.
  • A payment cannot be dated after today. Record a post-dated cheque on the day it is cashed.
  • The receipt shows the amount, the method, the invoice it paid and what is left on it, and who received the money, with room for a signature. You find receipts later on the Payments page and in the patient’s Account tab.

Refunding a patient

When you give money back to a patient, record it as a refund, so the invoice, the cash and their account all agree.

  1. On the invoice page open the ⋮ menu and choose Refund, or turn on Refund (money returned to the patient) in the payment window.
  2. Under Refund from, choose the invoice the money was paid on, or From the patient’s credit.
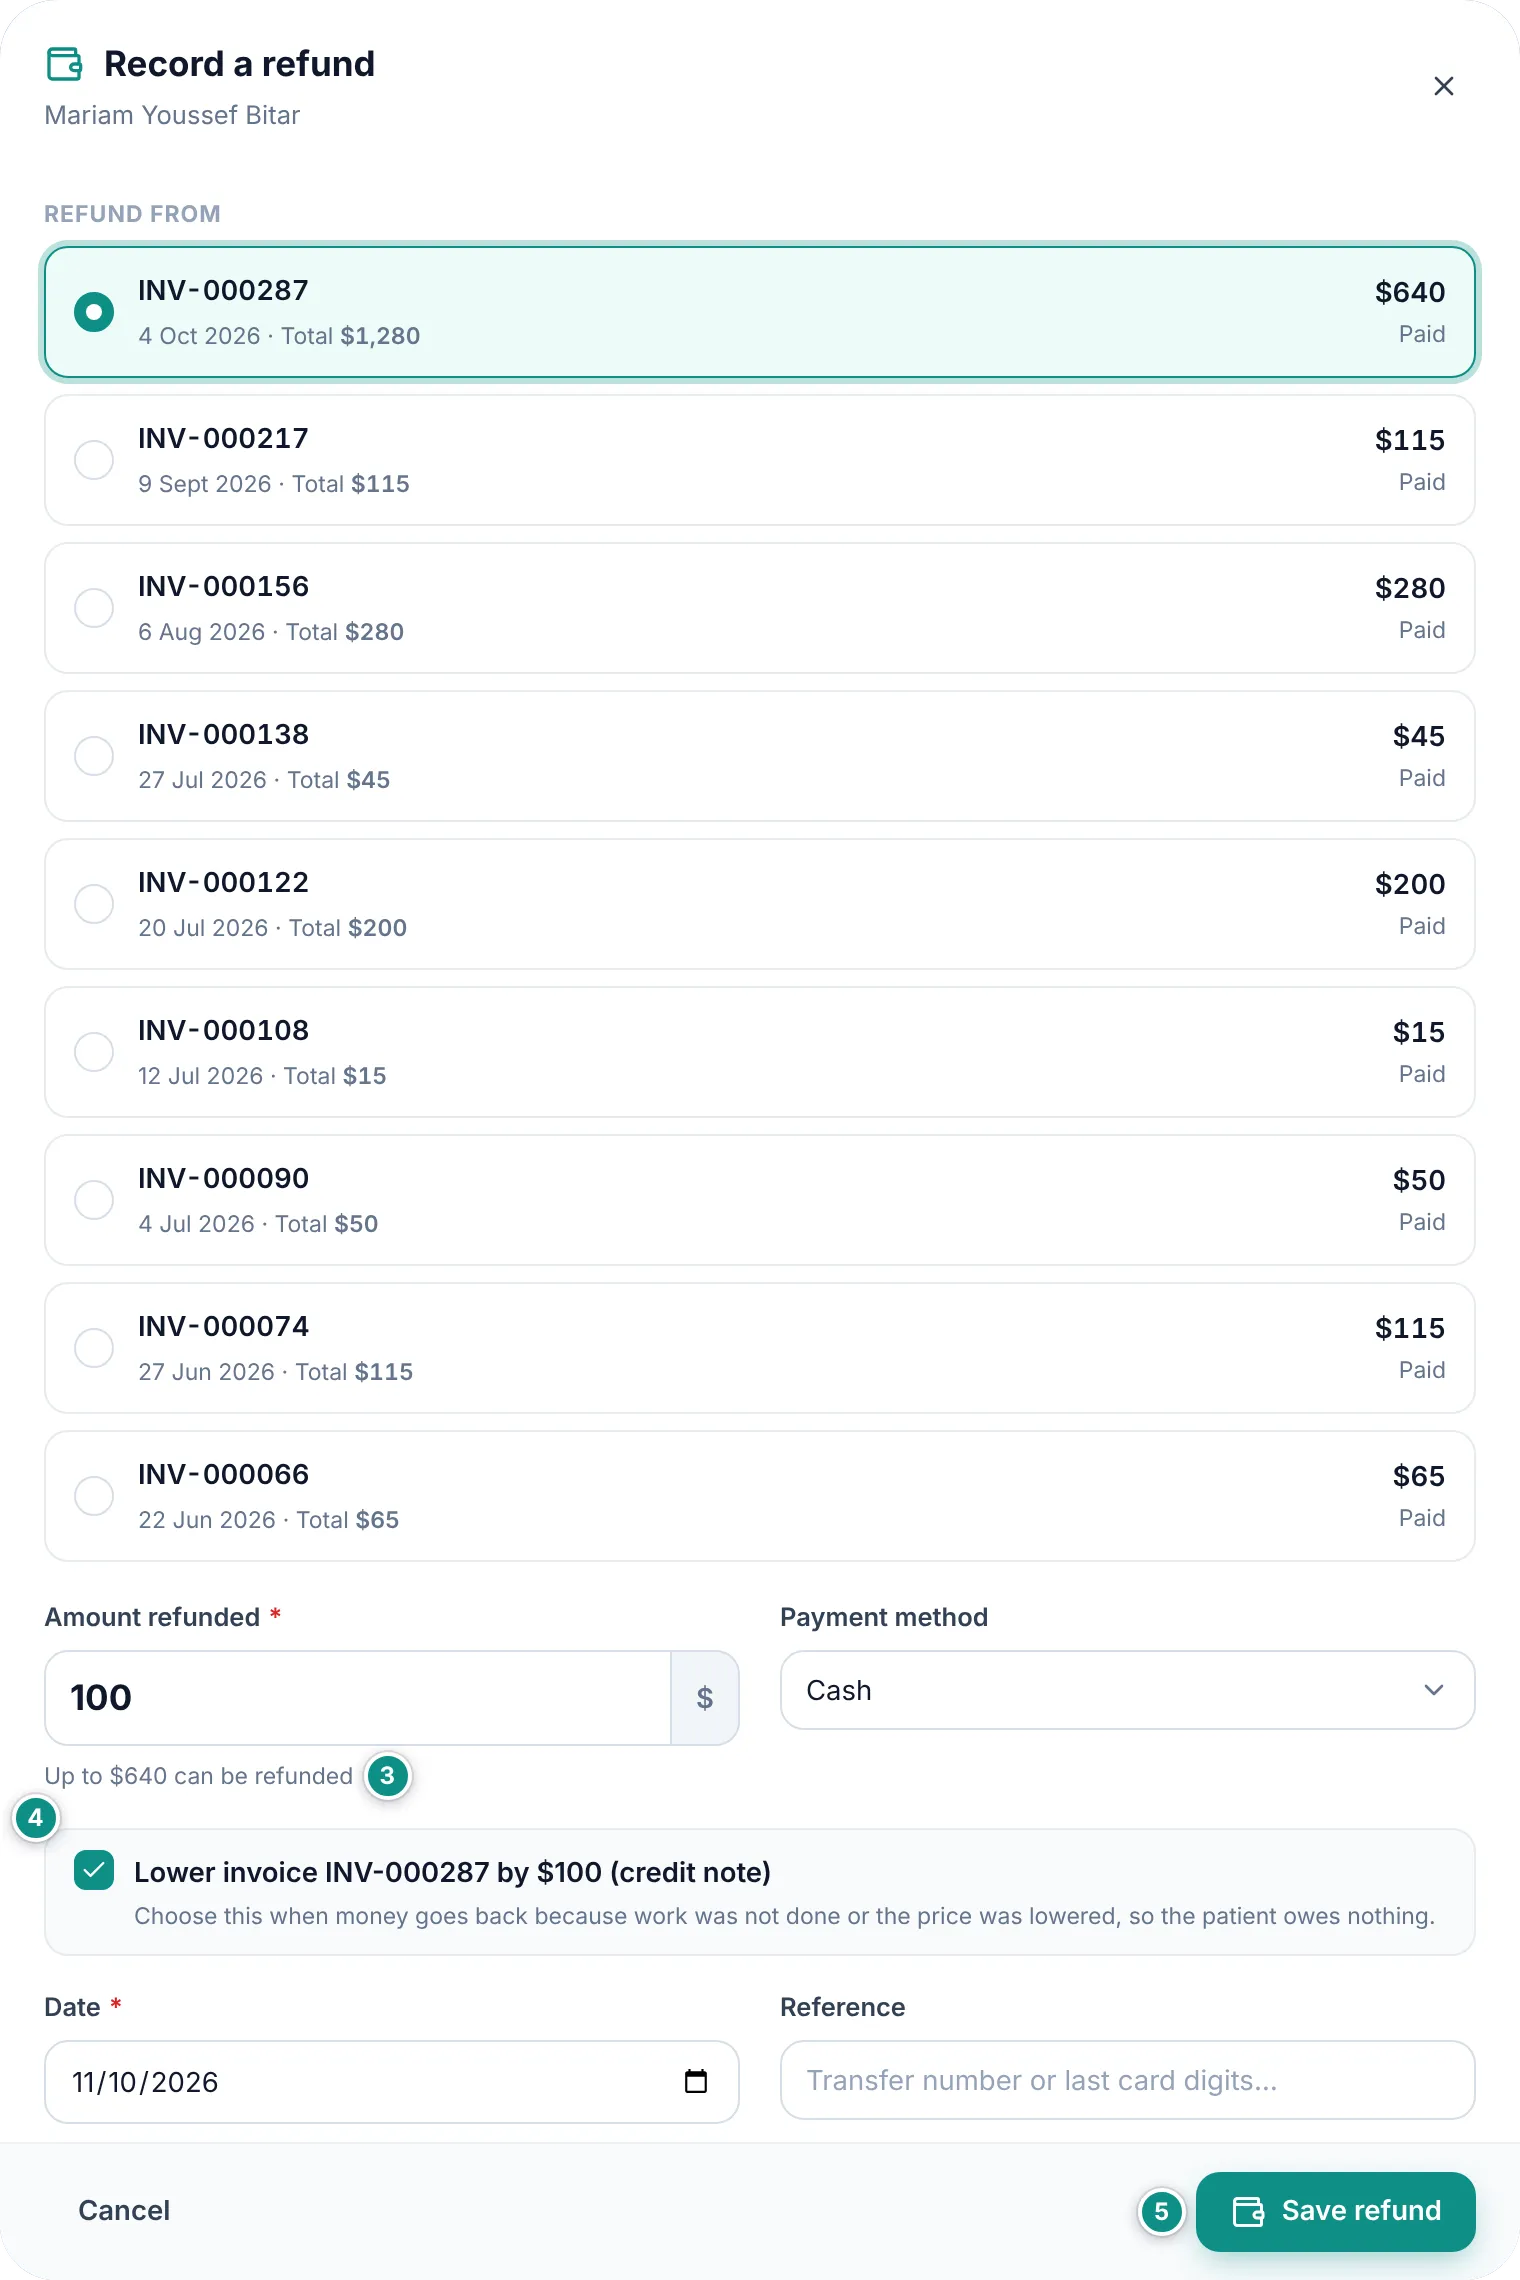
  3. Type the Amount refunded. The most you can refund is shown under the box.
  4. If the money goes back because the work was not done or the price was lowered, keep the “Lower invoice … (credit note)” option ticked, so the patient owes nothing.
  5. Choose the Payment method you used to pay back, then click Save refund.
The Record a refund window: the amount refunded, the most that can be refunded, and the credit note optionEnlarge the picture

Good to know

  • If you untick the credit note and the patient has no credit to cover the amount, Dentora warns that the invoice will show the refunded amount as due again, and the patient will owe it.
  • You cannot refund more than was paid on the invoice plus the patient’s credit.
  • A refund prints its own receipt, titled “Refund receipt”.
  • Refunds show on the Payments page with a Refund badge and come off the net collected.

Payments and the cash report

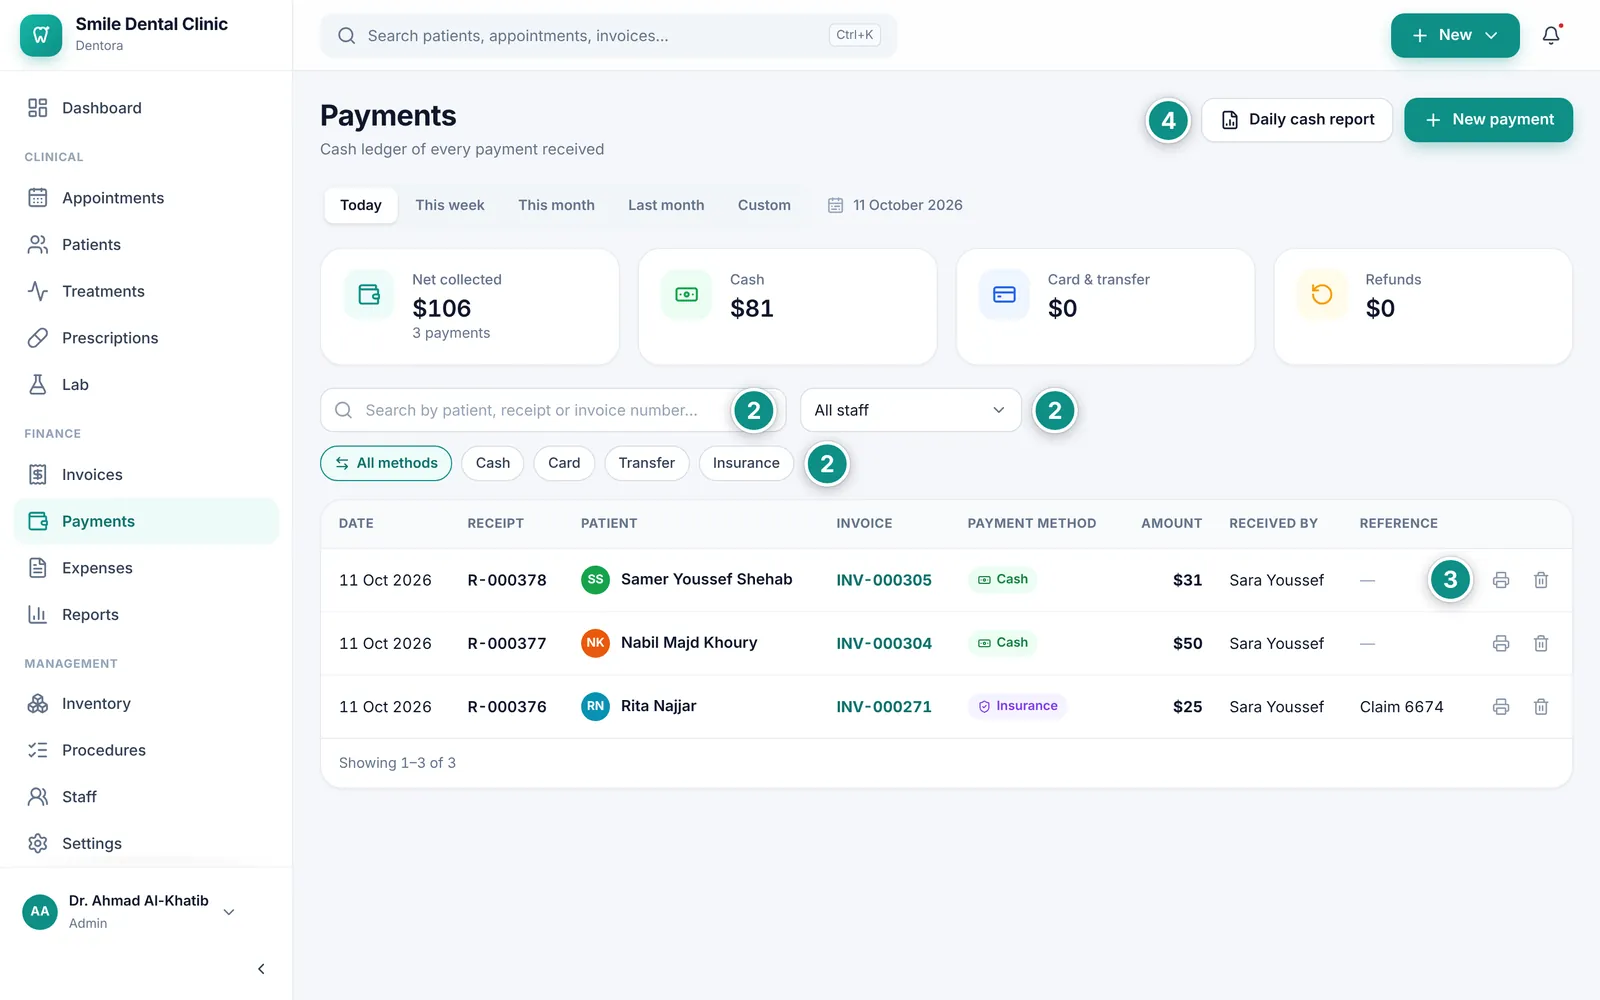
The Payments page is the cash ledger: one row per payment received, with its receipt number, the invoice it paid, the method and who received it. It first opens on Today, then remembers the period you choose.

  1. Open Payments in the sidebar, or with the Payments button on the Invoices page.
  2. Choose the period, then filter by the staff member who received the money or by payment method, or search by patient, receipt or invoice number.
  3. Click any row, or the printer button at its end, to open its receipt and print it. The invoice number and the patient’s name in the row open the invoice and the patient file instead.
  4. At the end of the day click Daily cash report, then Print.
The Payments page for today: the cards, staff and method filters, and the table of receiptsEnlarge the picture
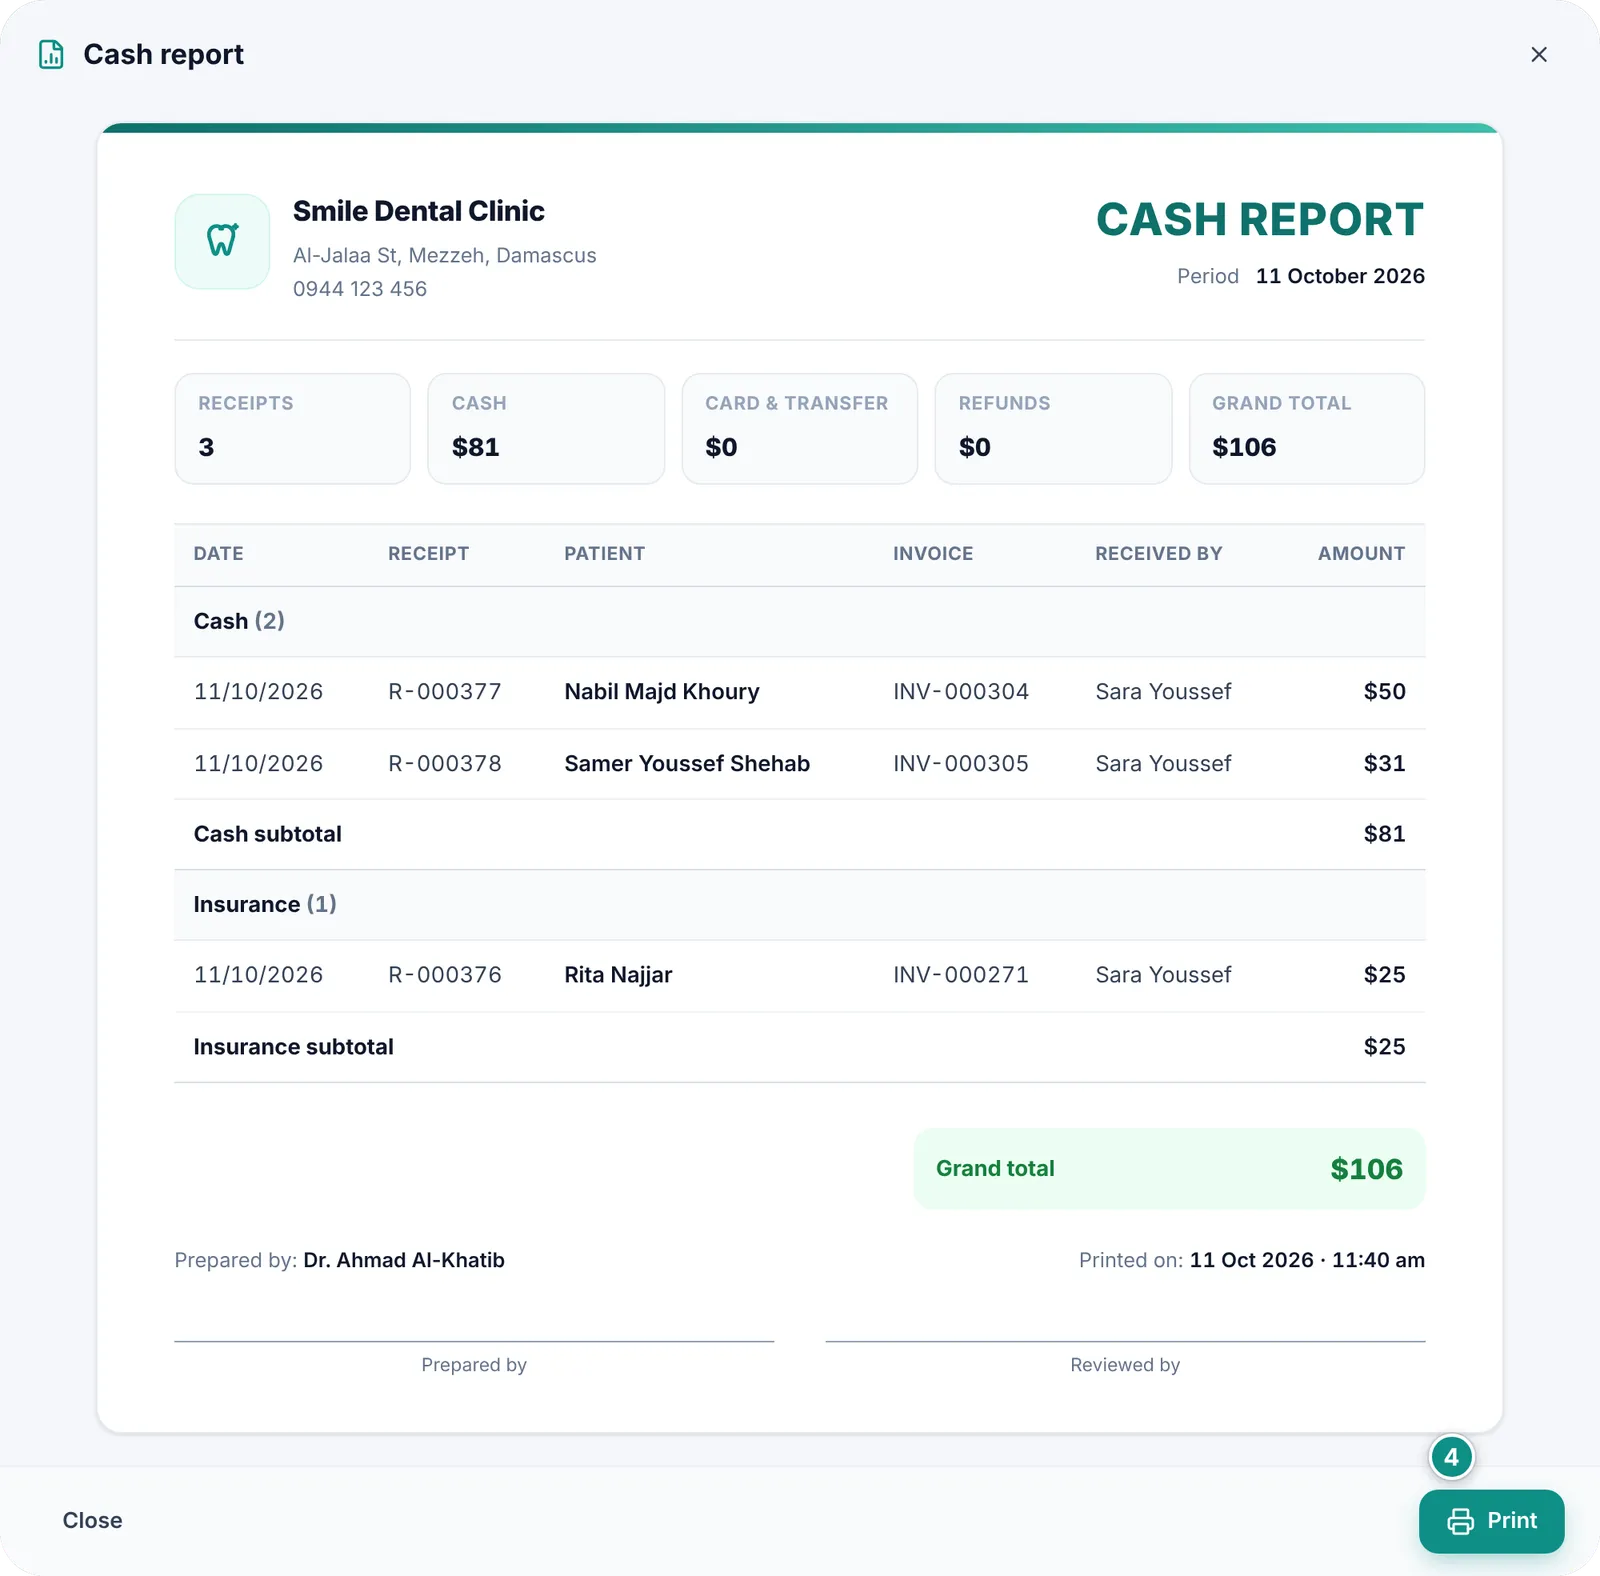
Today’s cash report: receipts grouped by payment method, with subtotals and the grand totalEnlarge the picture

Good to know

  • The cards: Net collected after refunds with the number of payments, Cash, Card & transfer and Refunds.
  • The cash report groups the receipts by payment method, with a subtotal per method and a grand total, and follows the period and filters on screen. At the bottom are who prepared it, when it was printed, and two signature lines.
  • Only the clinic admin can delete a payment, with the bin button on its row; the whole receipt is deleted. The invoices it paid are then recalculated, and the deletion stays in the activity log. There is no delete button on a phone: delete from a computer.
  • A payment whose credit was partly refunded cannot be deleted before the refund receipt.

The patient’s account and statement

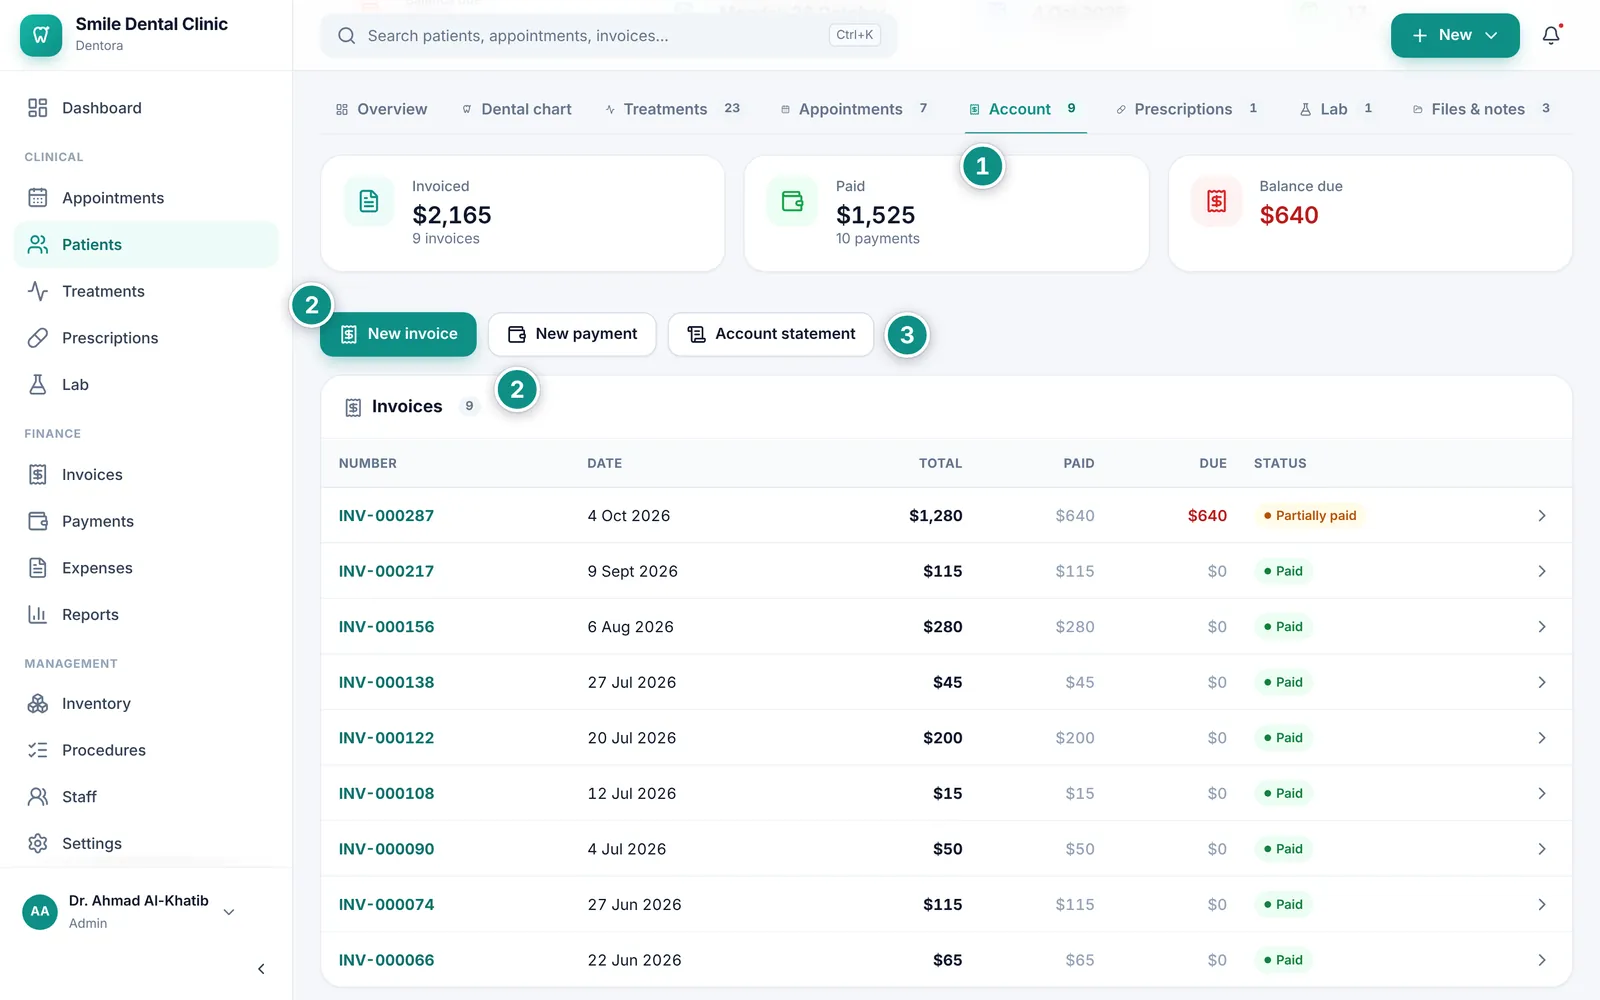
Every patient file has an Account tab with three cards: Invoiced, Paid and Balance due, or Patient credit when the clinic holds money for them. Below them are the patient’s invoices and payments.

  1. Open the patient’s file, then the Account tab.
  2. Click New invoice or New payment to start right from their account.
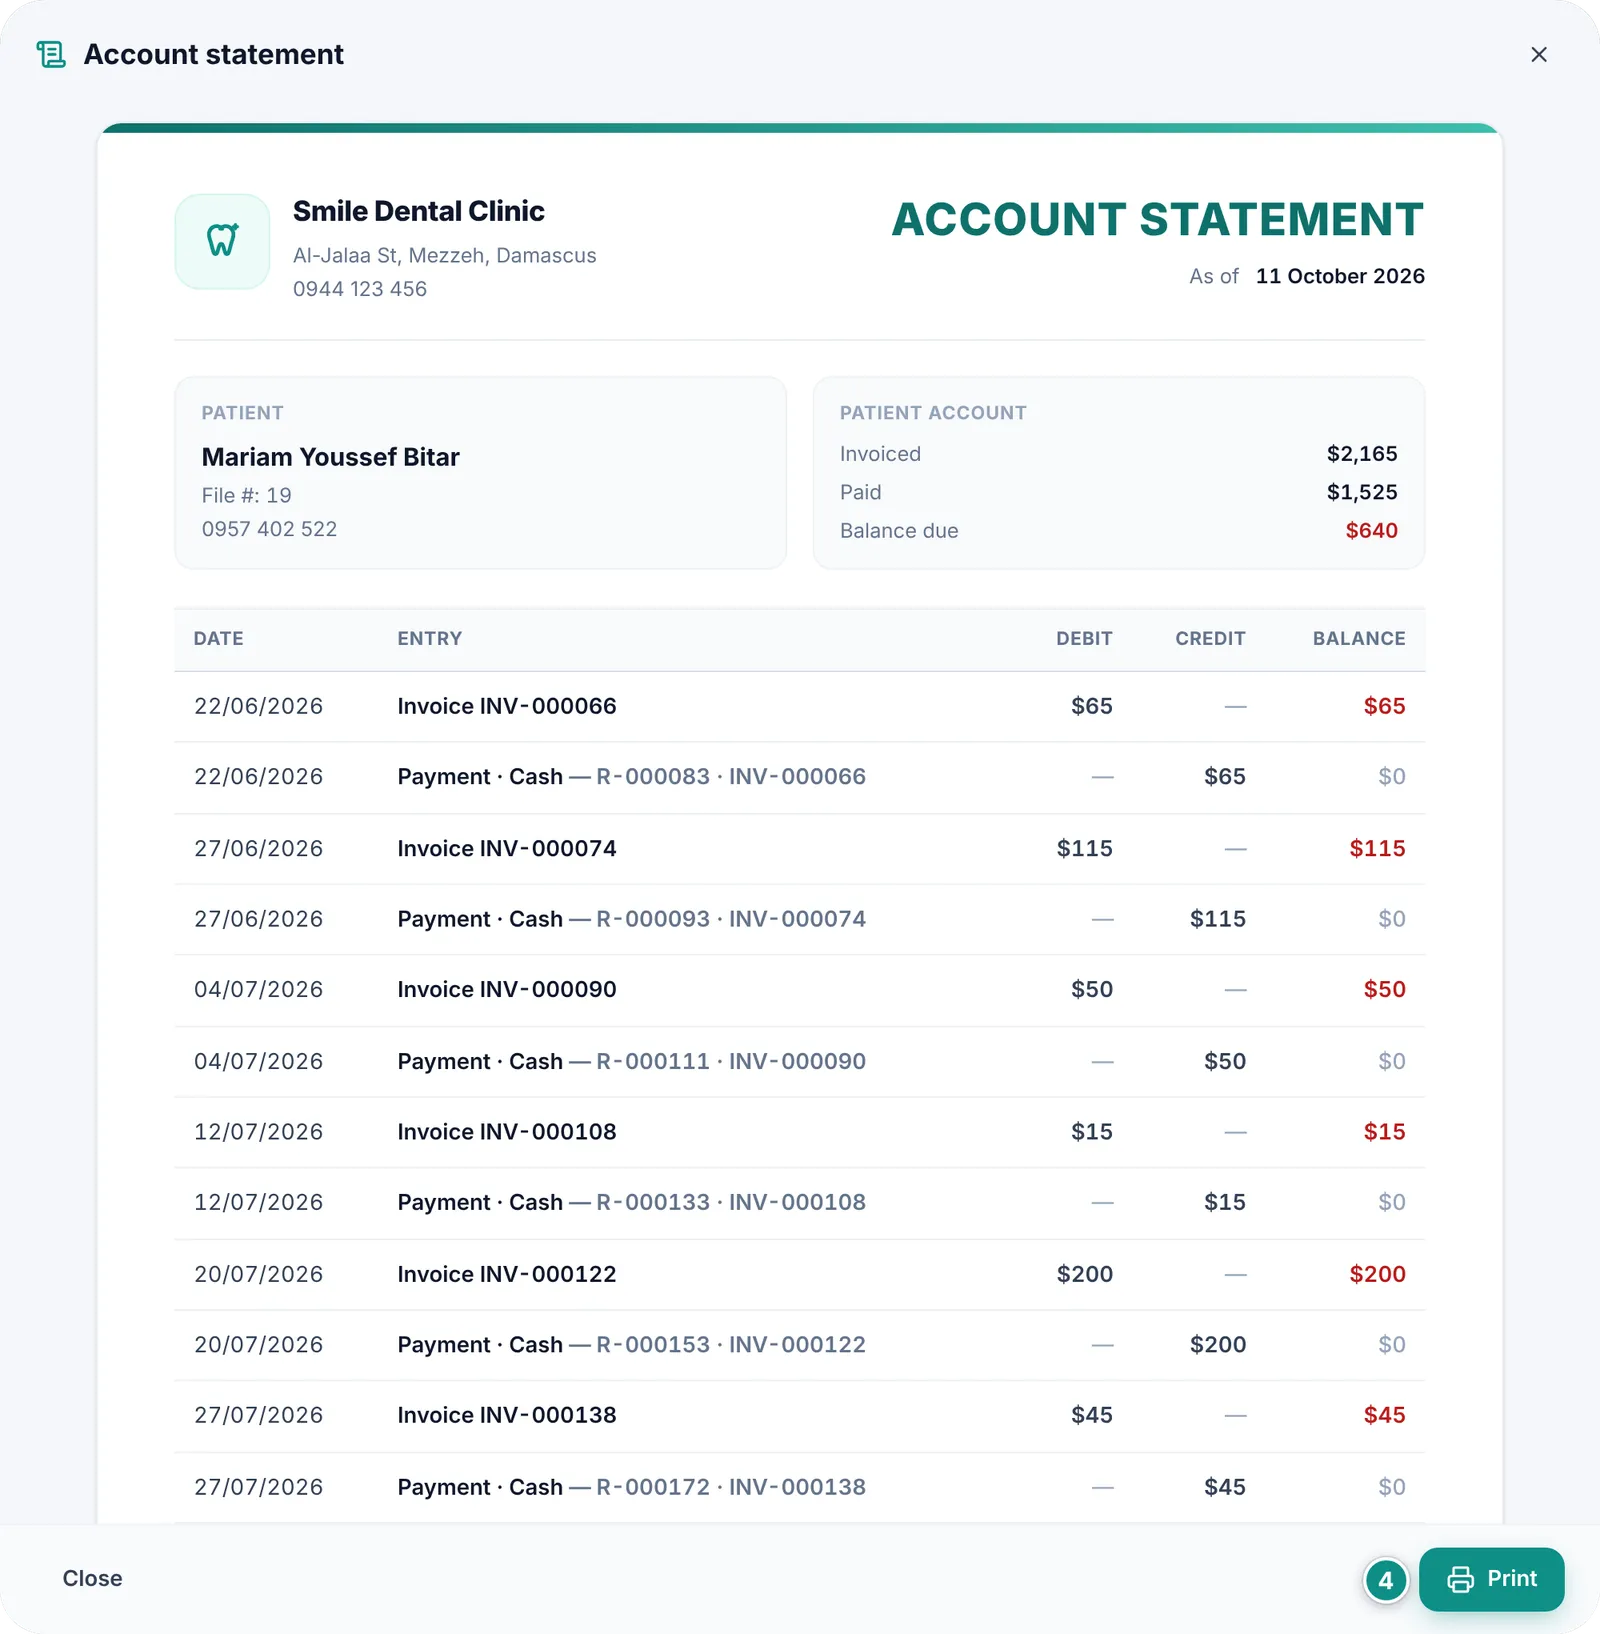
  3. Click Account statement to see their invoices and payments in date order, with the balance after each entry.
  4. Click Print to hand the statement to the patient or save it as a PDF.
The Account tab of a patient file: the three cards, the New invoice, New payment and Account statement buttons, and the invoicesEnlarge the picture
A patient’s account statement: invoices and payments in date order with debit, credit and the balance after each entryEnlarge the picture

Good to know

  • Drafts and cancelled invoices do not count in the balance. When everything is paid, the tab says “Account fully settled”.
  • Click a payment in the list to open its receipt.
  • The balance also shows at the top of the patient’s file and in the patients list. See The patient file.
  • On a phone, the statement merges debit and credit into one column.
  • To see every patient who owes money in one list, open the Outstanding balances report.

Printing, PDF and WhatsApp on Windows and Android

Invoices, receipts, statements and the cash report print as tidy sheets with the clinic letterhead and logo from Settings, in Arabic or English as the app is set.

On a phone a few things move: New invoice floats at the bottom of the invoices list, the print button on the invoice page is an icon, and Send via WhatsApp is in the ⋮ menu.

An invoice on a phone: Record payment, the print icon and the ⋮ menu above the sheetEnlarge the picture

Good to know

  • On Windows the Windows print dialog opens: choose your printer, or “Microsoft Print to PDF” to save a PDF file.
  • On Android the system print screen opens: choose a printer the phone can reach, or the save-as-PDF option.
  • The PDF gets a clear name, such as “Invoice INV-000287 — Mariam Youssef Bitar”.
  • On Android the WhatsApp button opens the patient’s chat in the WhatsApp app. On Windows the link opens in the browser, where you continue in WhatsApp Web or the WhatsApp desktop app.
  • The WhatsApp message goes to the patient’s number; local numbers get the code of the Country chosen in the clinic details.
Previous topicTreatments and treatment plansNext topicPrescriptions

Need help?

If you did not find your answer here, message us on WhatsApp and we will help.

WhatsApp+963 996 489 504

On this page

  1. The invoices list
  2. Issuing an invoice
  3. The invoice page
  4. Recording a payment and printing the receipt
  5. Refunding a patient
  6. Payments and the cash report
  7. The patient’s account and statement
  8. Printing, PDF and WhatsApp on Windows and Android

Back to top

All topics

  1. Getting started
  2. Finding your way around
  3. The dashboard
  4. Patients
  5. Dental chart
  6. Appointments
  7. Treatments and treatment plans
  8. Invoices and payments
  9. Prescriptions
  10. Dental lab
  11. Inventory
  12. Expenses
  13. Reports
  14. Settings
  15. Staff and permissions
  16. Backup and moving your clinic
  17. Licence and activation
  18. Questions and answers

© 2026 Dentora. All rights reserved.

HomeUser guideVideosActivate a licencePrivacy policyTerms of use