
Skip to content
Dentora
العربية
  1. Home
  2. User guide
  3. Inventory

Inventory

Keep track of your clinic’s supplies and instruments: quantities, alert levels and expiry dates. Record purchases and use in a click, and let Dentora warn you before anything runs out.

Watch this topic on video
On this page
  1. The Inventory page
  2. Adding a new item
  3. Quick stock in and out
  4. Recording a purchase and restocking
  5. Movement history
  6. Alerts, search and filters
  7. Editing, deactivating, deleting and exporting
  8. Inventory on the phone

The Inventory page

Open Inventory from the sidebar, in the Management section. On a phone it is under More in the bottom bar.

Four cards sit at the top: Items, Low stock, Expiring soon and Stock value (quantity × cost price). Under them a yellow bar names the items that have reached their alert level, with a Restock button.

Then come two tabs, Items and Movements. In the items table each item shows its SKU and category, its Quantity between a − and a + button, then Threshold, Cost price, Value, Supplier and Expiry, with the ⋮ options button at the end of the row.

The list is sorted by urgency: out of stock first, then items at their alert level, then expired or expiring ones, then everything else by name. The top of the list reads like a to-do list.
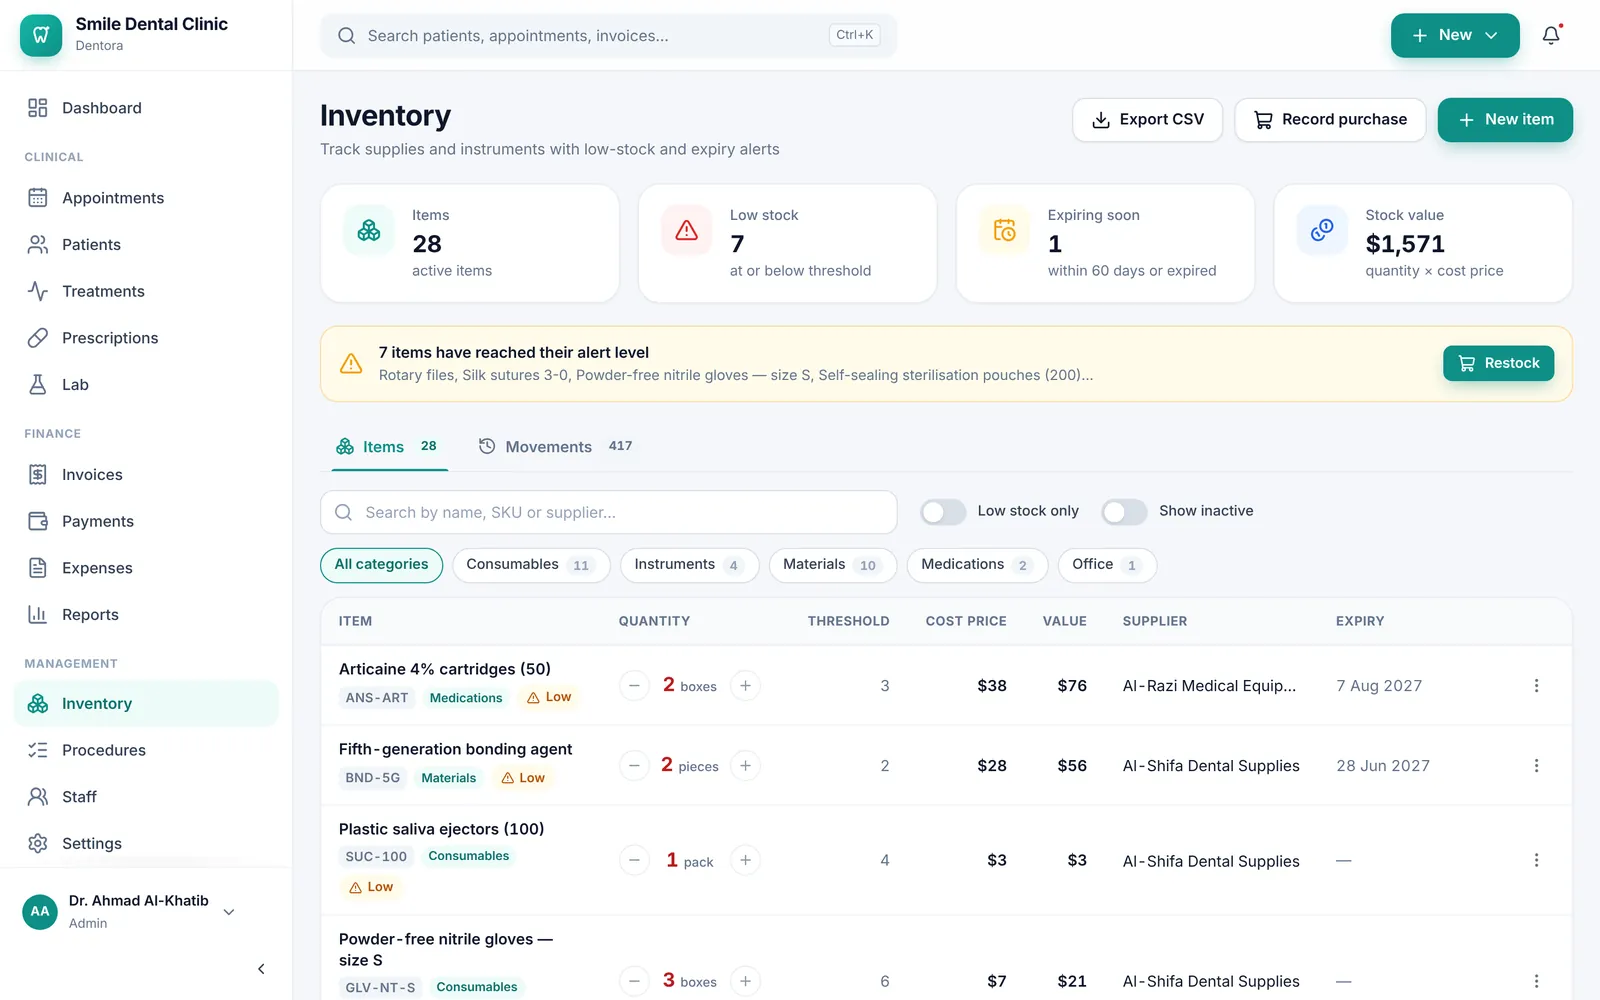
The Inventory page: four figure cards, a yellow bar listing low items with a Restock button, then the items table with quantities and the add and take buttonsEnlarge the picture

Good to know

  • Inventory is open to every role: admin, doctor, assistant and receptionist. See Roles and permissions.
  • The list shows 25 items a page, with the number of items shown and their value underneath.
  • If the trial ends without activation, the list and history stay readable but read-only, and the − and + buttons disappear. See Licence.

Adding a new item

Add each supply or instrument you want to follow once; after that its quantity moves with every purchase and every use.

  1. Click New item at the top of the page. If the inventory is still empty, there is also an Add first item button in the middle.
  2. Type the Item name, for example: Latex gloves, size M.
  3. Pick a Category with one click from the ready ones (Consumables, Instruments, Materials, Medications, Office, Equipment), or type a new one. Add the SKU if the item has a code.
  4. Choose the Unit: piece, box, pack, ml or g. If yours is not there, choose Other unit… and type it, for example: tube.
  5. Enter the Opening quantity you have now, the Alert threshold, the Cost price of one unit and the Expiry date if there is one.
  6. Fill in the Supplier, Storage location and Notes if useful, then click Add item.
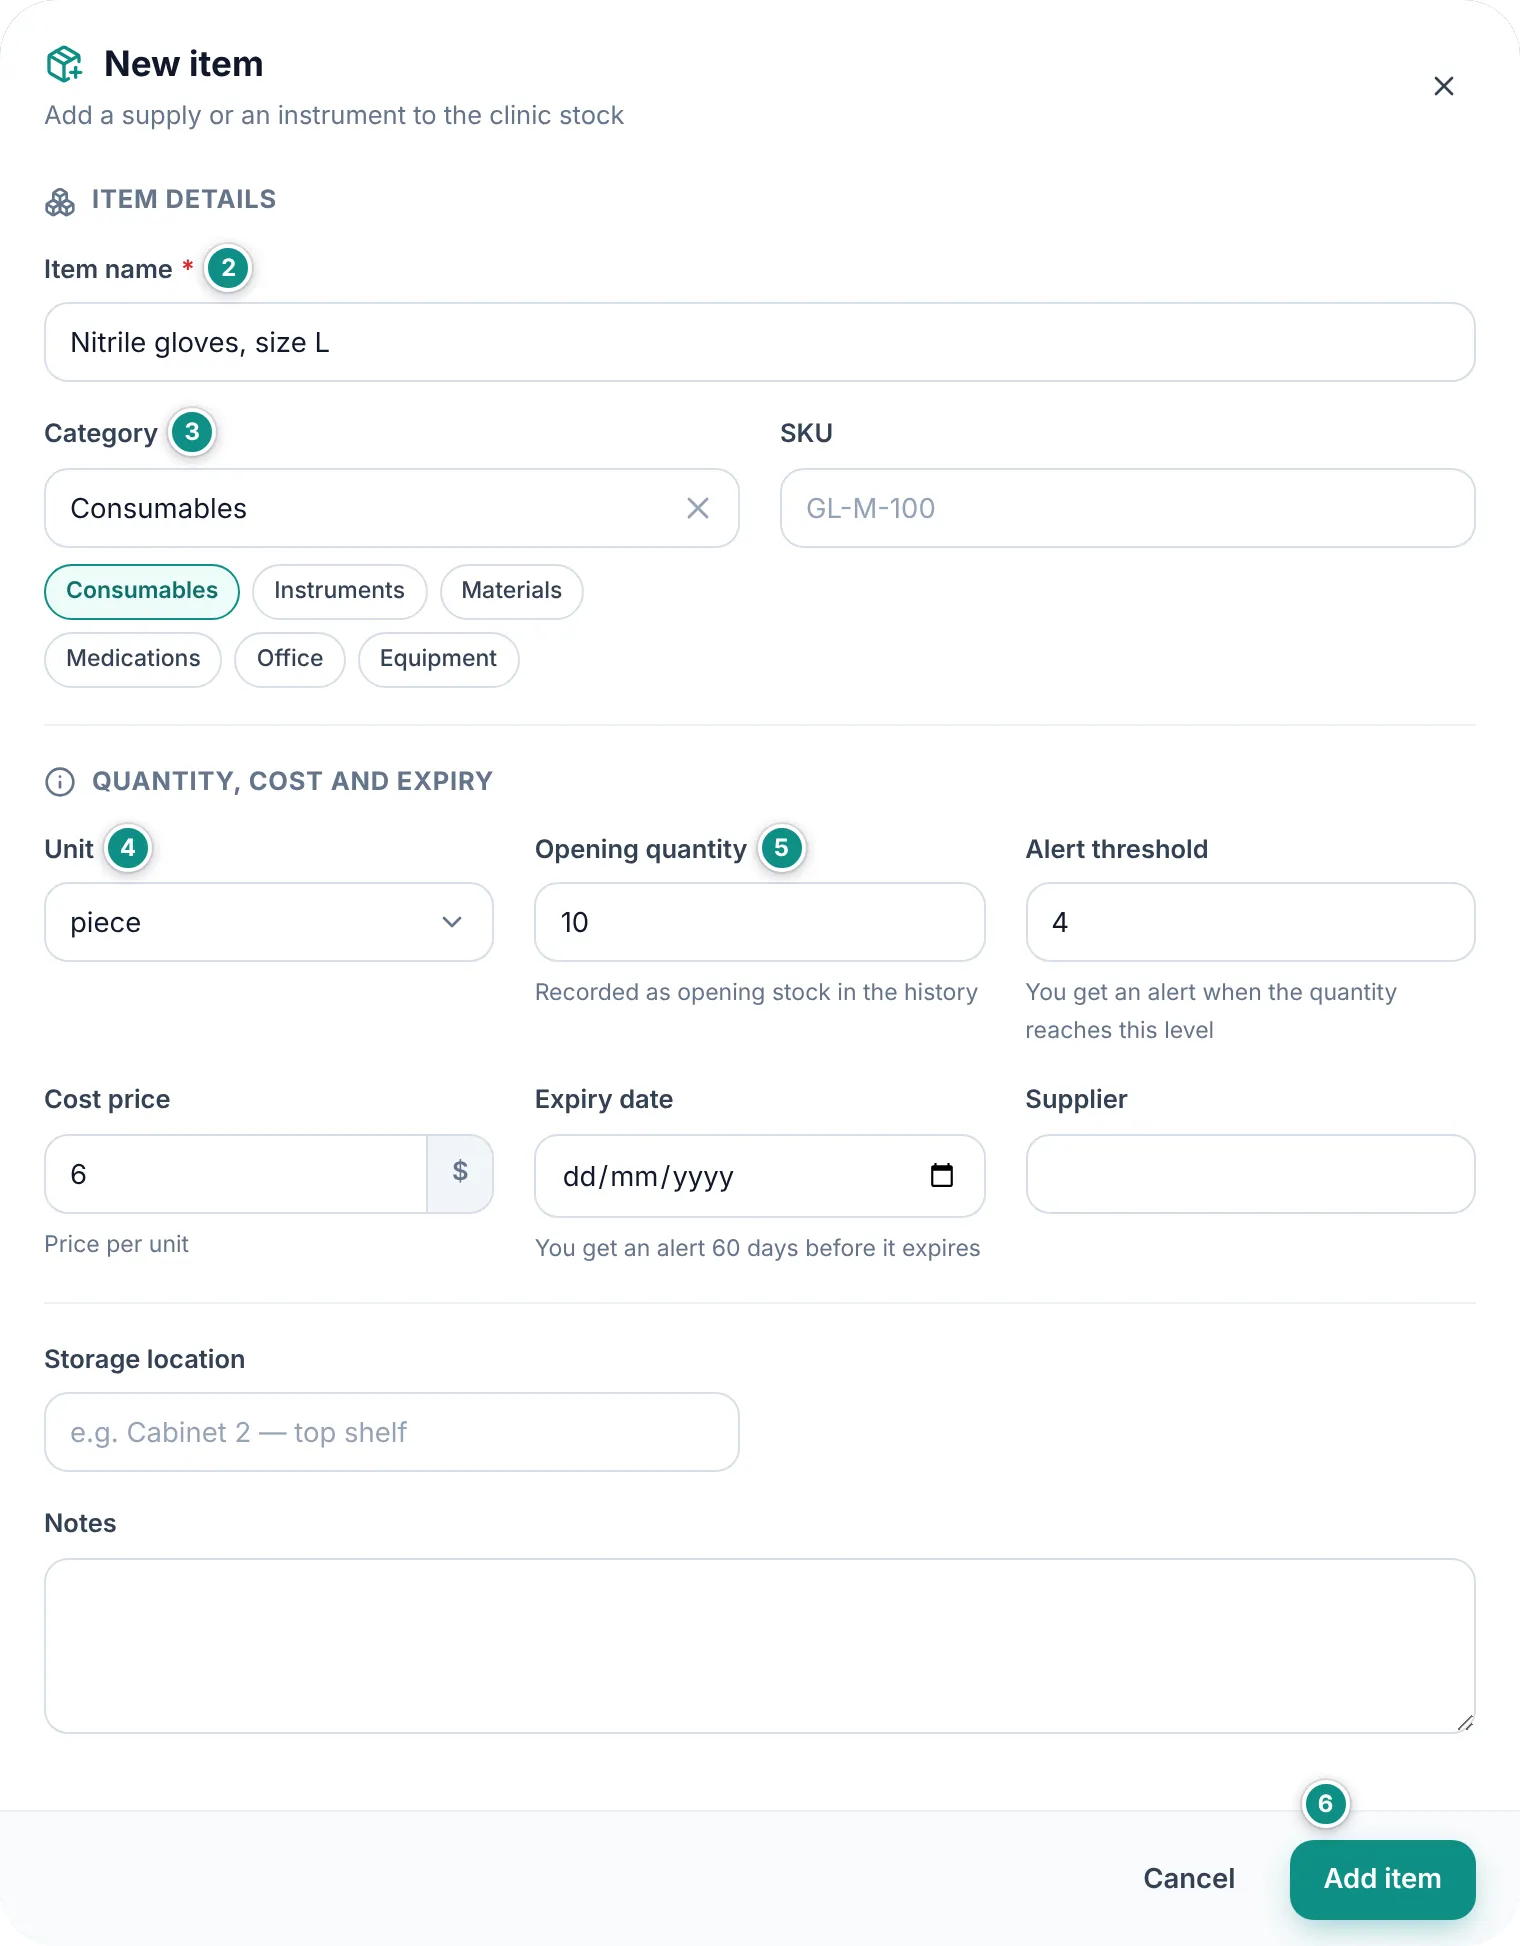
The New item dialog: item name, category with its ready buttons and SKU, then unit, opening quantity, alert threshold, cost price, expiry date and supplierEnlarge the picture

Good to know

  • The item name is the only required field, and the unit is preset (piece).
  • The opening quantity is recorded in the history as Opening stock. After that the quantity is not edited in the item form but through stock movements, so the history stays complete.
  • An item counts as low once its quantity reaches its alert threshold or goes below it. If you leave the threshold at zero, Dentora warns you only when the item runs out.
  • With an expiry date, Dentora warns you 60 days before it.
  • Dentora suggests the suppliers you typed before, and a new category you type shows up among the filter buttons.

Quick stock in and out

Next to each item’s quantity there are two buttons: − to take stock and + to add stock. Use them when you take something from the cabinet or put something back, without opening another page.

  1. On the item’s row, click + to add stock or − to take stock.
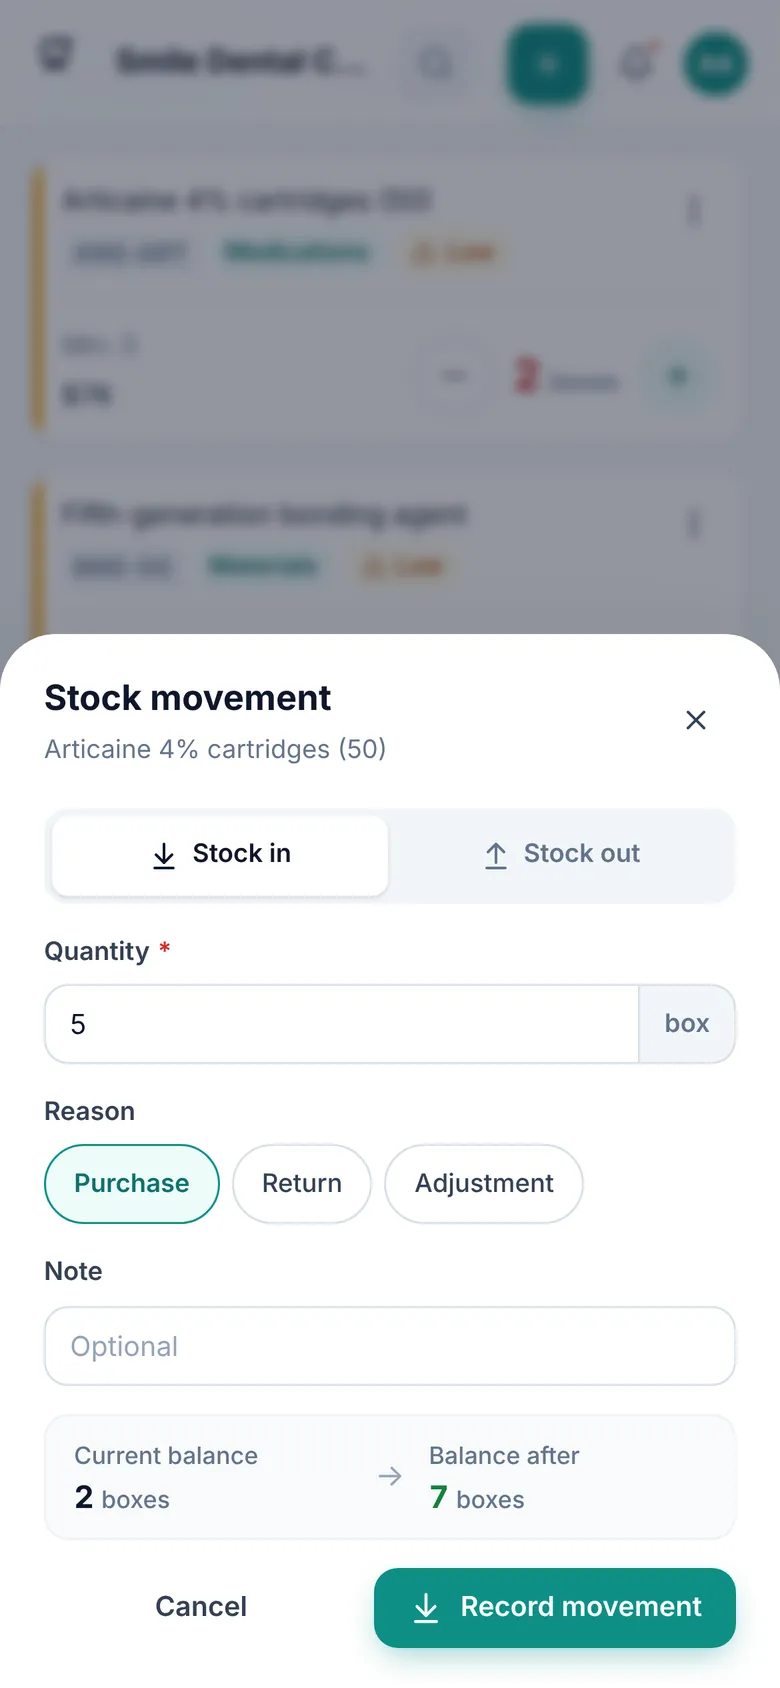
  2. In the Stock movement box, type the Quantity. You can switch between Stock in and Stock out at the top of the box.
  3. Choose the Reason: Purchase, Return or Adjustment for stock in; Used, Discarded or Adjustment for stock out.
  4. Add a Note if you like, check the Balance after, then click Record movement.
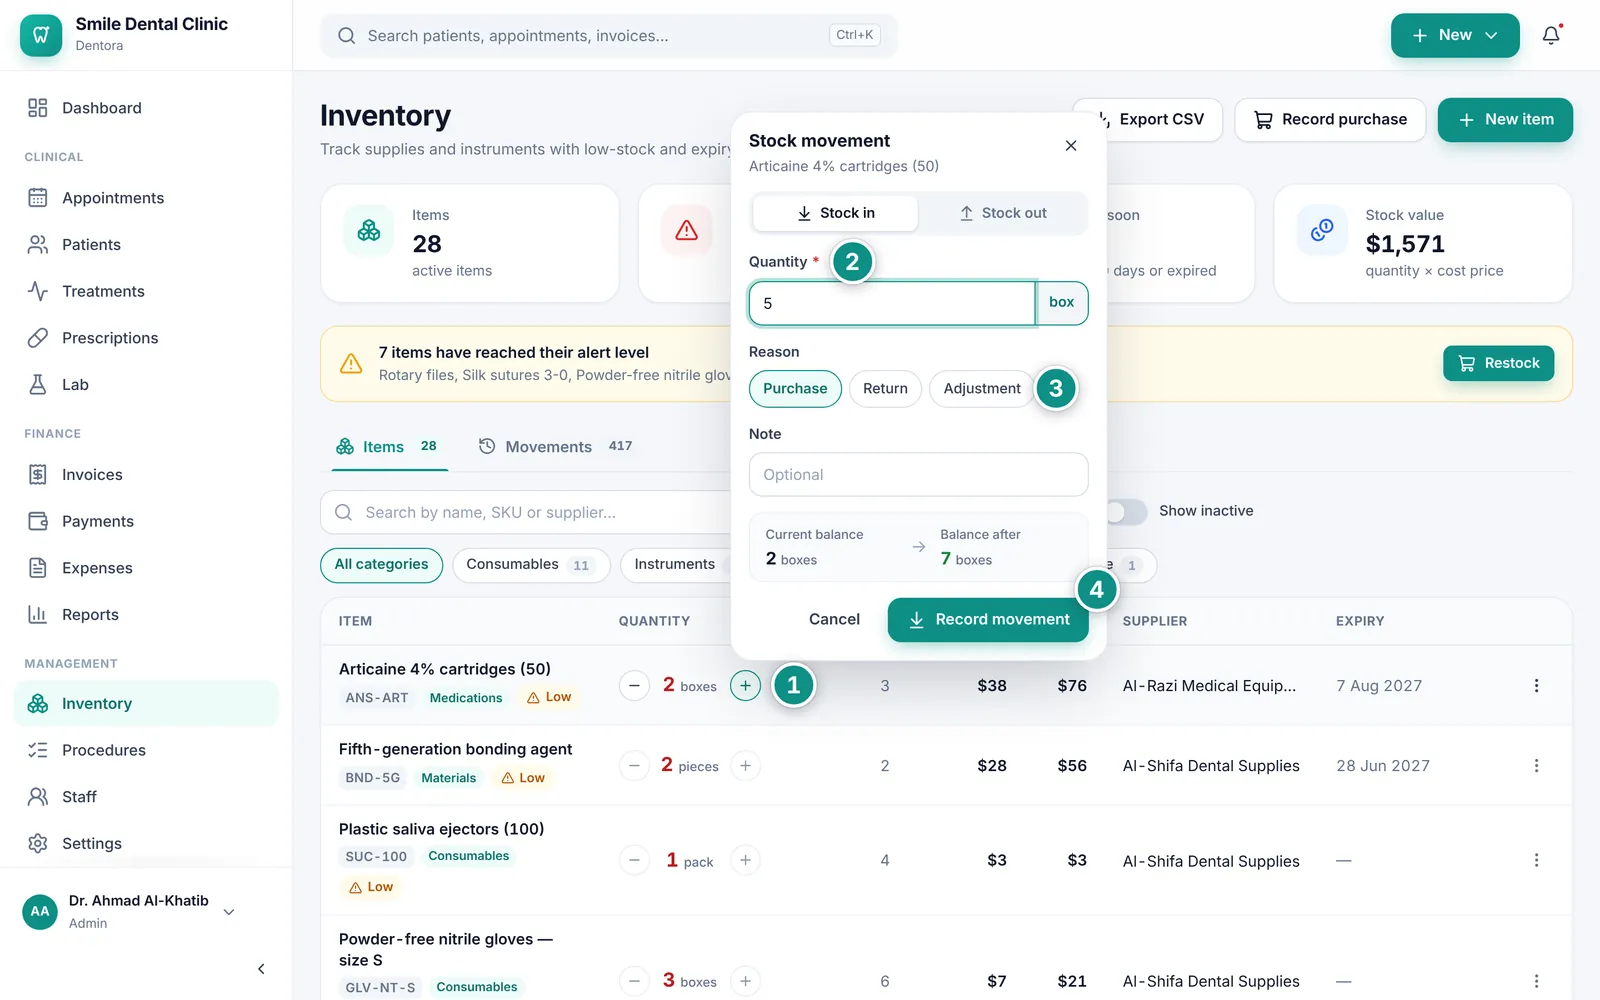
The small Stock movement box next to the add button: stock in or out, quantity, reason, note, current balance and balance afterEnlarge the picture

Good to know

  • The quantity never goes below zero: if you type more than there is, Dentora tells you “Only … available”. The − button is disabled when the quantity is zero.
  • Use Adjustment after counting the cabinet to correct the figure, and Discarded for anything expired or damaged.
  • Every movement keeps its date, time and the name of whoever recorded it.
  • To record a delivery with several items, use Record purchase: it is quicker, and it updates the cost prices too.
  • On a phone the movement box opens from the bottom of the screen. See Inventory on the phone.

Recording a purchase and restocking

When a delivery arrives, record all its items in one go. The quantities go up, each item’s Cost price becomes the new unit price, and the supplier is saved on the items.

  1. Click Record purchase at the top of the page. Or click Restock in the yellow bar: the form opens with every low item and a suggested quantity. Or choose Record a purchase from the ⋮ menu of a single item.
  2. Check the Purchase date, and fill in the Supplier and Invoice number if you have them.
  3. On each line pick the Item and type the Quantity and Unit price. Click Add item for another line, or Add low-stock items to add everything at its alert level.
  4. Leave Record the purchase total as an expense on if you want the total recorded as an expense under Materials.
  5. Check the Purchase total at the bottom, then click Save purchase.
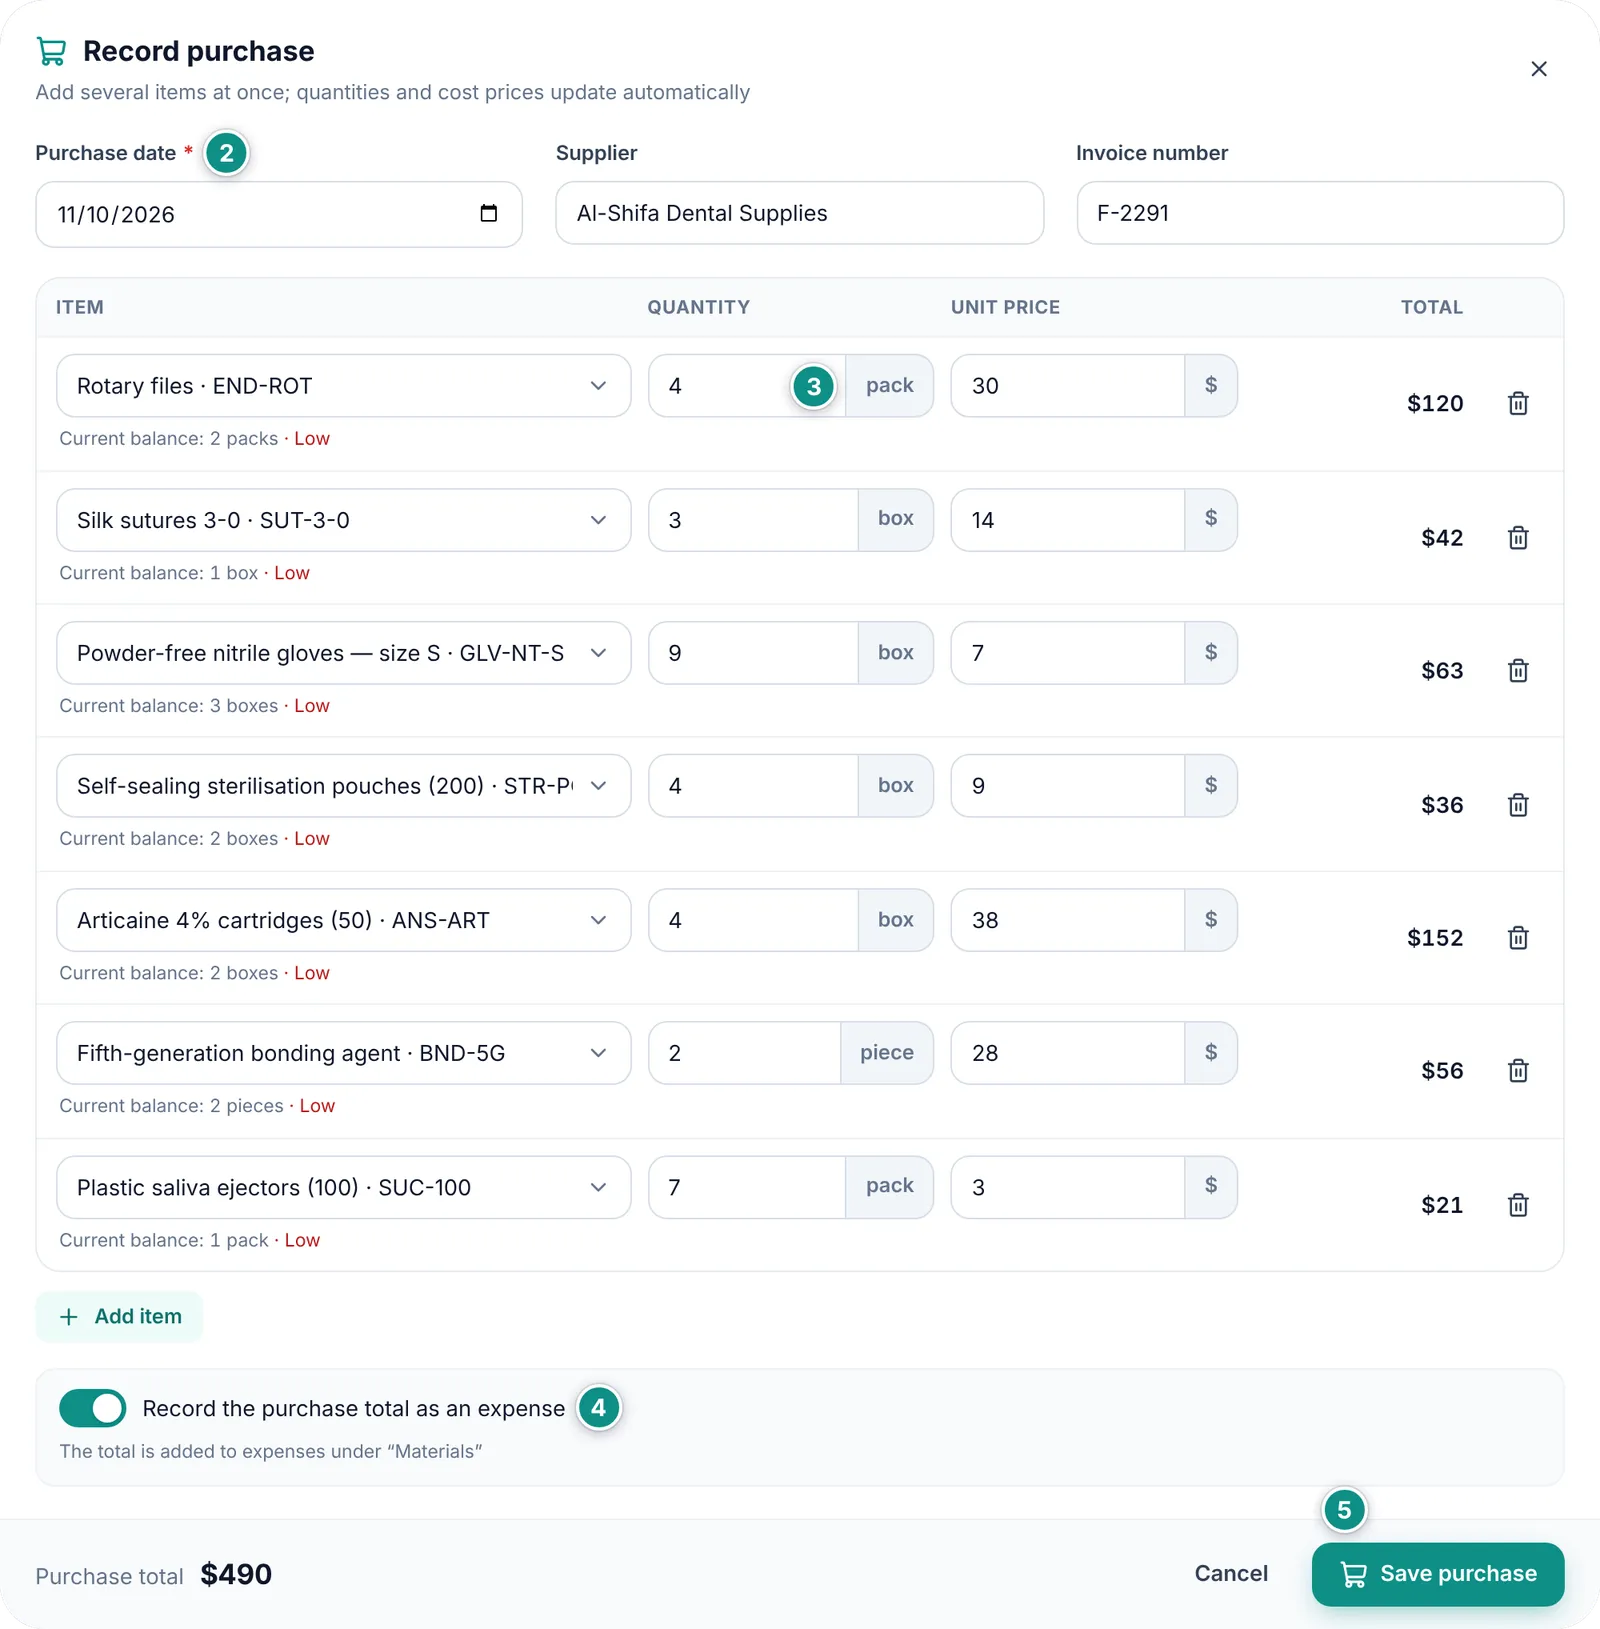
The Record purchase dialog filled with the low items: purchase date, supplier and invoice number, then a line per item with quantity, unit price and total, and the purchase total at the bottomEnlarge the picture

Good to know

  • The suggested quantity brings a low item back to twice its alert threshold, and the unit price is filled in from its current cost price. Change both to match your invoice.
  • A purchase cannot be dated after today, and the same item cannot be on two lines (“Duplicate item”). Inactive items are not in the list.
  • The expense switch is shown to the admin only, because Expenses are an admin task. A purchase recorded by anyone else updates the stock only.
  • The supplier and invoice number are written as a note on each item’s movement, so you find them later in the history.

Movement history

Click any item’s row (or choose Movement history from its ⋮ menu) to open the Movement history panel at the side of the screen. At the top it shows the current quantity in large type with the threshold, then Cost price, Value and Expiry, the storage location and the supplier. From here you add or take stock with Add stock and Take stock, and change the item with Edit item at the bottom.

Under Recent movements each movement shows its reason, date, time, who recorded it and its note, the quantity it added or took, and the Balance after.

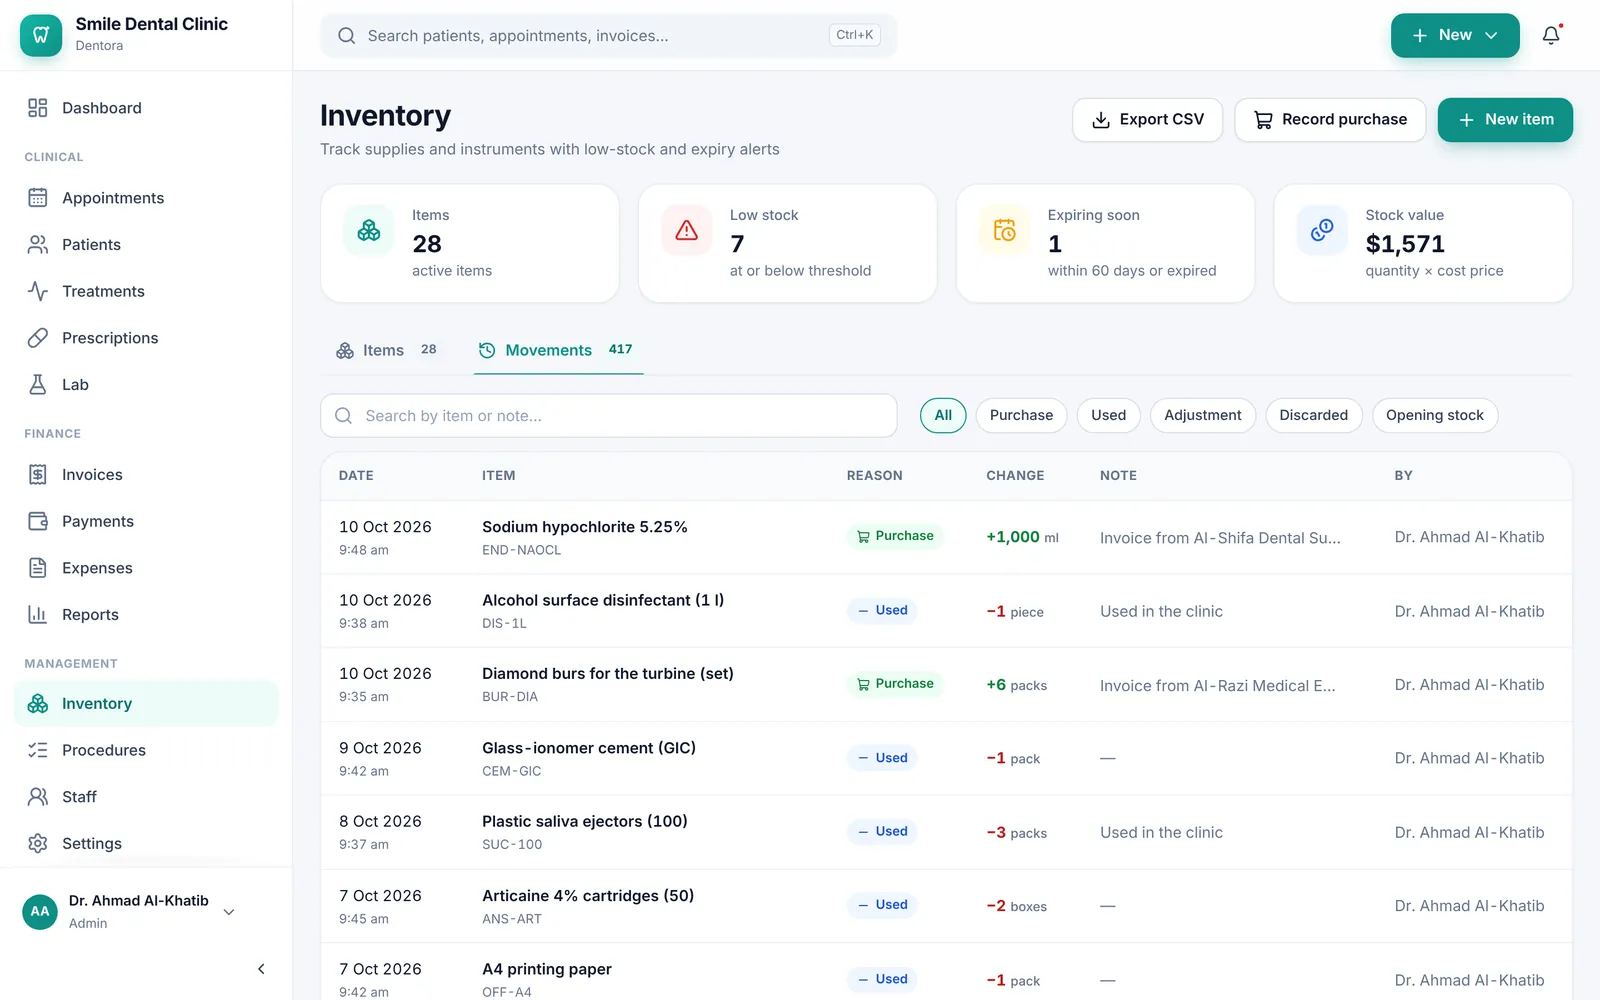
The Movements tab at the top of the page gathers the movements of every item, newest first. Search it by item name, SKU or note, or pick one reason (Purchase, Used, Adjustment…) to show only those. Click any movement to open its item’s history.
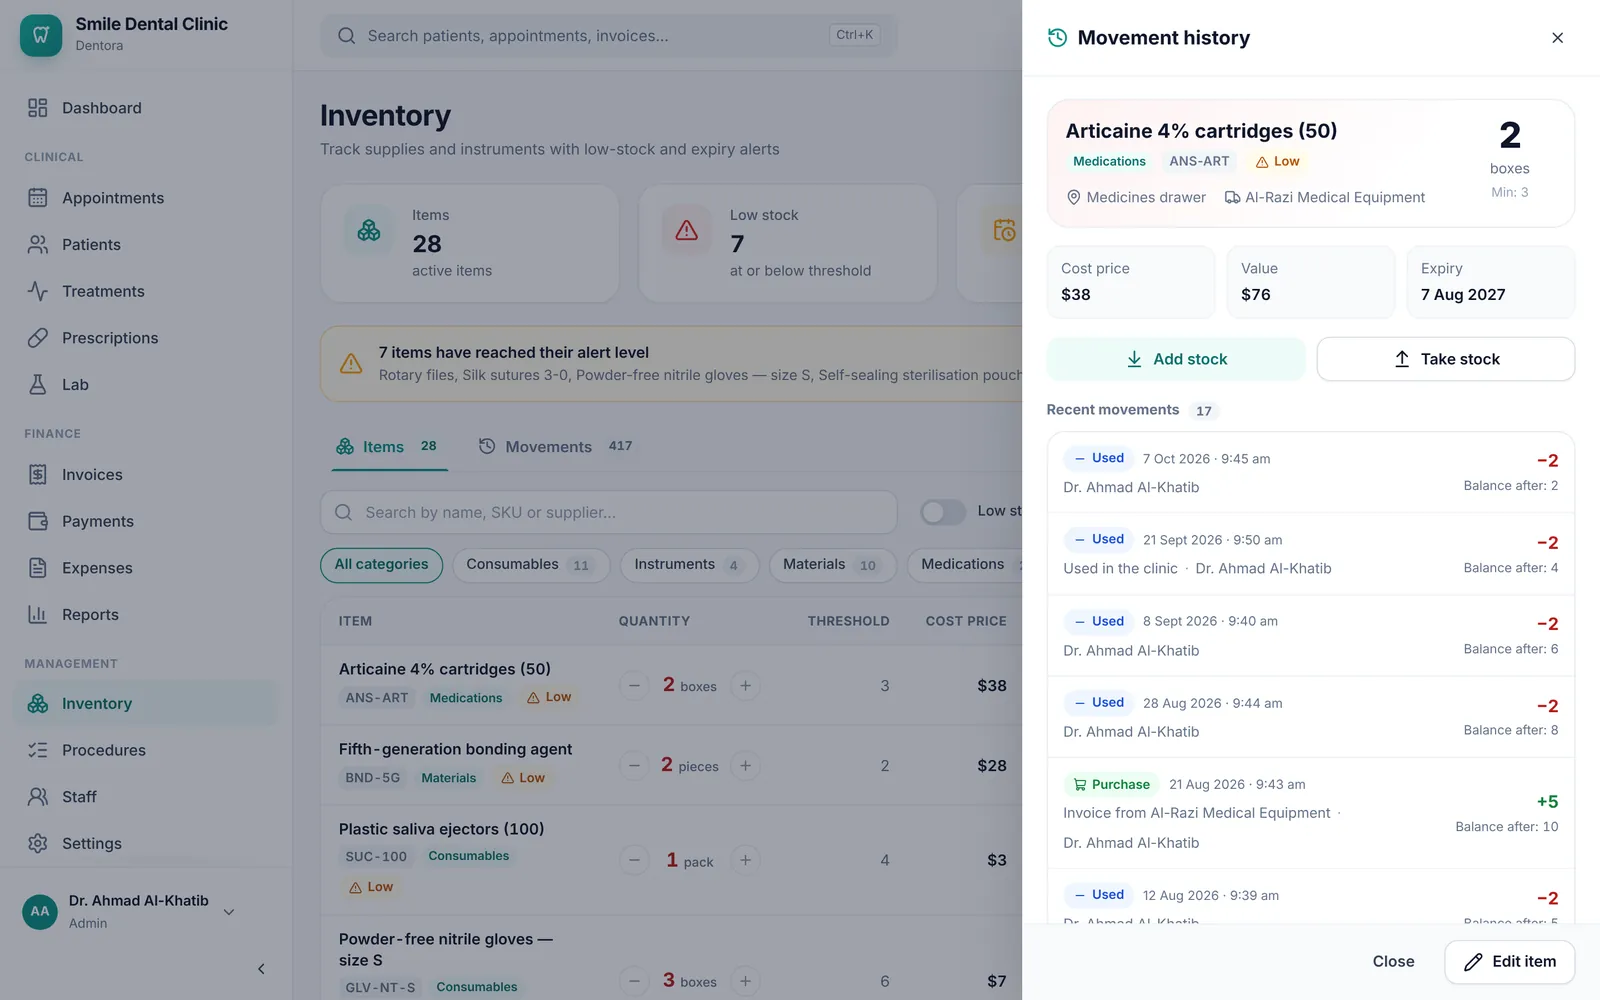
An item’s Movement history panel: current quantity and threshold, cost price, value and expiry, the Add stock and Take stock buttons, then recent movements with the balance after eachEnlarge the picture
The Movements tab: search and reason buttons, then a table of every stock movement with date, item, reason, change, note and who recorded itEnlarge the picture

Alerts, search and filters

An item gets a Low badge when it reaches its alert threshold, and Out of stock when its quantity is zero. In the Expiry column a badge such as “Expires in 24 days” or Expired marks anything expiring within 60 days or already past it.

You do not need to open Inventory to know: low and expiring stock also shows in the Notifications under the bell, and low stock in the Dashboard alerts.

  1. Type an item’s name, SKU, supplier, category or storage location in the search box.
  2. Click a category button under the search to show only its items, or All categories to go back.
  3. Turn on Low stock only, or click the Low stock card. For expiring stock click the Expiring soon card: an Expiring or expired button appears, with an × to remove it.
  4. Click Clear filters under the table to see every item again.
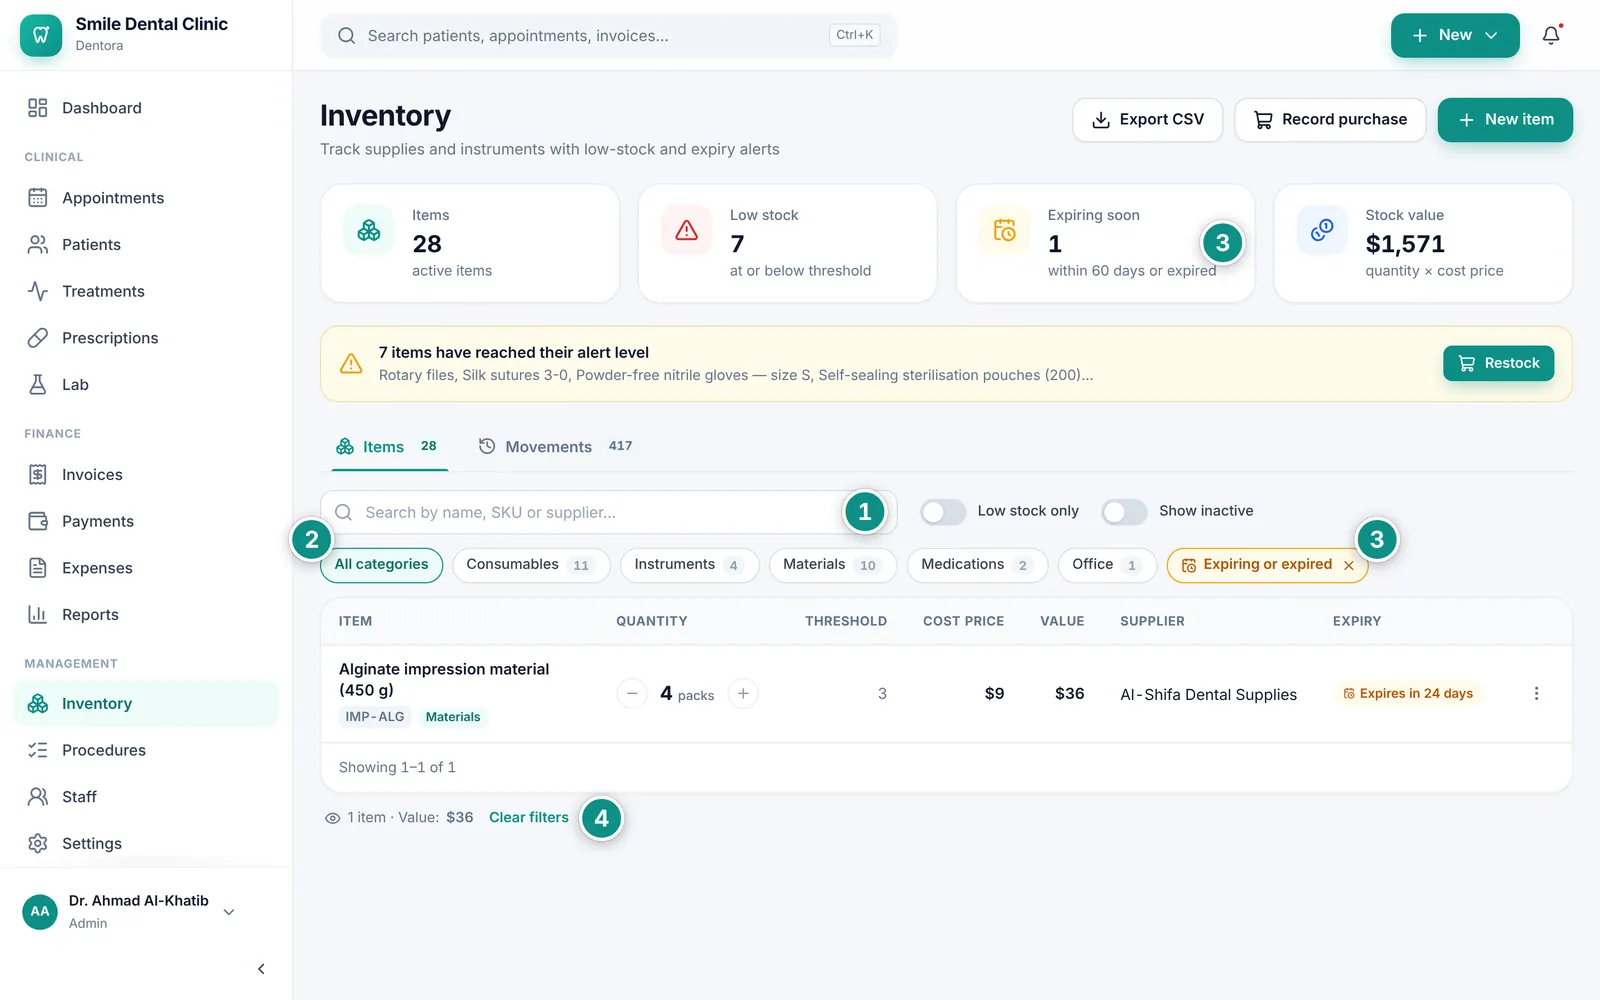
Inventory filtered to expiring stock: the Expiring or expired button is on, and one item in the table carries an “Expires in 24 days” badgeEnlarge the picture

Good to know

  • Inactive items never raise alerts, and show only with Show inactive turned on.
  • The two cards work like a switch: click the same card again to remove the filter.

Editing, deactivating, deleting and exporting

Each item’s ⋮ menu holds Movement history, Edit, Record a purchase and Deactivate item (or Reactivate for an inactive one). Delete item appears only for an item whose history holds nothing but its opening stock.

The Export CSV button at the top saves the items table as you see it, search and filters included, as a spreadsheet file that Excel opens with Arabic intact. On the Movements tab the same button saves every stock movement.
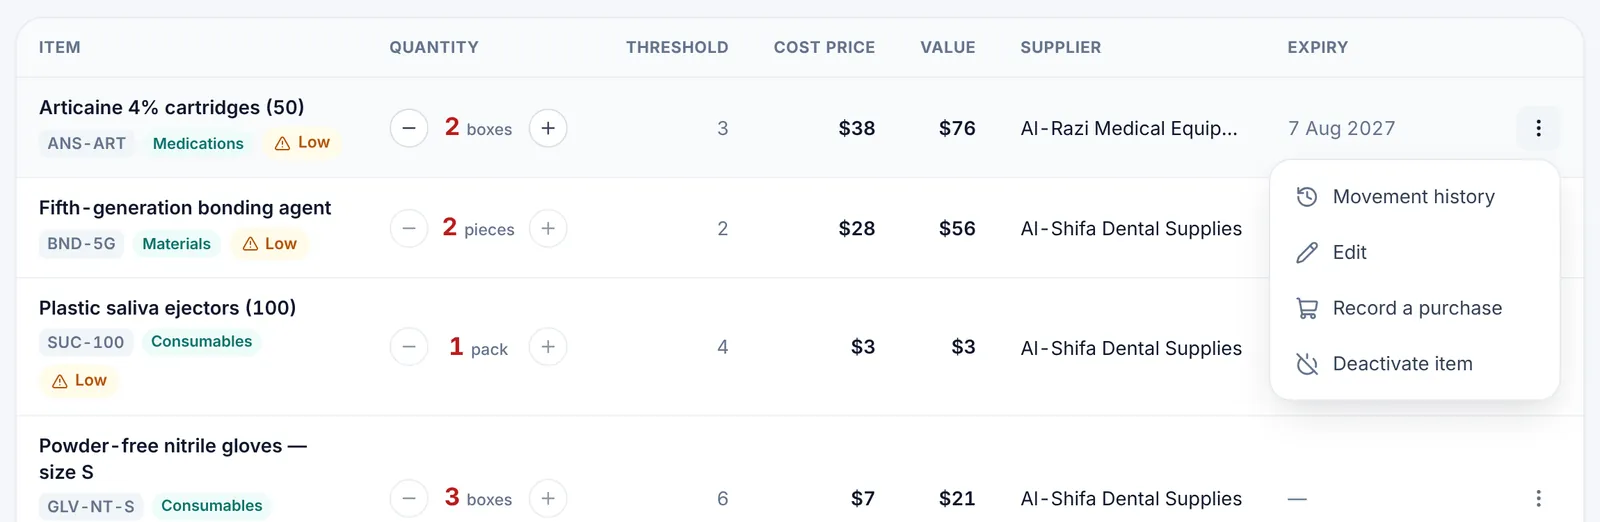
An item’s options menu open: Movement history, Edit, Record a purchase, Deactivate itemEnlarge the picture

Good to know

  • Editing an item changes its name, category, unit, price, expiry and the rest, never its quantity: the Current quantity box stays locked, because the quantity moves only through stock movements.
  • Deactivate an item you no longer use instead of deleting it: it leaves the lists, purchases and alerts, and its history is kept. To bring it back, turn on Show inactive and choose Reactivate from its menu. The Active item switch in the edit window does the same.
  • An item with purchases or uses in its history cannot be deleted, only deactivated, so its history is never lost.
  • On Windows a save window opens so you choose where the file goes. On Android the system’s save screen opens: choose Downloads or Google Drive, for example. On a phone the export button is the download-arrow icon.

Inventory on the phone

On a phone each item becomes a card: name, SKU, category and the low badge, then the threshold and value (and an expiry badge when the item is expiring or expired), with the quantity at the bottom between two large − and + buttons that are easy to tap.

Tap the card to open its movement history, or ⋮ for the options menu. The movement box opens from the bottom of the screen with the same fields.
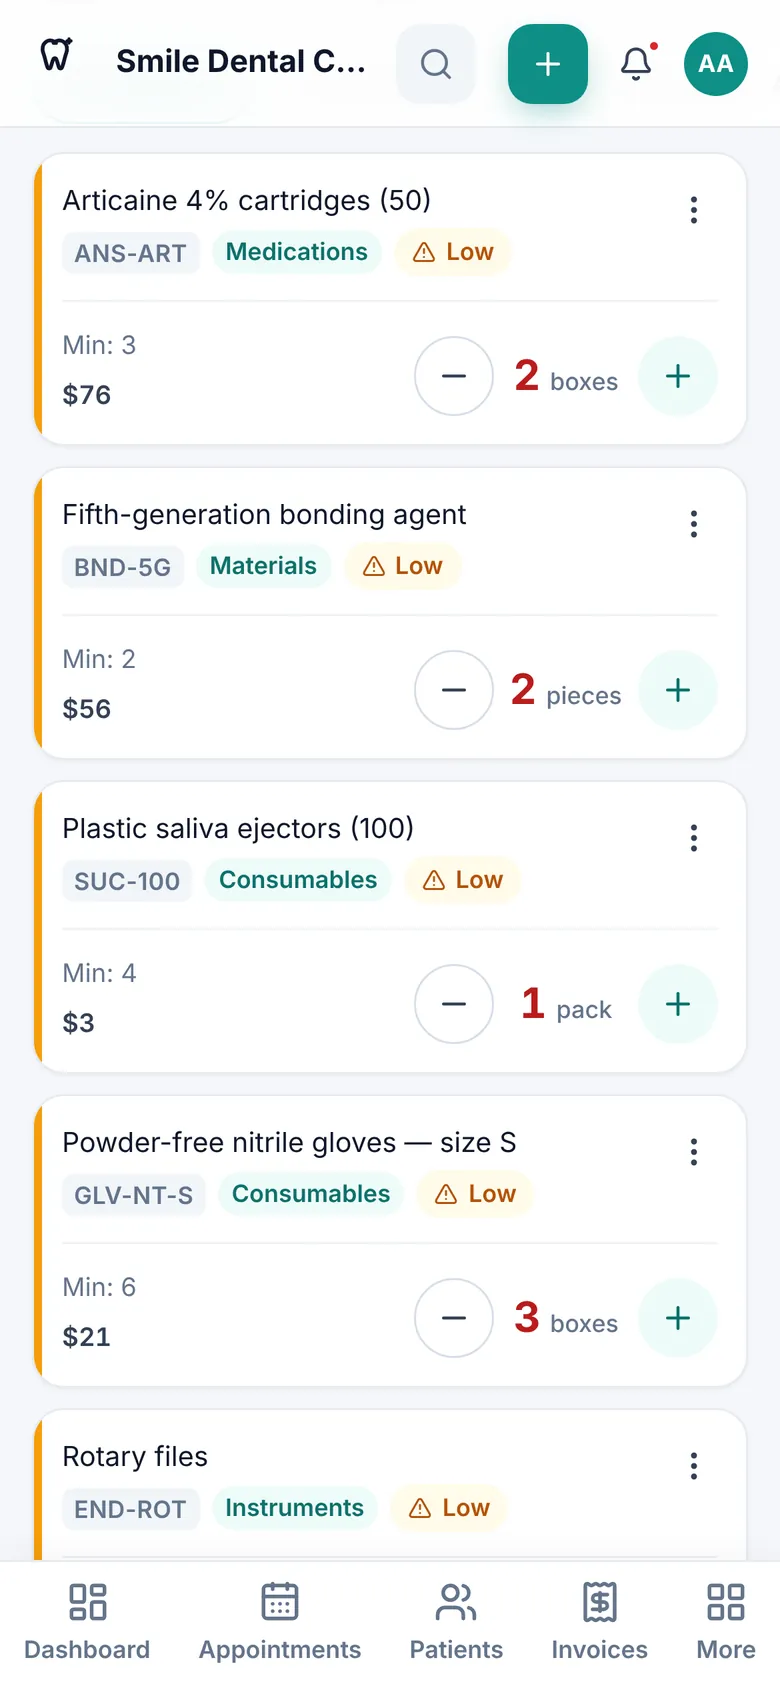
Inventory on a phone: each item is a card with its low badge, threshold and value, and the quantity between two large take and add buttonsEnlarge the picture
The Stock movement sheet open from the bottom of a phone screen, with the same fieldsEnlarge the picture

Good to know

Android’s Back button first closes the open movement box or menu, then goes back a page.

Previous topicDental labNext topicExpenses

Need help?

If you did not find your answer here, message us on WhatsApp and we will help.

WhatsApp+963 996 489 504

On this page

  1. The Inventory page
  2. Adding a new item
  3. Quick stock in and out
  4. Recording a purchase and restocking
  5. Movement history
  6. Alerts, search and filters
  7. Editing, deactivating, deleting and exporting
  8. Inventory on the phone

Back to top

All topics

  1. Getting started
  2. Finding your way around
  3. The dashboard
  4. Patients
  5. Dental chart
  6. Appointments
  7. Treatments and treatment plans
  8. Invoices and payments
  9. Prescriptions
  10. Dental lab
  11. Inventory
  12. Expenses
  13. Reports
  14. Settings
  15. Staff and permissions
  16. Backup and moving your clinic
  17. Licence and activation
  18. Questions and answers

© 2026 Dentora. All rights reserved.

HomeUser guideVideosActivate a licencePrivacy policyTerms of use