Skip to content
Dentora
العربية
  1. Home
  2. User guide
  3. Staff and permissions

Staff and permissions

Add your doctors, assistants and receptionists, each with their own PIN and a role that decides what they see. See how the screen locks itself, and what to do when someone forgets their PIN.

Watch this topic on video
On this page
  1. The Staff page
  2. Roles and permissions
  3. Adding a team member
  4. Editing, deactivating and deleting
  5. Signing in, locking and signing out
  6. Forgot your PIN?

The Staff page

Open Staff from the sidebar, in the Management section. Each member has a card with their avatar in their colour, name and title, role, specialty, phone and email, and their Last sign-in or Has not signed in yet. Your own card carries a You badge.

At the bottom of each card a switch deactivates or activates the account in one click, and the ⋮ button at the top holds the other options. Above the cards a filter shows All, Active or Deactivated members.

Under the cards are two panels: Permissions by role shows what each role can do, and the Sign-in log lists the last 30 sign-ins to the app, grouped by day.
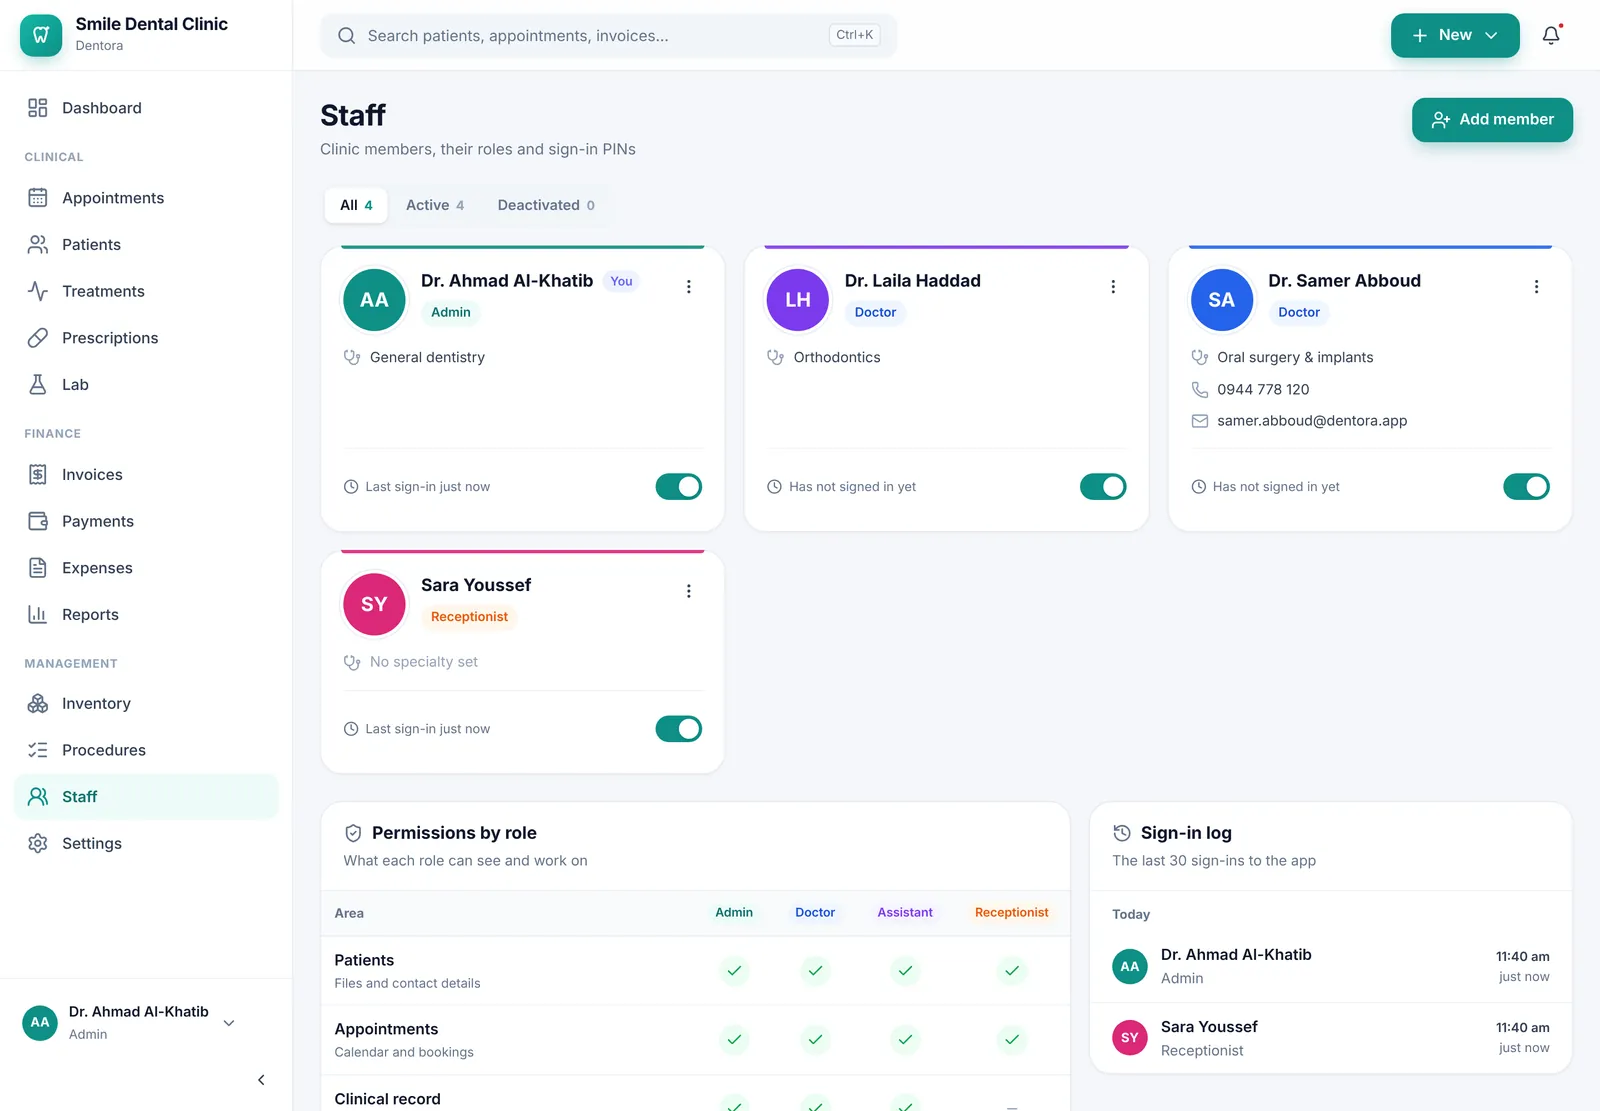
The Staff page: a card per member with their role, last sign-in and active switch, then the permissions-by-role table and the sign-in logEnlarge the picture

Good to know

  • The Staff page is for the clinic admin only: it is left out of the other roles’ menu, and anyone else who opens its address sees “This page is not available for your role”.
  • On a phone the phone number on the card is a link: tap it to call the member.

Roles and permissions

Every member has one of four roles, and the role decides which pages they see:

  • Admin: the clinic owner or manager. Every permission, including expenses, the procedure list and its prices, deleting patient files, settings, backups, the team and sign-in PINs.
  • Doctor: treats patients, writes prescriptions, issues invoices and sees reports; no settings or team management.
  • Assistant: patients, appointments, the clinical record (dental chart, treatments, prescriptions and lab) and inventory; no billing or finances.
  • Receptionist: registers patients, books appointments, issues invoices, takes payments and manages inventory; no clinical record.
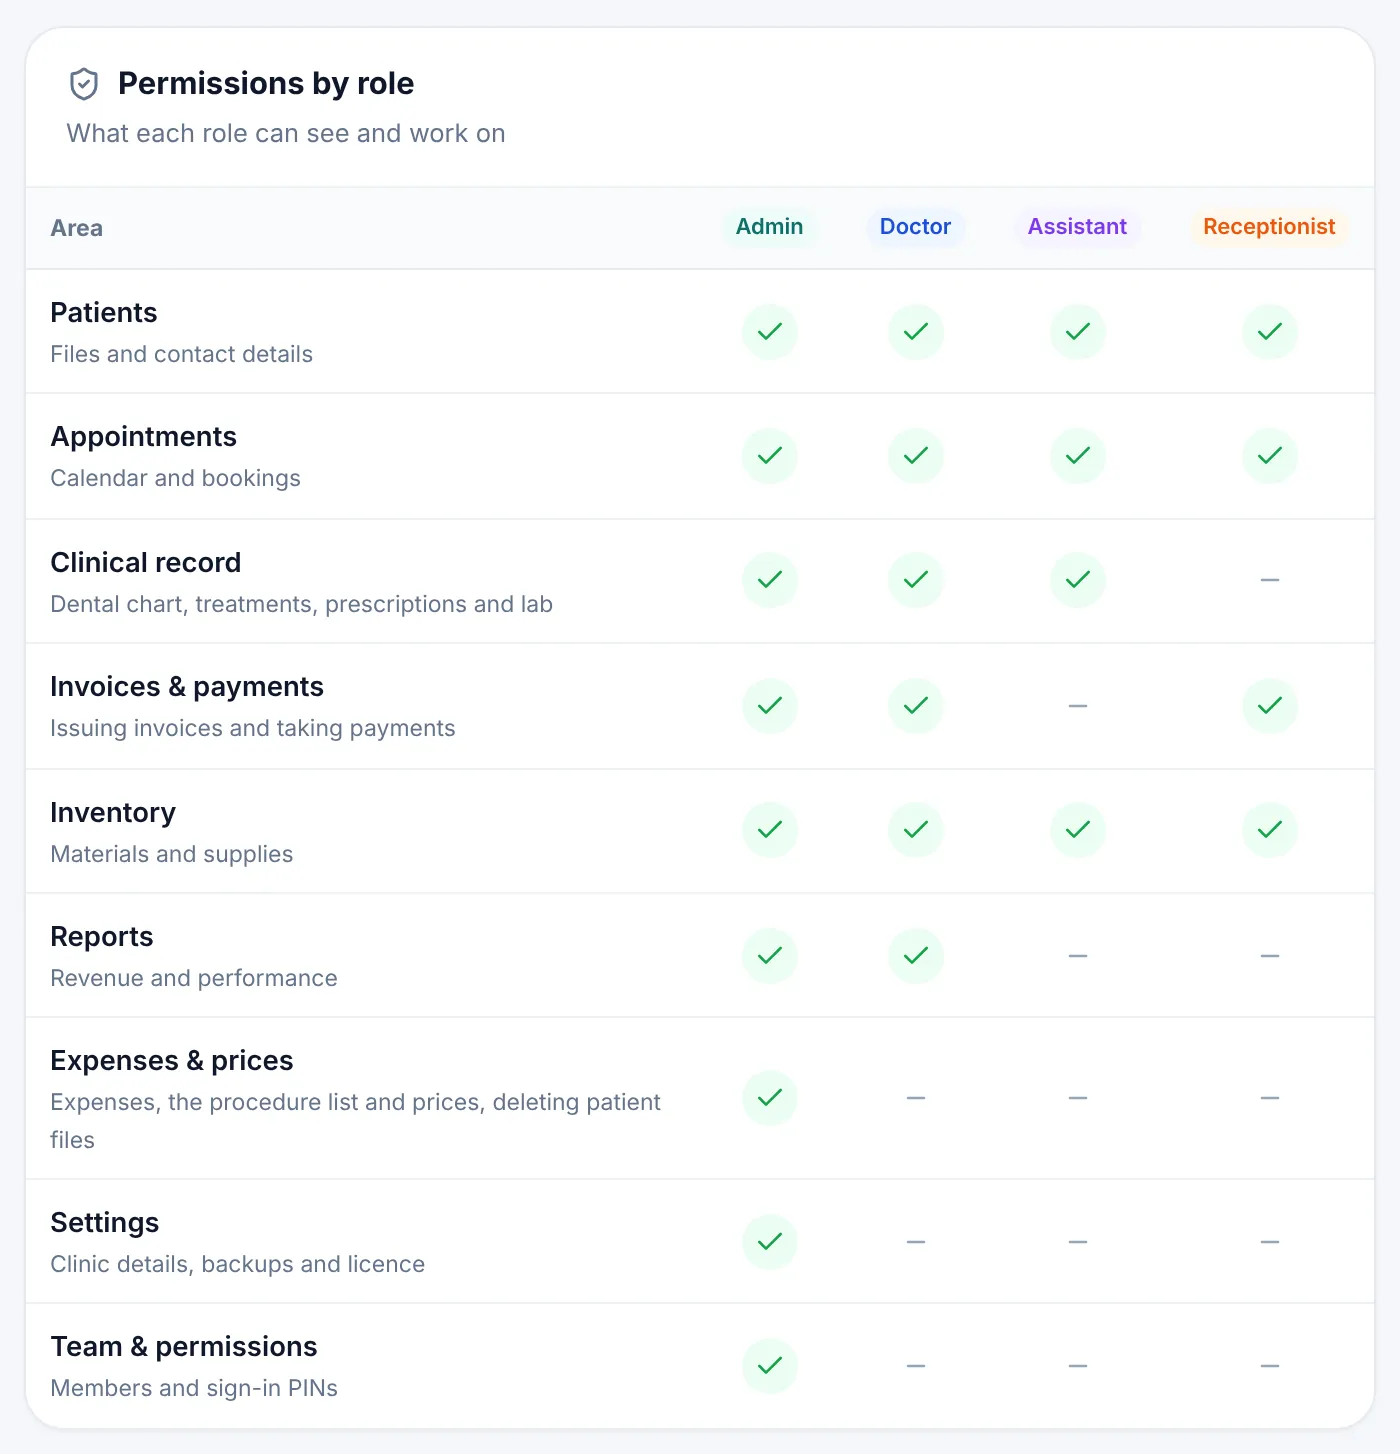
The permissions-by-role table: nine areas in the rows, the four roles in the columns, and a tick for everything the role allowsEnlarge the picture

Good to know

  • A page the role has no permission for disappears from that member’s menu. Anyone who opens its address sees “This page is not available for your role”.
  • Inventory is open to all four roles, Reports to the admin and the doctors, and Expenses to the admin only.
  • Everyone sees Settings, but changing the clinic’s settings and the backup page are for the admin. See Settings.
  • The roles are fixed as in the table; permissions are not set member by member. To give someone more access, change their role.

Adding a team member

  1. Click Add member at the top of the page.
  2. Type the Full name and choose the Title: Dentora sets Dr. for a doctor and No title for the other roles, and you can change it.
  3. Add the Specialty, Phone and Email if you like.
  4. Choose the Role. A box under it describes the role and lists, under Can work on, the areas it opens.
  5. Pick a colour for the member: it marks their appointments in the calendar and their avatar in the app.
  6. Type a Sign-in PIN of 4 to 6 digits, then Repeat the PIN, and click Add member. Then tell the member their PIN.
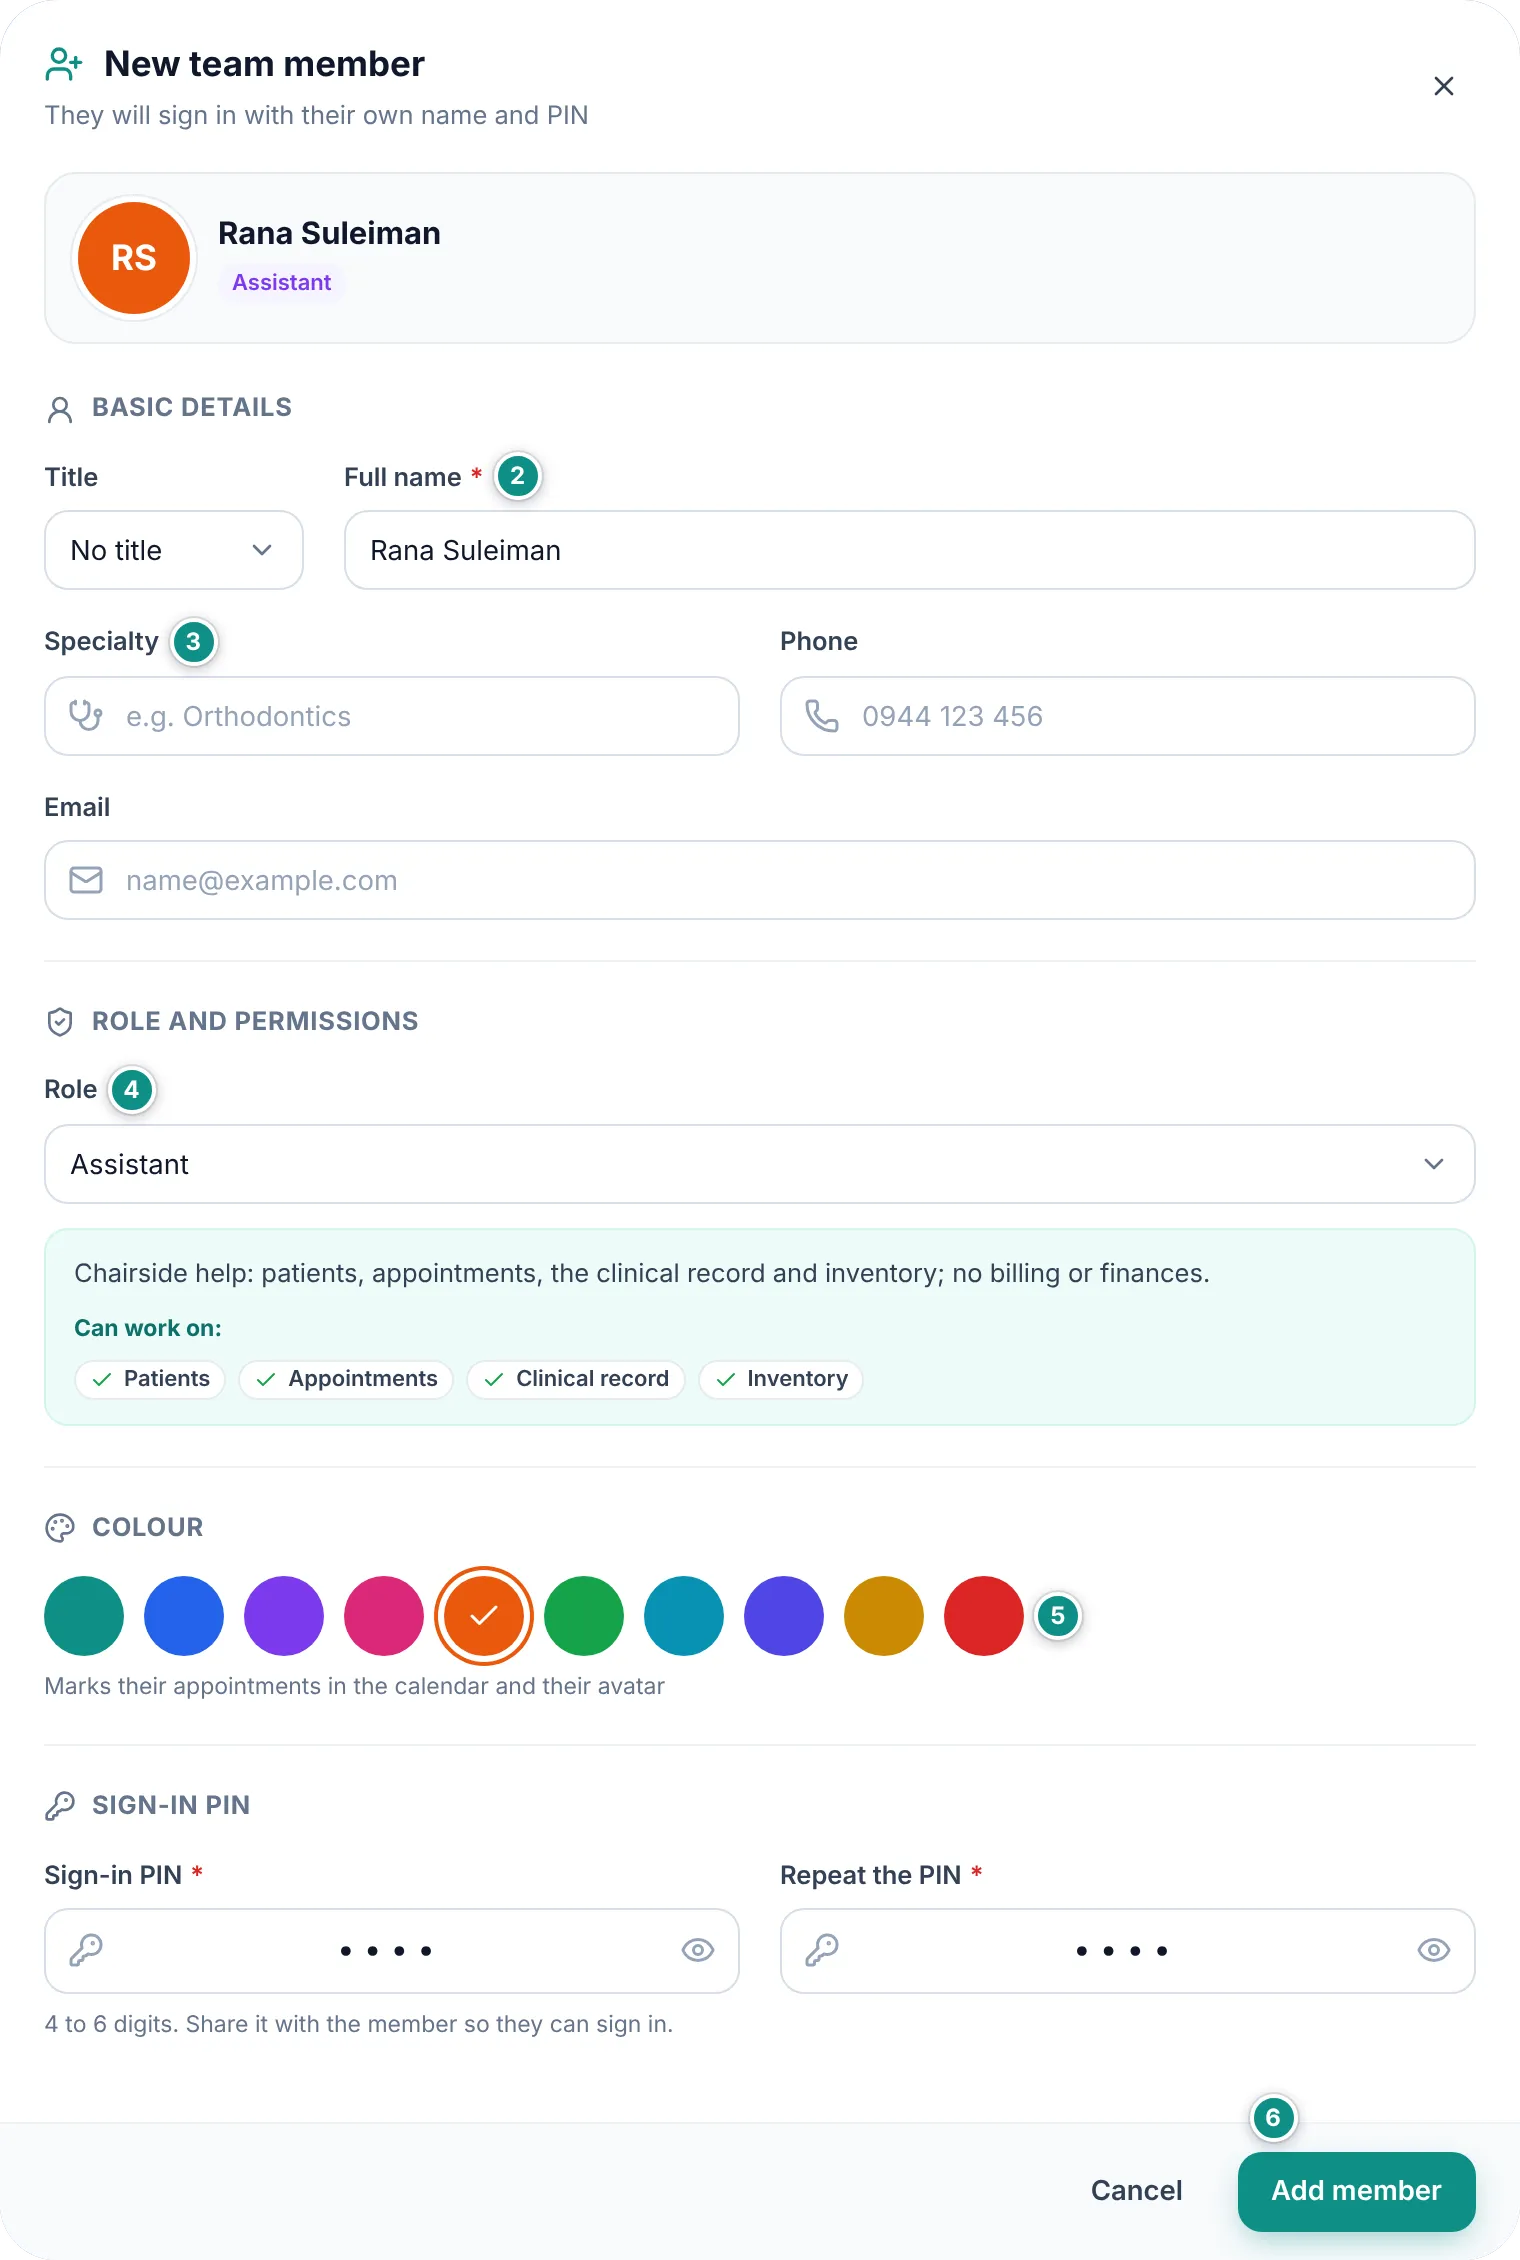
The New team member dialog filled in for an assistant: name and title, the role with its description and what it can work on, the colours, and the PIN twiceEnlarge the picture

Good to know

  • Two members cannot have the same name (“Another member already has this name”).
  • Dentora gives a new member a colour no active member uses yet.
  • The new member shows on the sign-in screen at once, and a doctor shows in the doctor lists of appointments and reports.

Editing, deactivating and deleting

The ⋮ menu on a member’s card holds Edit to change their details, role or colour, Set a new PIN, Deactivate account (or Activate account for a deactivated one) and Delete member.

When someone leaves the clinic, deactivate their account: they can no longer sign in, and their name stays on their appointments, treatments and invoices. You find them under Deactivated and can bring them back at any time.

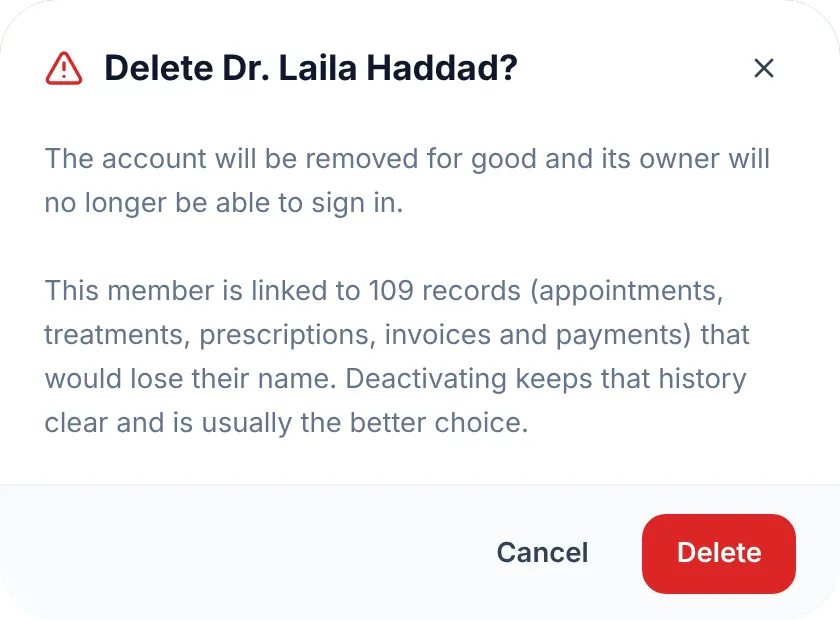
Deleting is permanent. If the member has records (appointments, treatments, prescriptions, invoices or payments), the delete dialog tells you how many would lose their name and recommends deactivating instead.
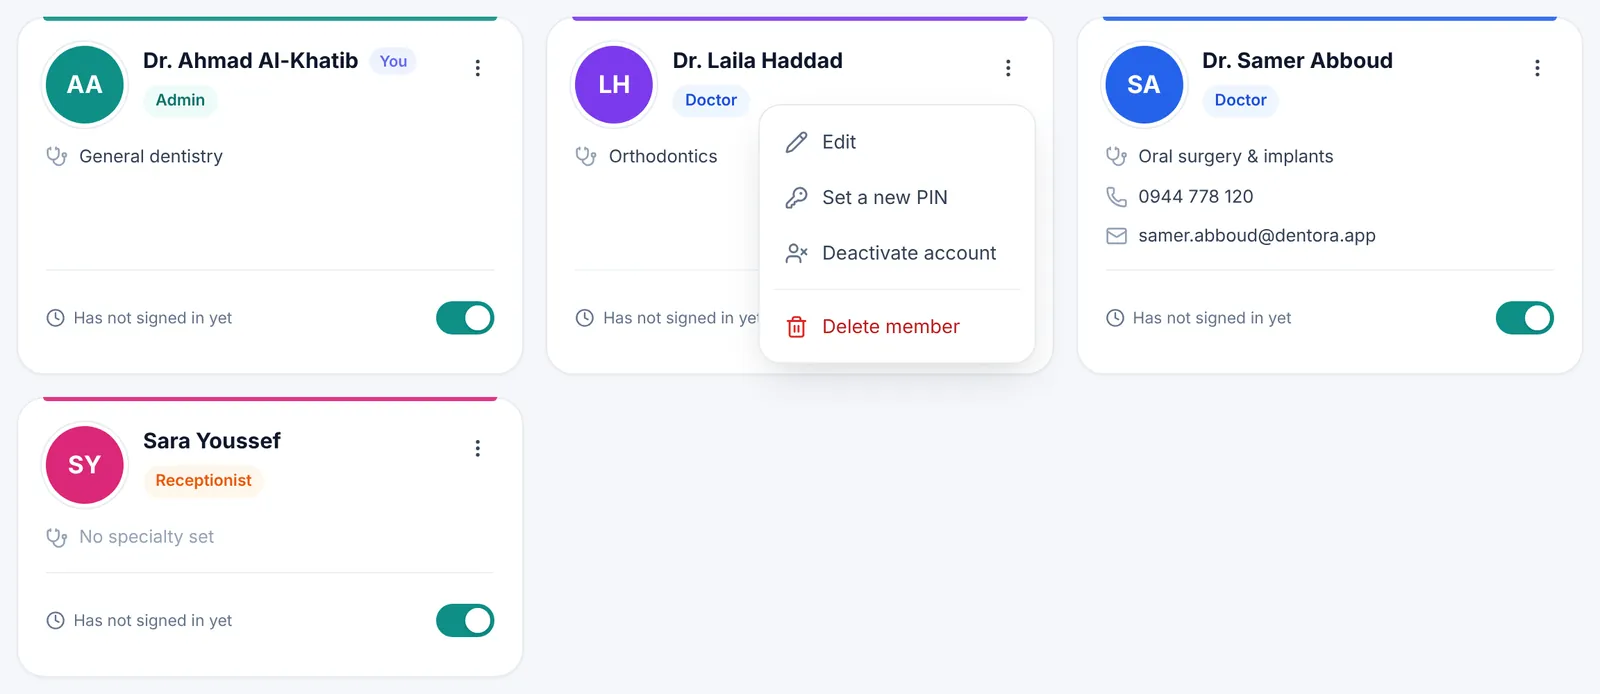
A member’s options menu open on their card: Edit, Set a new PIN, Deactivate account, Delete memberEnlarge the picture
The delete confirmation for a member, giving the number of linked records and recommending deactivation insteadEnlarge the picture

Good to know

  • You cannot deactivate or delete the account you are using.
  • At least one active admin must remain: the last admin cannot change role, be deactivated or be deleted. Add another admin first.
  • The Edit window has a Set a new PIN switch (leave it off to keep the current PIN) and an Account active switch.

Signing in, locking and signing out

Each member signs in with their own name and PIN, sees what their role allows, and their name is kept with what they record, such as payments, expenses and stock movements. Signing in step by step is in Signing in every day.

When you step away from the device, lock the screen so nobody can see patient files.

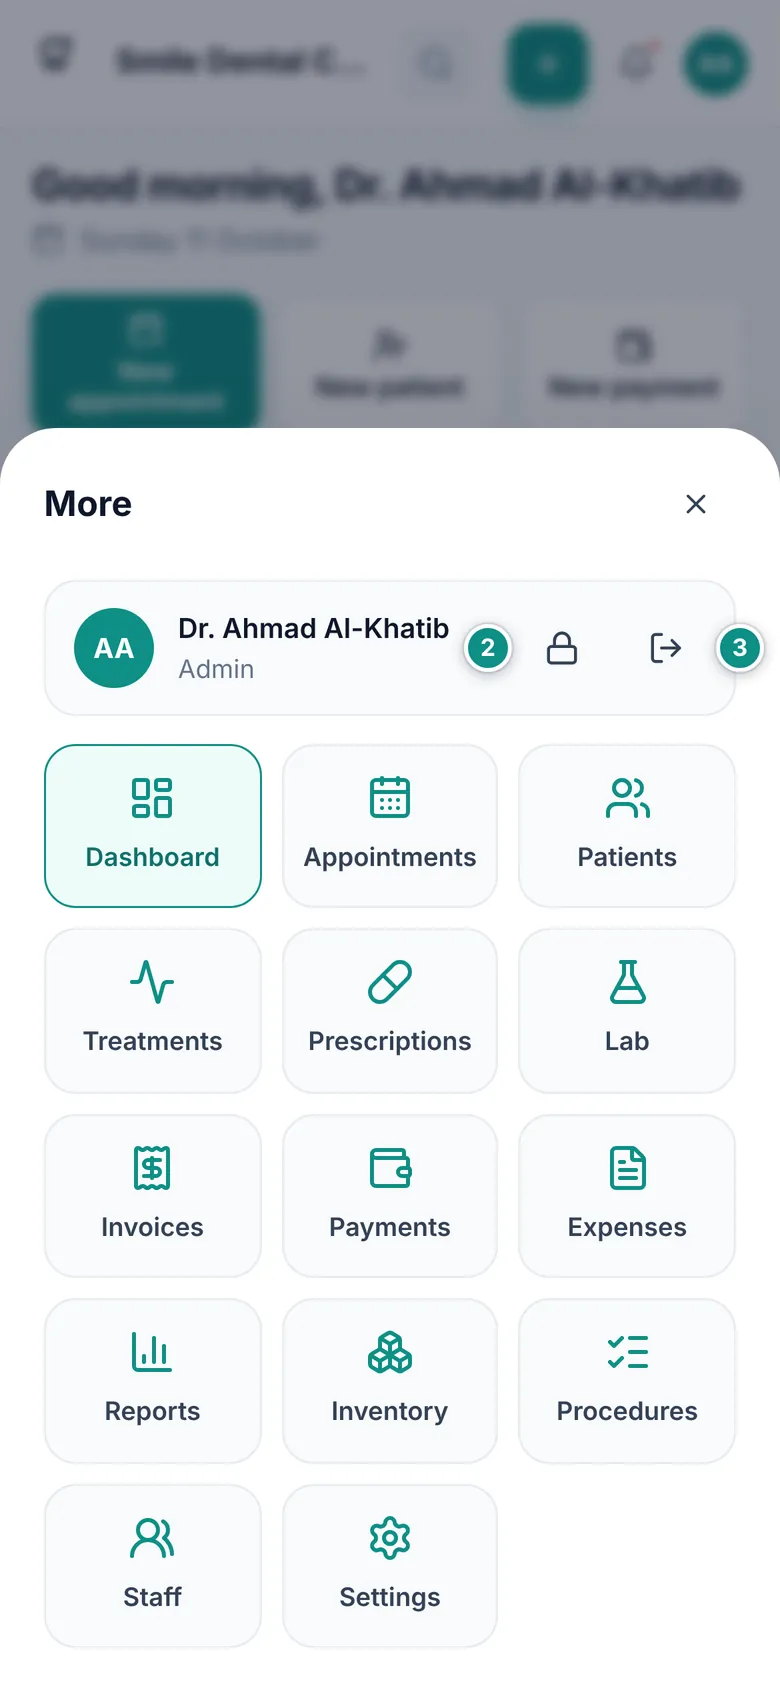
  1. Click your name at the bottom of the sidebar. On a phone tap the circle with your initials at the top of the screen, or open More, where the lock and sign-out buttons sit next to your name.
  2. Choose Lock screen when you step away for a while: the sign-in screen appears, and you come back with your PIN.
  3. Choose Sign out at the end of your shift. Dentora goes back to the sign-in screen, and the next person clicks Switch user and picks their name.
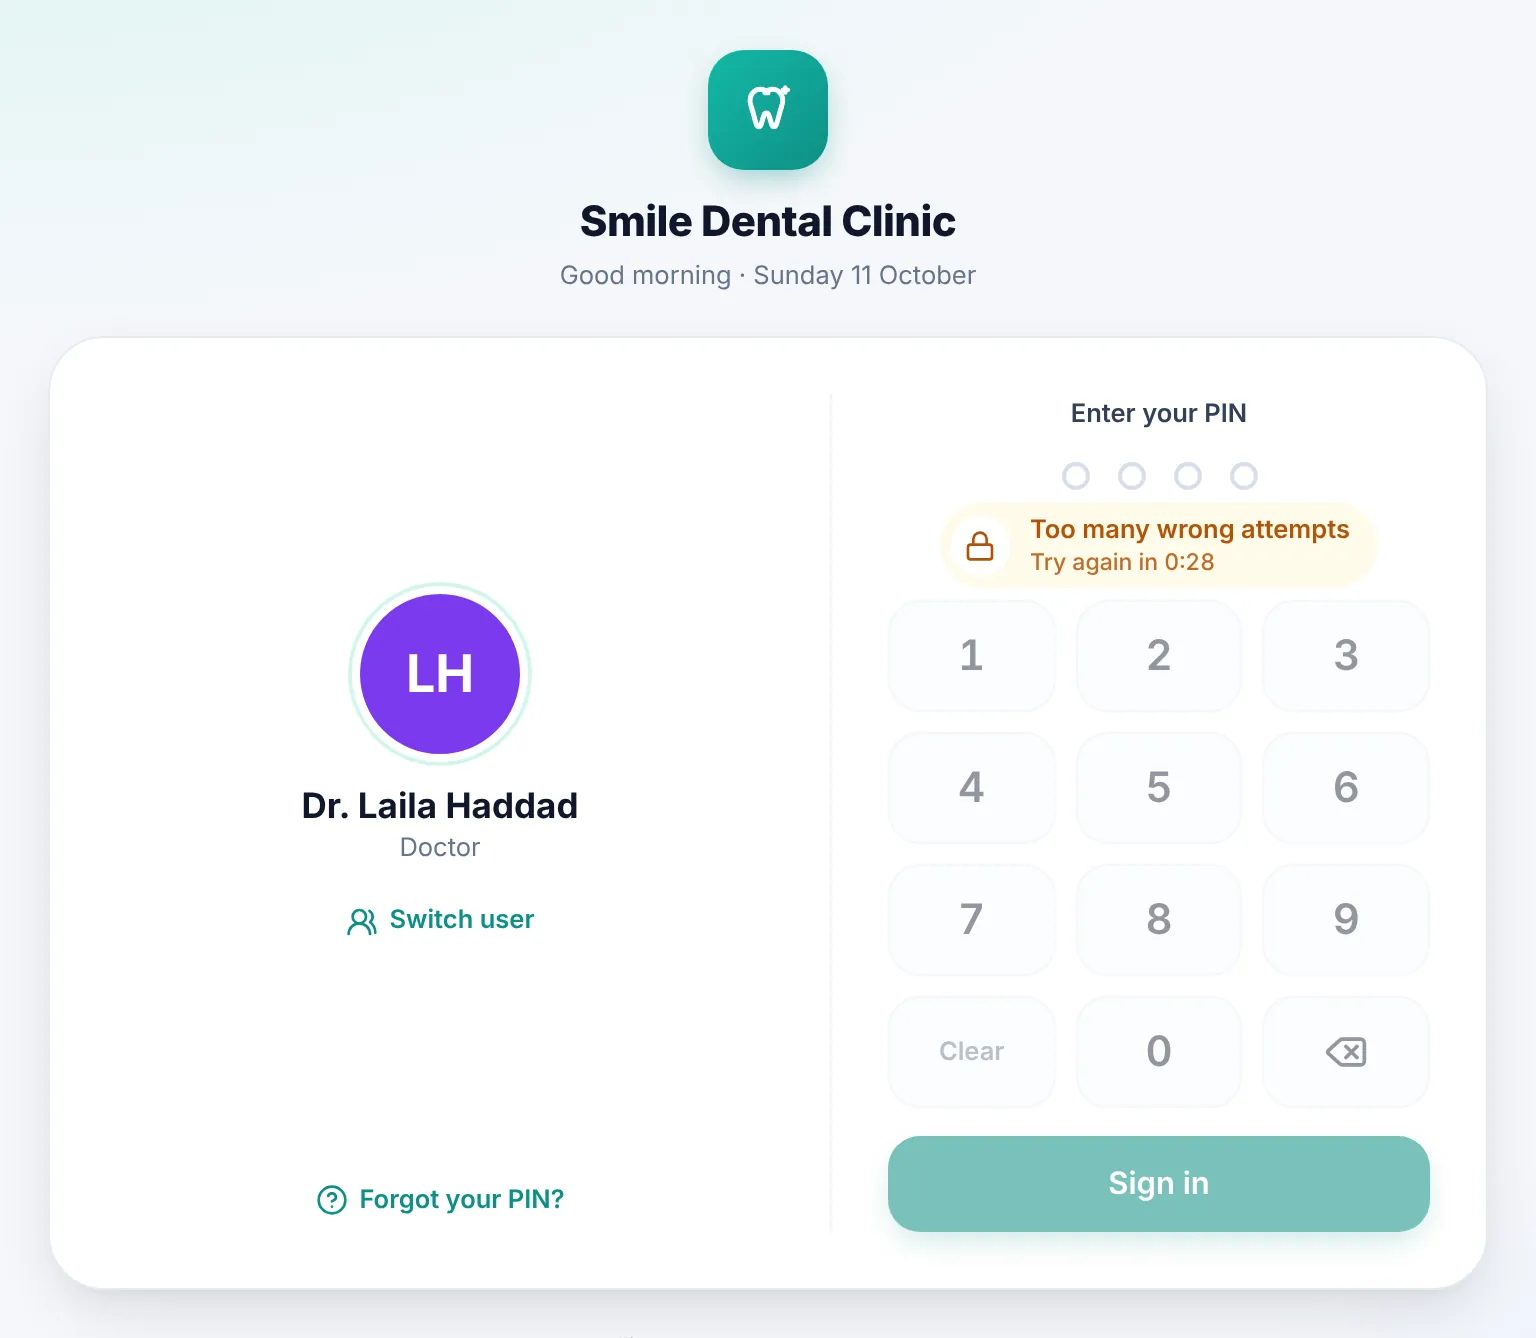
The sign-in screen after five wrong PINs: the keypad paused with a “Too many wrong attempts” message and a countdownEnlarge the picture
The More sheet on a phone: the user’s name and role with the Lock screen and Sign out buttons next to it, then the app’s other pagesEnlarge the picture

Good to know

  • Dentora locks itself after a period without use, 15 minutes to start with, and time the device spends asleep counts. The admin changes the delay for this device in Auto-lock.
  • Dentora asks for a PIN every time it is started, on Windows and on Android. Coming back to it from another app does not, unless the auto-lock delay has passed.
  • Five wrong PINs in a row pause that account’s keypad for 30 seconds, then 1 minute, 5 minutes, 15, 30 and an hour, until the right PIN is typed. The pause holds even if the app is closed, and the count is forgotten after a day without mistakes.
  • Before the pause Dentora warns you: “2 attempts left before a short lock”.
  • Lock screen, Sign out and the auto-lock all close whatever is open and return to the sign-in screen, so save what you are typing before you step away. After signing in again you come back to the page you were on.

Forgot your PIN?

If a team member forgets their PIN, the admin can fix it: from the ⋮ menu on their card choose Set a new PIN, type the new PIN twice and click Save new PIN. The member uses the new PIN from their next sign-in, and any pause from wrong attempts is lifted.

If the admin forgets their PIN and the clinic has another admin, that admin sets a new one the same way. If they are the only admin, follow these steps:

  1. On the sign-in screen choose your name, then click Forgot your PIN?.
  2. Copy the Device number with the copy button next to it, and send it to whoever supplied Dentora.
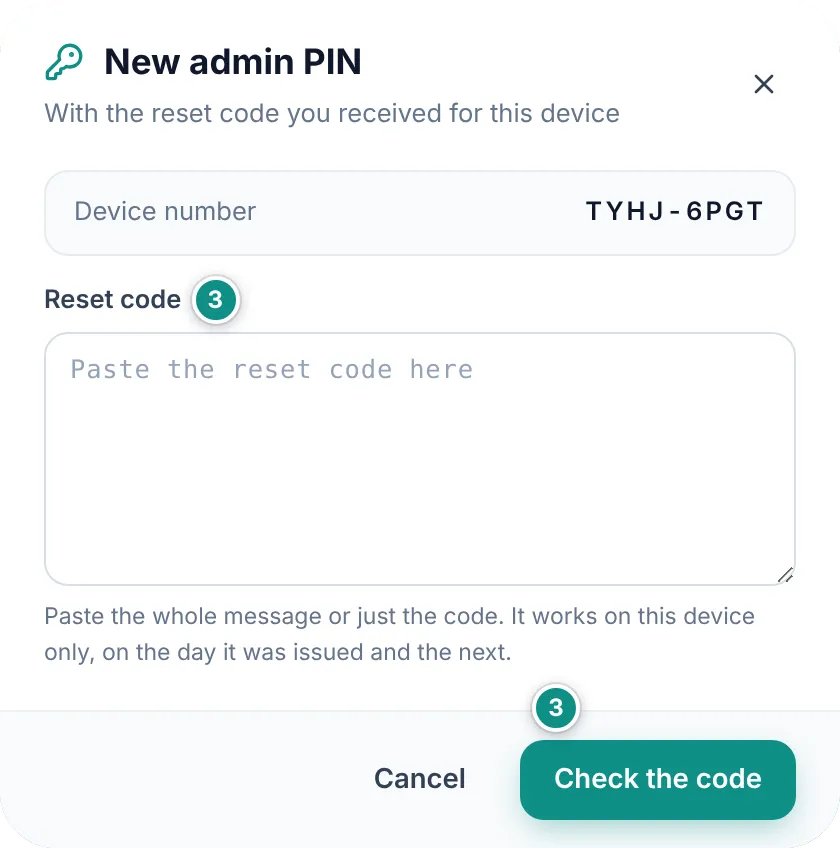
  3. When the reset code arrives, click I have a reset code, paste the whole message or just the code, then click Check the code.
  4. Type the New PIN and Repeat the new PIN, then click Save and sign in.
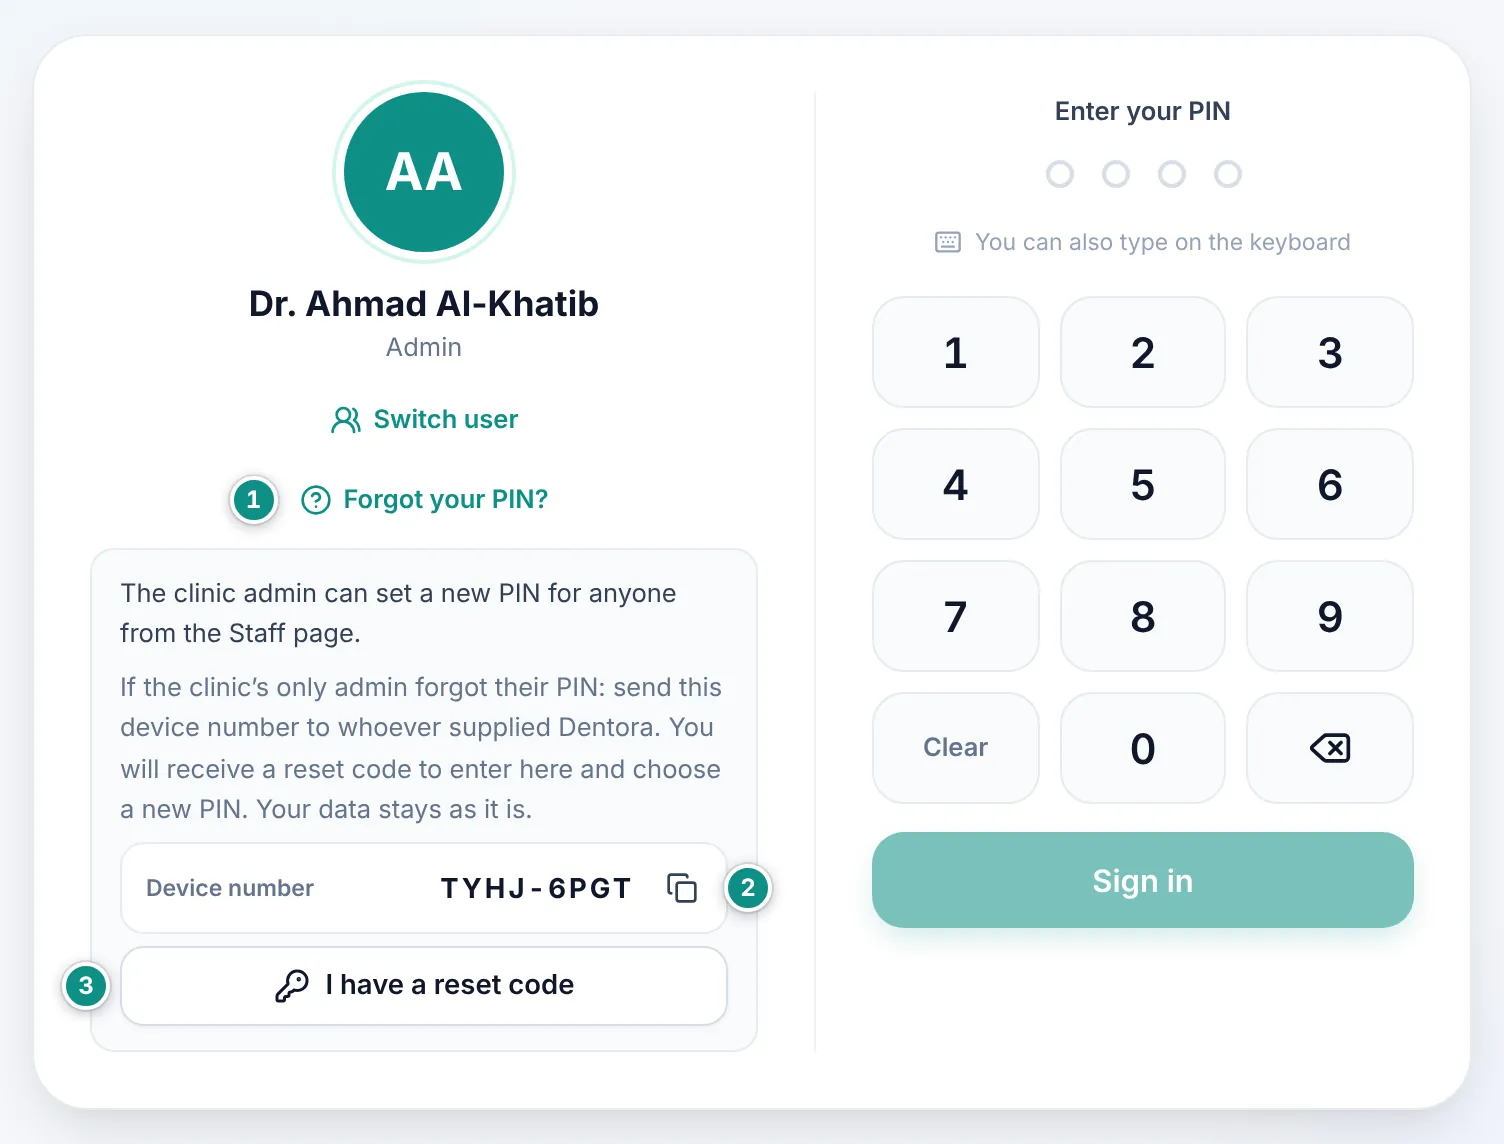
The sign-in screen with the Forgot your PIN? help open under the keypad: the device number with its copy button, and the I have a reset code buttonEnlarge the picture
The New admin PIN dialog: the device number, a box to paste the reset code, and the Check the code buttonEnlarge the picture

Good to know

  • The reset code works on this device only, on the day it was issued and the next, and only once. Your data stays as it is.
  • A licence activation code does not work here: it goes in Licence after signing in.
  • If every account has been deactivated, the sign-in screen says “No active account”, and the same reset code brings the admin account back.
  • In read-only mode, after the trial ends without activation, the Staff page cannot change anything, including Set a new PIN: activate the licence first. The admin’s reset code still works. See Licence.
Previous topicSettingsNext topicBackup and moving your clinic

Need help?

If you did not find your answer here, message us on WhatsApp and we will help.

WhatsApp+963 996 489 504

On this page

  1. The Staff page
  2. Roles and permissions
  3. Adding a team member
  4. Editing, deactivating and deleting
  5. Signing in, locking and signing out
  6. Forgot your PIN?

Back to top

All topics

  1. Getting started
  2. Finding your way around
  3. The dashboard
  4. Patients
  5. Dental chart
  6. Appointments
  7. Treatments and treatment plans
  8. Invoices and payments
  9. Prescriptions
  10. Dental lab
  11. Inventory
  12. Expenses
  13. Reports
  14. Settings
  15. Staff and permissions
  16. Backup and moving your clinic
  17. Licence and activation
  18. Questions and answers

© 2026 Dentora. All rights reserved.

HomeUser guideVideosActivate a licencePrivacy policyTerms of use