Skip to content
Dentora
العربية
  1. Home
  2. User guide
  3. Dental lab

Dental lab

Record every case you send to the lab, follow it from sending to fitting, spot late work before the patient’s visit, and let its cost reach your expenses by itself.

Watch this topic on video
On this page
  1. The lab board
  2. Recording a lab order
  3. Following an order to fitting
  4. Printing the lab slip
  5. Lab orders in the patient file

The lab board

Open Lab in the sidebar. Here is every case you send to dental labs, such as crowns, bridges, veneers and dentures, from sending to fitting.

Four cards sit at the top: Open orders, with how many are at the lab and how many wait to be fitted, Due this week, Overdue and Lab costs this month.

Below them you filter the orders by status, doctor or lab, or search by patient, lab or tooth number. Late orders come first, then the soonest due.
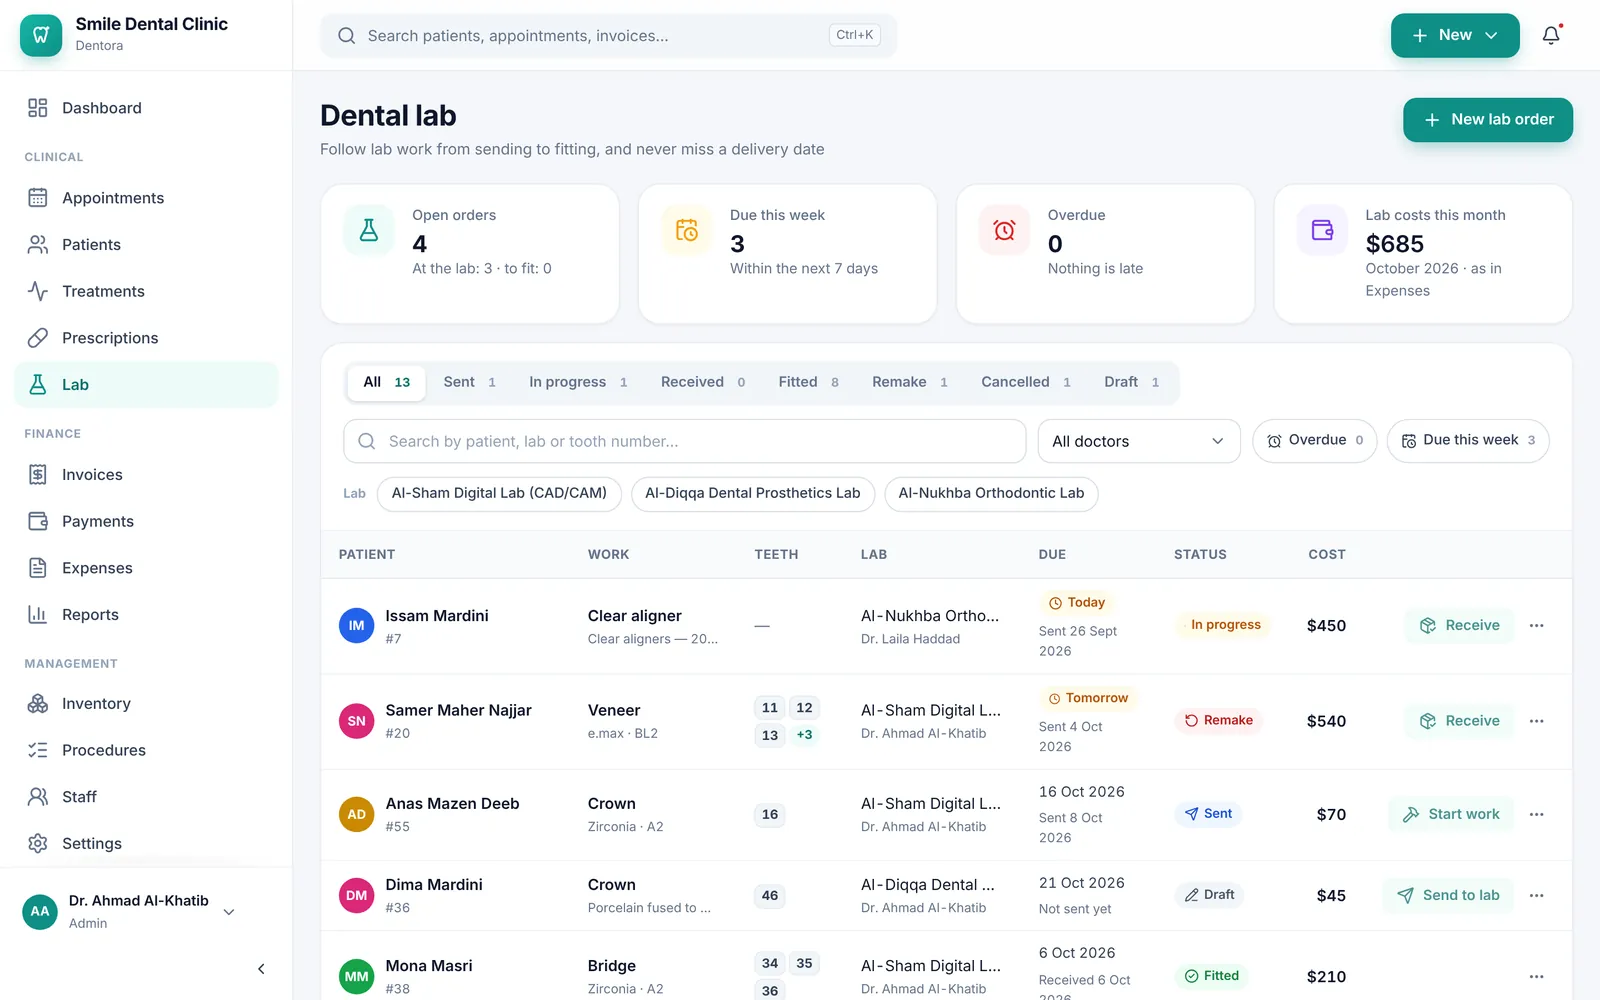
The lab board: the four cards, the status, doctor and lab filters, and the orders with their next-step buttonsEnlarge the picture
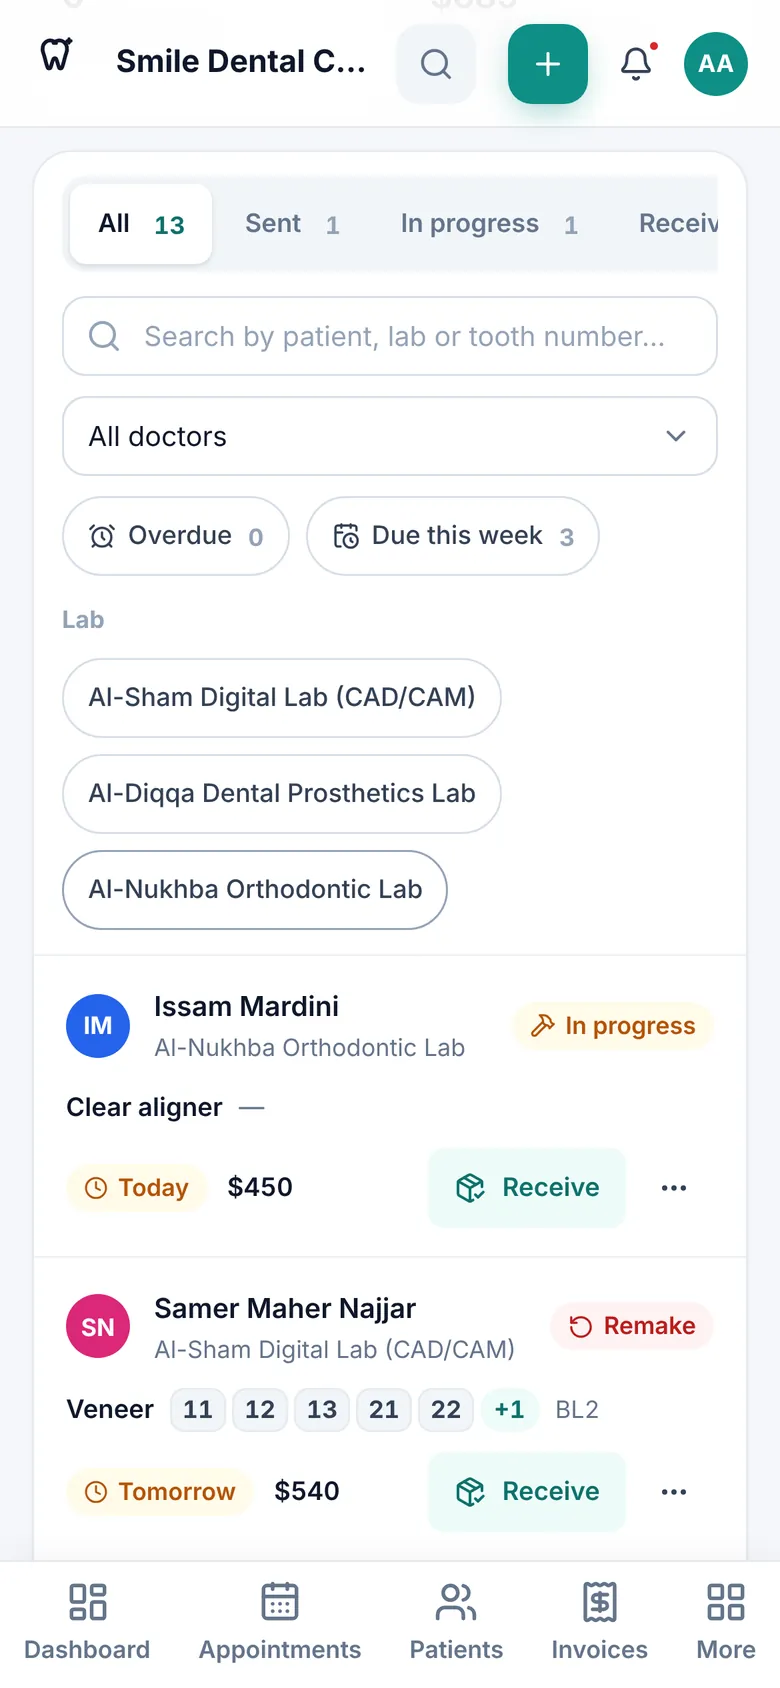
Lab orders on a phone as cards, each with its status, due date and next-step buttonEnlarge the picture

Good to know

  • Click the Overdue or Due this week card to show only those orders, and click it again to clear the filter.
  • A due date turns red when the order is late, and orange when it falls within two days, with “Today” or “Tomorrow”.
  • Orders that are Sent or In progress and are late or due today also show in Notifications and on the Dashboard. Remake orders and drafts do not show there: follow them with the Overdue card on this page.
  • The lab is open to the admin, doctors and assistants; reception does not see it (see Roles and permissions). On a phone the orders show as cards, and Lab is under More in the bottom bar.
  • In read-only mode you can still view the orders and print lab slips, but you cannot add an order or change its status. See Licence.

Recording a lab order

Record the order on the day the impression or case goes to the lab, to follow its status, due date and cost.

  1. Click New lab order on the Lab page, or in the Lab tab of the patient’s file.
  2. Choose the Patient and Doctor, and type the Lab name or pick one of the labs you used before.
  3. Under Work requested choose the Type of work, then the Shade from the VITA guide, and the Material, such as zirconia or e.max.
  4. Click the teeth included in the work, or Upper arch or Lower arch to take the whole arch. Leave the teeth empty for full dentures and night guards.
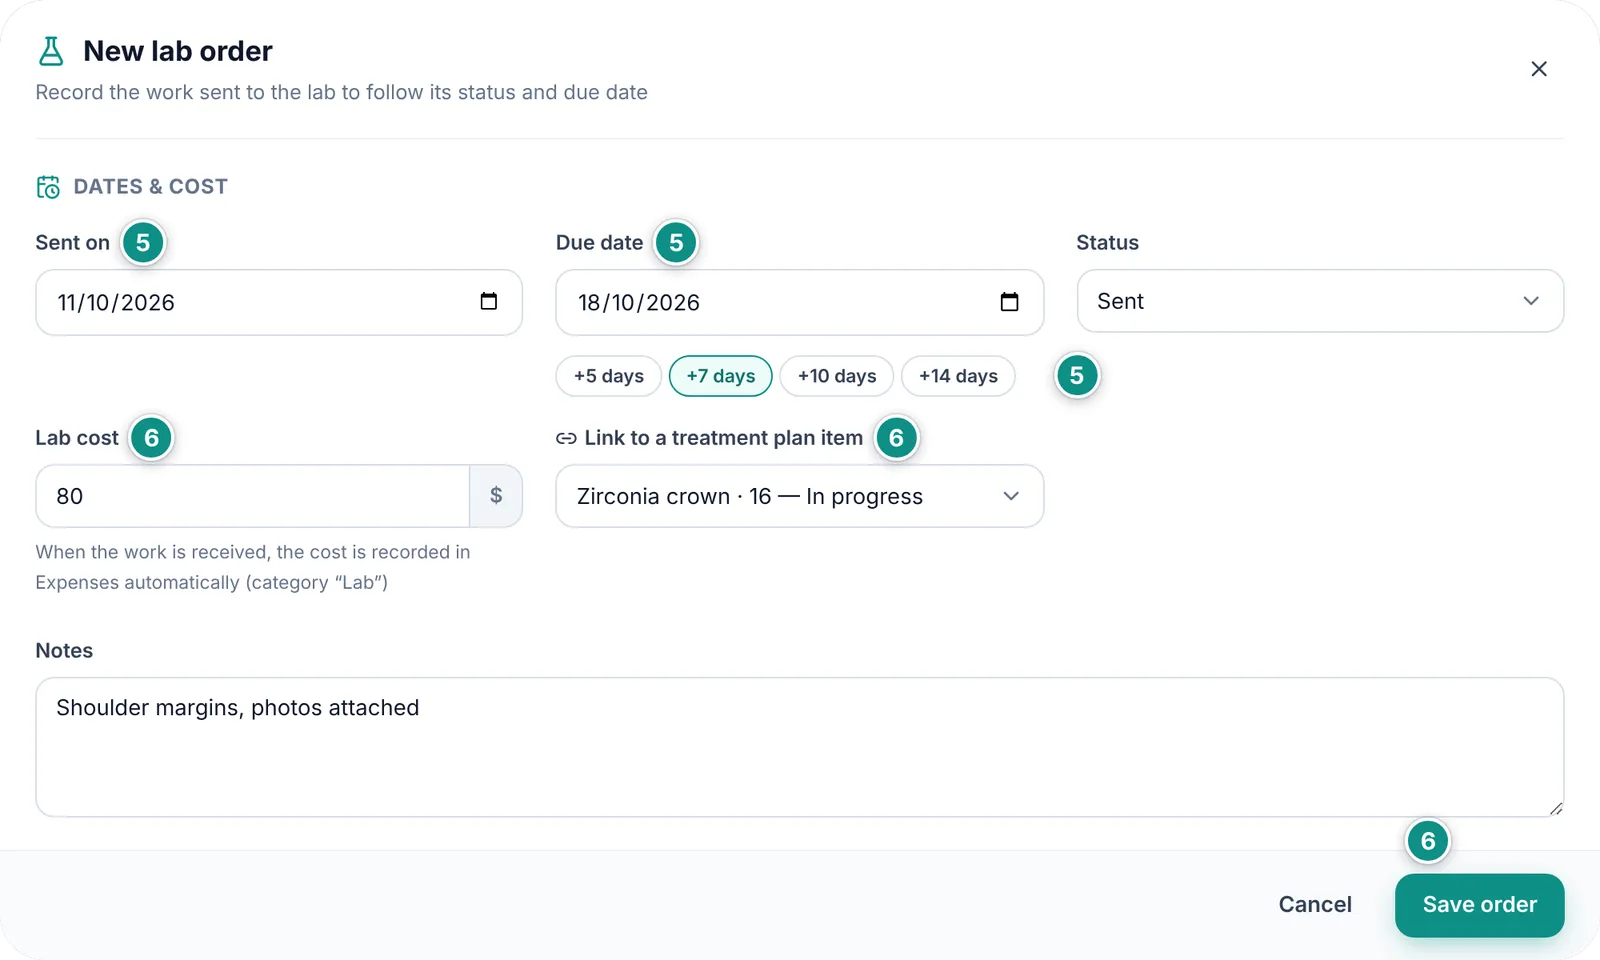
  5. Under Dates & cost, Sent on is today and the Due date is 7 days later. Change it, or click +5 days, +7 days, +10 days or +14 days.
  6. Type the Lab cost, link the order to a planned treatment in Link to a treatment plan item if you wish, add Notes for the lab, then click Save order.
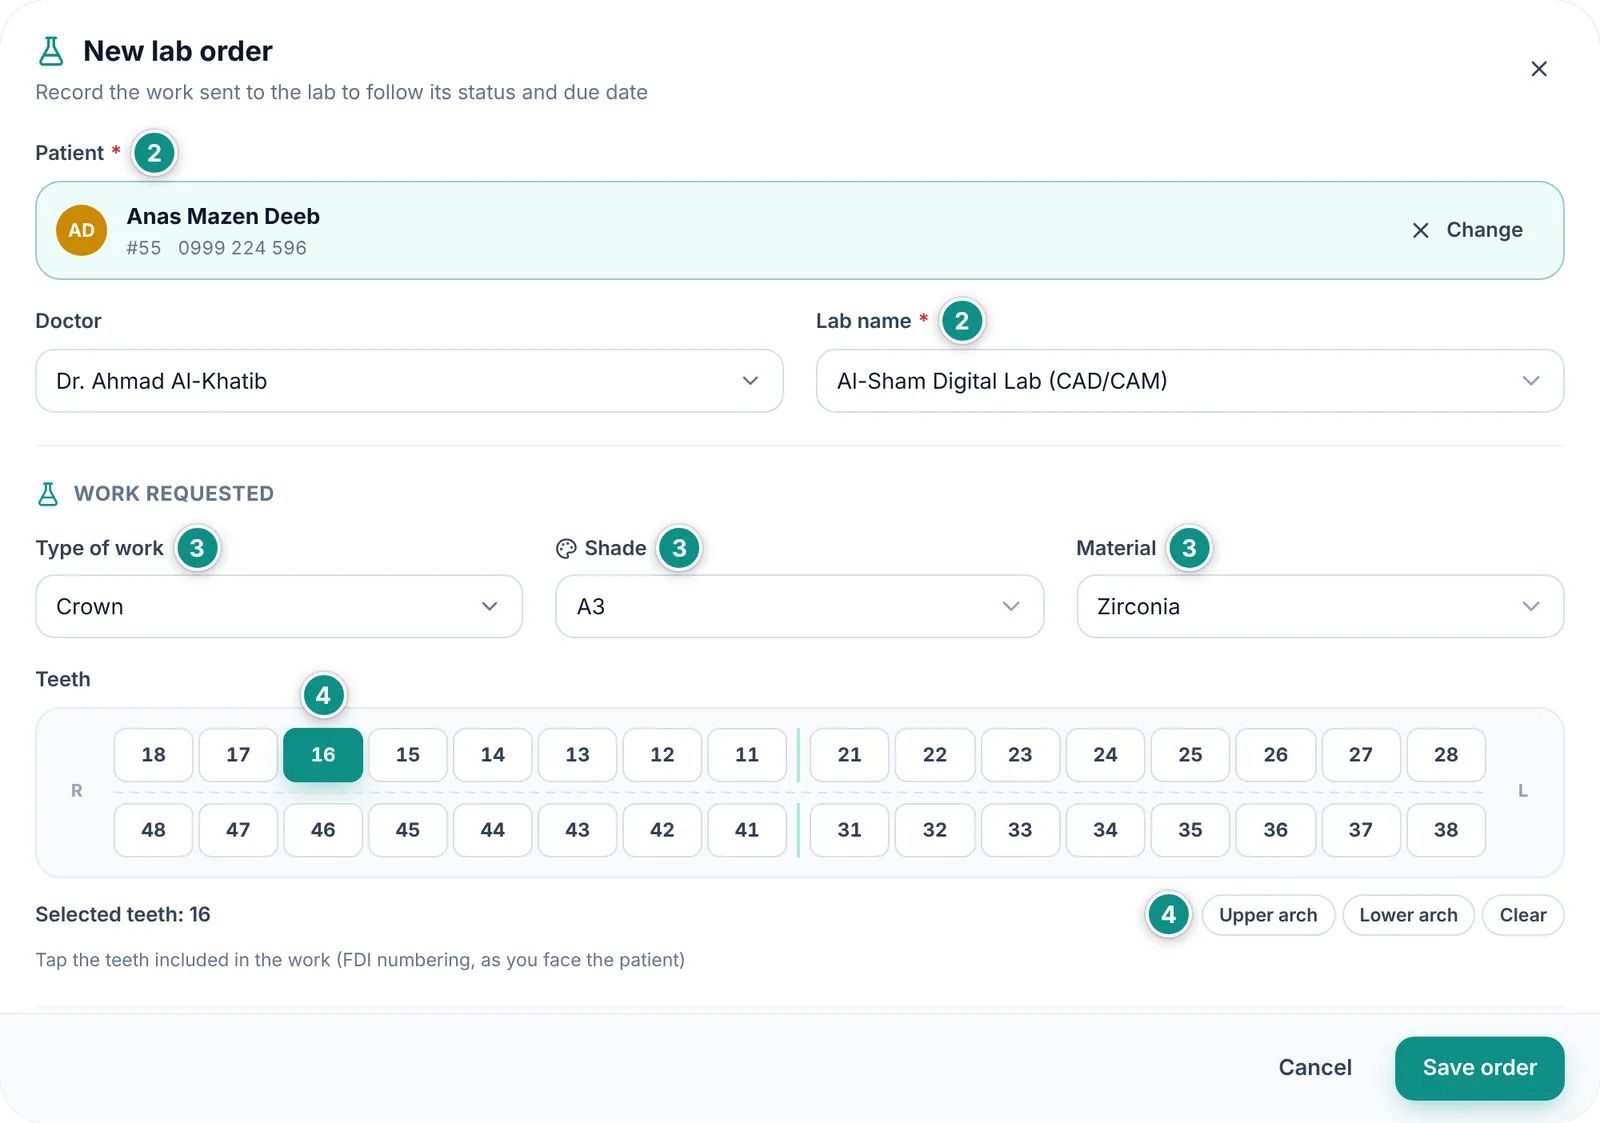
The New lab order window: patient, doctor and lab name, type of work, shade and material, and tooth 16 selectedEnlarge the picture
The Dates & cost part of a lab order: sent date, due date, quick day buttons, status, cost and the treatment linkEnlarge the picture

Good to know

  • A new order starts as Sent. If it has not gone yet, choose Draft in the Status field and clear Sent on and Due date; otherwise today stays as the sent date and the due date counts from it.
  • If you link the order to an item on a tooth and pick no teeth, the item’s tooth is selected for you.
  • Dentora does not accept a due date before the sent date.
  • Each order gets a running reference, such as LAB-000014, printed on the lab slip.
  • The cost does not reach your expenses until you receive the work. See Following an order to fitting.

Following an order to fitting

An order moves through Draft, Sent, In progress, Received and Fitted, and may become Remake or Cancelled. Each row has a button named after the next step.

  1. When a draft goes out, click Send to lab. If its sent date is empty, today is recorded, and an empty due date is set 7 days later. Dates already filled in stay, so correct them with Edit if needed.
  2. When the lab starts the work, click Start work.
  3. When the work arrives at the clinic, click Receive. The received date is recorded and, if the order has a cost, the cost goes to your expenses.
  4. Once it is fitted for the patient, click Mark fitted.
  5. If the work needs correcting, open the ⋯ menu and choose Send back (remake). If the due date has come, a new one is set 7 days ahead, and the Receive button comes back on the row.
  6. To stop an order, choose Cancel order in the same menu. It stays in the history as Cancelled.
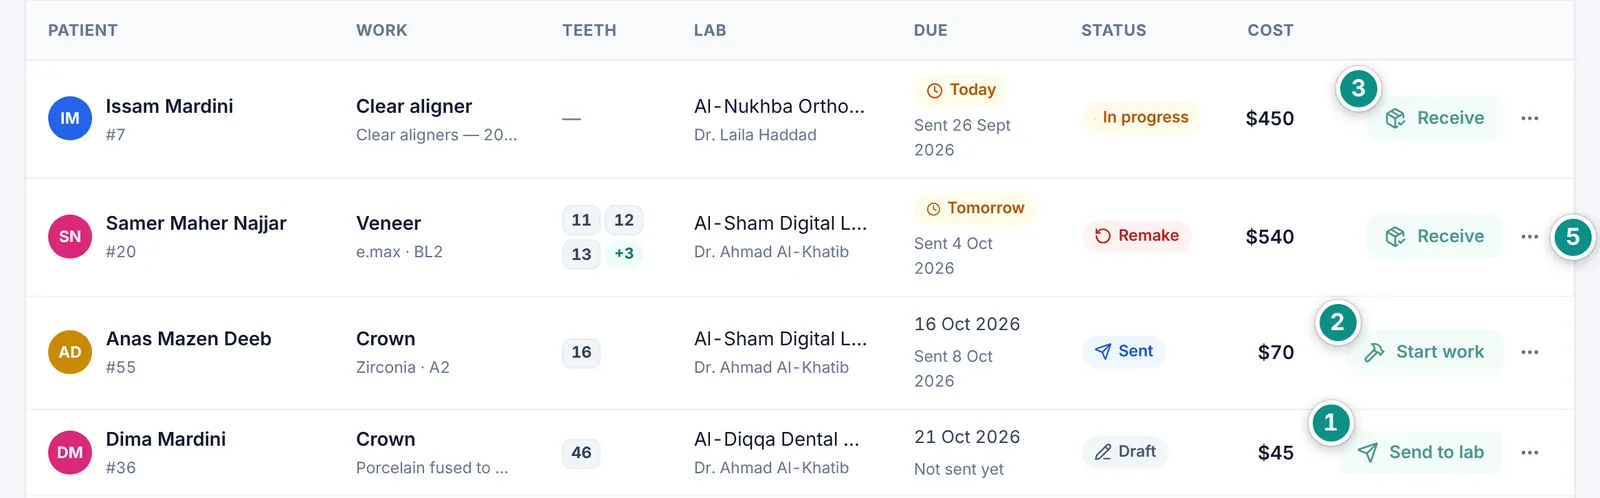
Lab rows with their next-step buttons: Receive for work in progress and for a remake, Start work for a sent order, Send to lab for a draftEnlarge the picture

Good to know

  • The same menu also has Print lab slip, Edit and Delete. You can also change the status directly in the Status field of the edit window.
  • On receipt, the Lab cost is recorded as an expense in the “Lab” category, dated the day received, with the lab’s name, the work, the patient and the order reference, so you never type a lab bill twice. See Expenses.
  • Change the cost or the lab name on the order, not on the Expenses page, and the expense follows. A remake adds no second expense; cancelling or deleting the order removes its expense, even when the work was already received: if you paid the lab, do not cancel the order, or enter the amount by hand in Expenses.
  • The Lab costs this month card adds up the month’s Lab expenses, including any you enter by hand. The admin can click it to open the Expenses page.

Printing the lab slip

Send a clear lab slip with the impression: what is needed, for which teeth, in which shade, and by when.

  1. On the order’s row open the ⋯ menu and choose Print lab slip.
  2. Check the sheet: the lab and the required date, the patient and doctor, the type of work, shade, material and sent date, a drawing of the chosen teeth, and your notes for the lab.
  3. Click Print, then sign the sheet where the doctor’s signature goes.
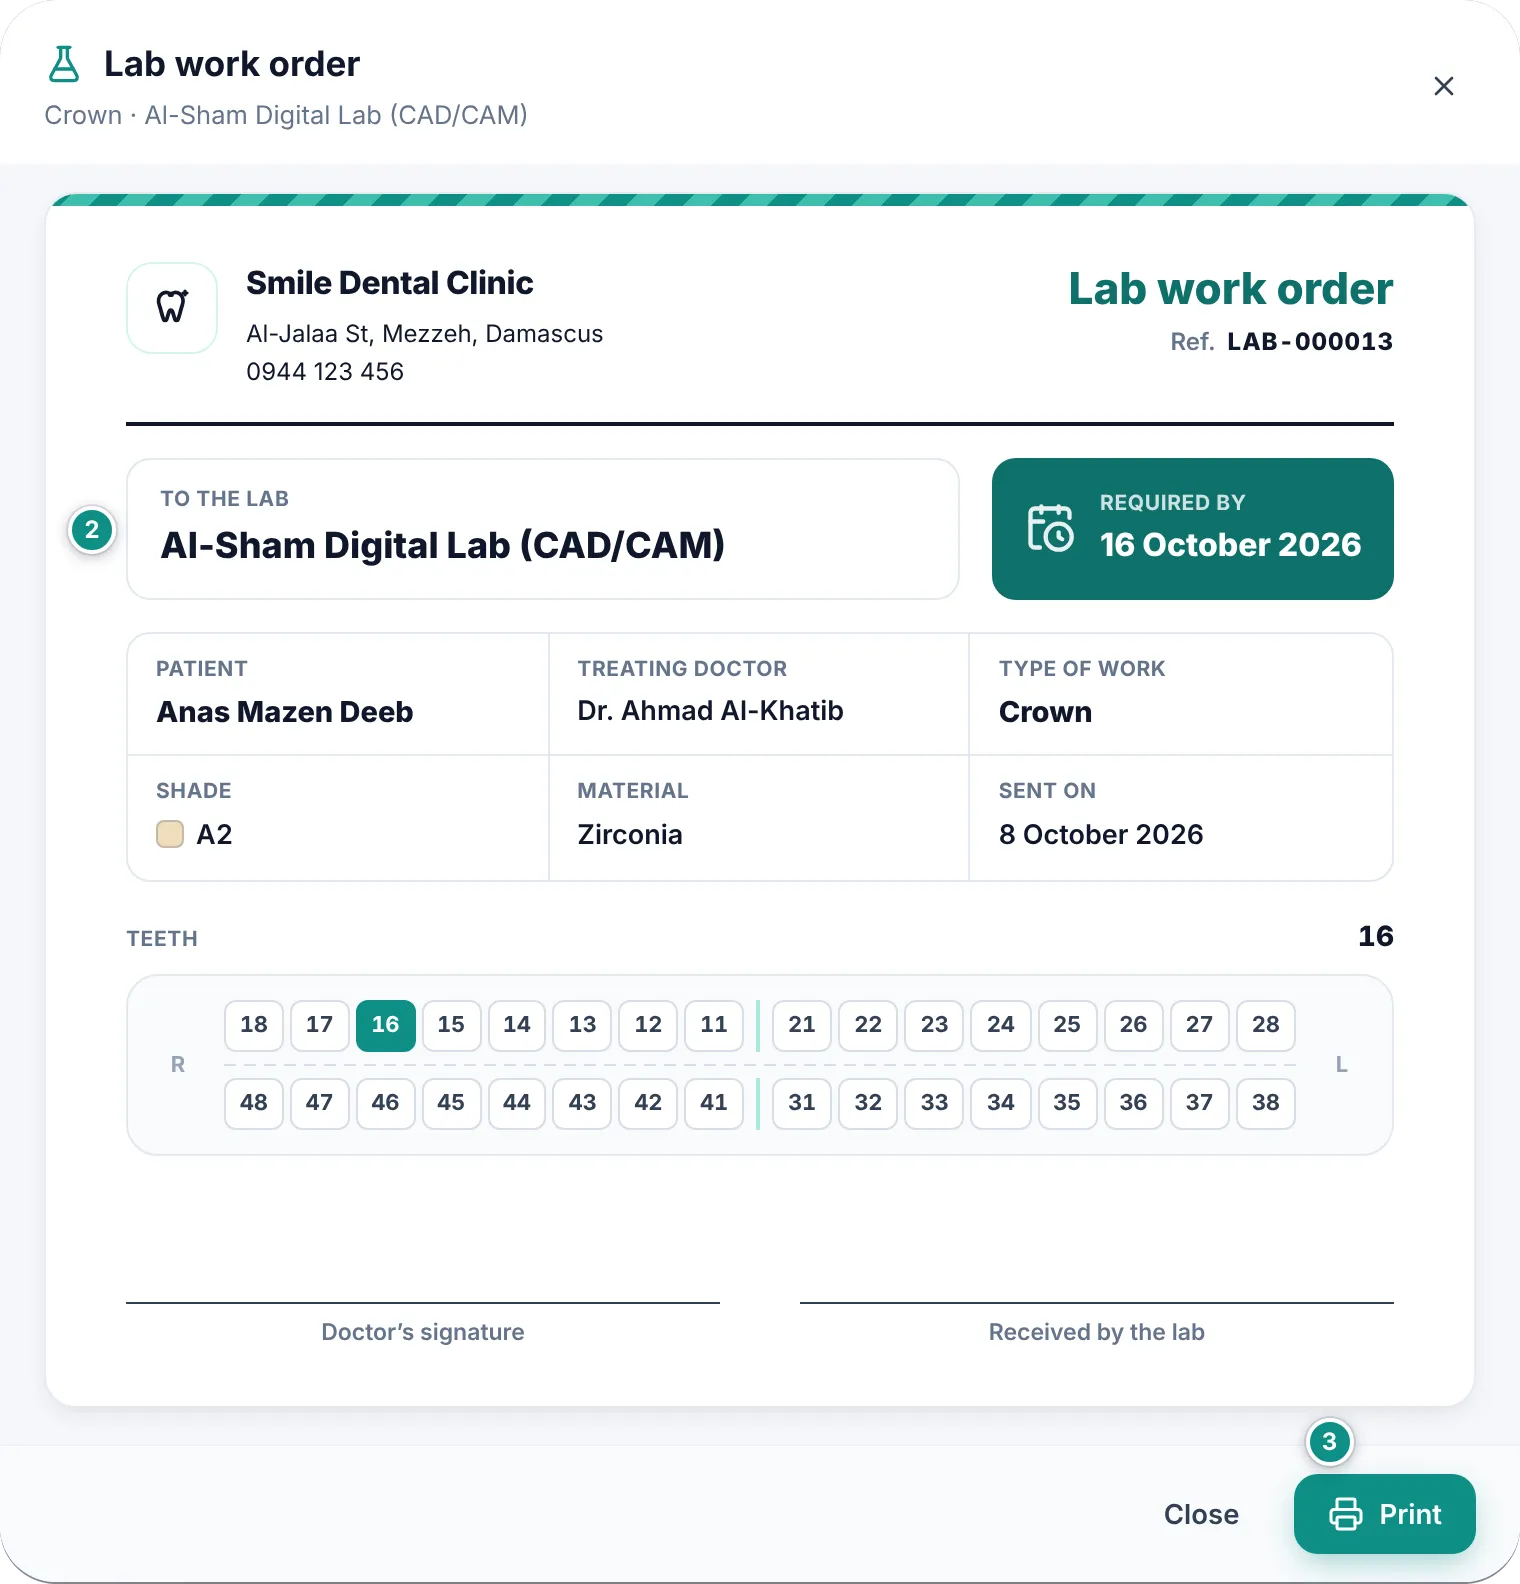
A lab slip: the lab and required date, patient, doctor, type of work, shade and material, the teeth drawing and the signature linesEnlarge the picture

Good to know

  • Of the patient’s details, only the name is printed on the slip: no phone and no medical data. The cost is not printed either.
  • At the bottom there is a second line for the lab to sign on receipt.
  • On Windows the Windows print dialog opens; to save a PDF choose “Microsoft Print to PDF”. On Android the system print screen opens, with a save-as-PDF option.
  • In read-only mode, clicking an order opens its lab slip directly.

Lab orders in the patient file

The Lab tab of the patient’s file shows that patient’s orders only: type of work, teeth and status, the lab, material, shade, sent date and cost, and the due or received date.

  1. Open the patient’s file, then the Lab tab.
  2. Click New lab order; the patient is already set.
  3. Click the next-step button to move the order on, or the order itself to edit it.
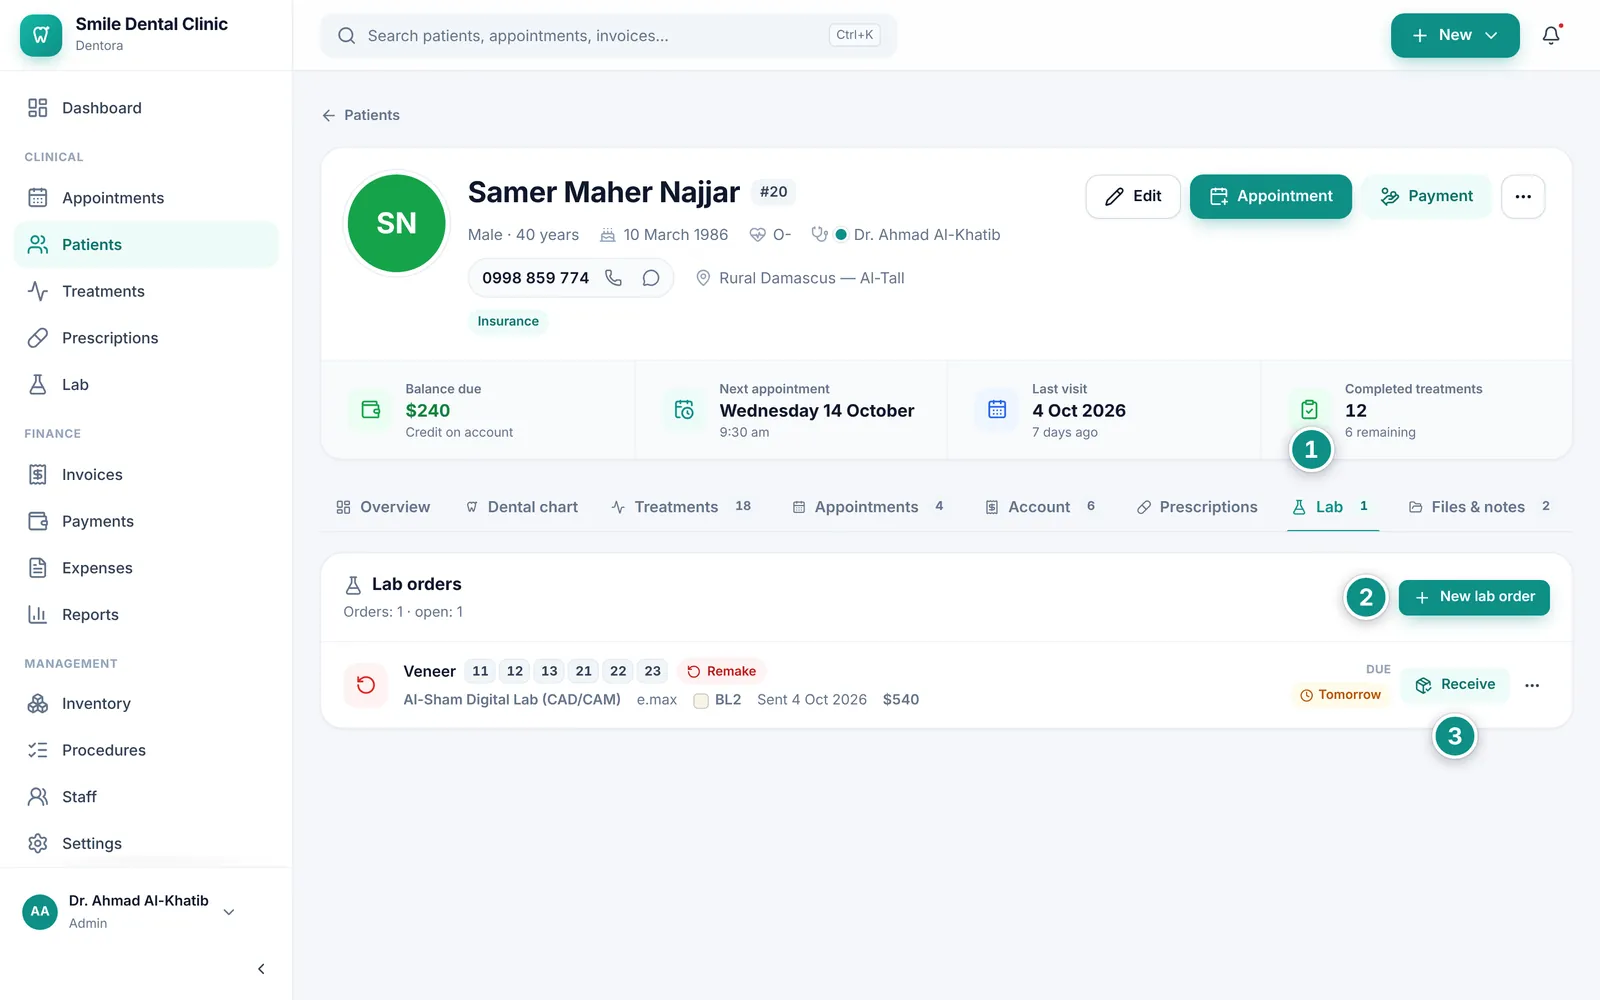
The Lab tab of a patient file: a veneer order marked Remake, due tomorrow, with the Receive buttonEnlarge the picture

Good to know

  • The card’s header shows how many orders there are and how many are open; the count also shows on the tab’s name.
  • Late orders come first.
Previous topicPrescriptionsNext topicInventory

Need help?

If you did not find your answer here, message us on WhatsApp and we will help.

WhatsApp+963 996 489 504

On this page

  1. The lab board
  2. Recording a lab order
  3. Following an order to fitting
  4. Printing the lab slip
  5. Lab orders in the patient file

Back to top

All topics

  1. Getting started
  2. Finding your way around
  3. The dashboard
  4. Patients
  5. Dental chart
  6. Appointments
  7. Treatments and treatment plans
  8. Invoices and payments
  9. Prescriptions
  10. Dental lab
  11. Inventory
  12. Expenses
  13. Reports
  14. Settings
  15. Staff and permissions
  16. Backup and moving your clinic
  17. Licence and activation
  18. Questions and answers

© 2026 Dentora. All rights reserved.

HomeUser guideVideosActivate a licencePrivacy policyTerms of use