Skip to content
Dentora
العربية
  1. Home
  2. User guide
  3. Expenses

Expenses

Record what the clinic spends, from rent and salaries to materials and bills, and see where the money goes month by month, compared with the month before.

Watch this topic on video
On this page
  1. The Expenses page
  2. Recording an expense
  3. Choosing the period and comparing
  4. Where does the money go? Breakdown and search
  5. Editing, deleting, automatic expenses and export
  6. Expenses on the phone

The Expenses page

Open Expenses from the sidebar, in the Finance section. The page opens on the current month.

At the top is the period bar, then four cards: Period total with its change vs previous period, Top category with its amount and share of the total, Expenses (how many) with the Average expense, and the Previous period total.

Below them is Breakdown by category, then the Expense log: each expense shows its date, category, description, vendor, payment method, amount and who recorded it.
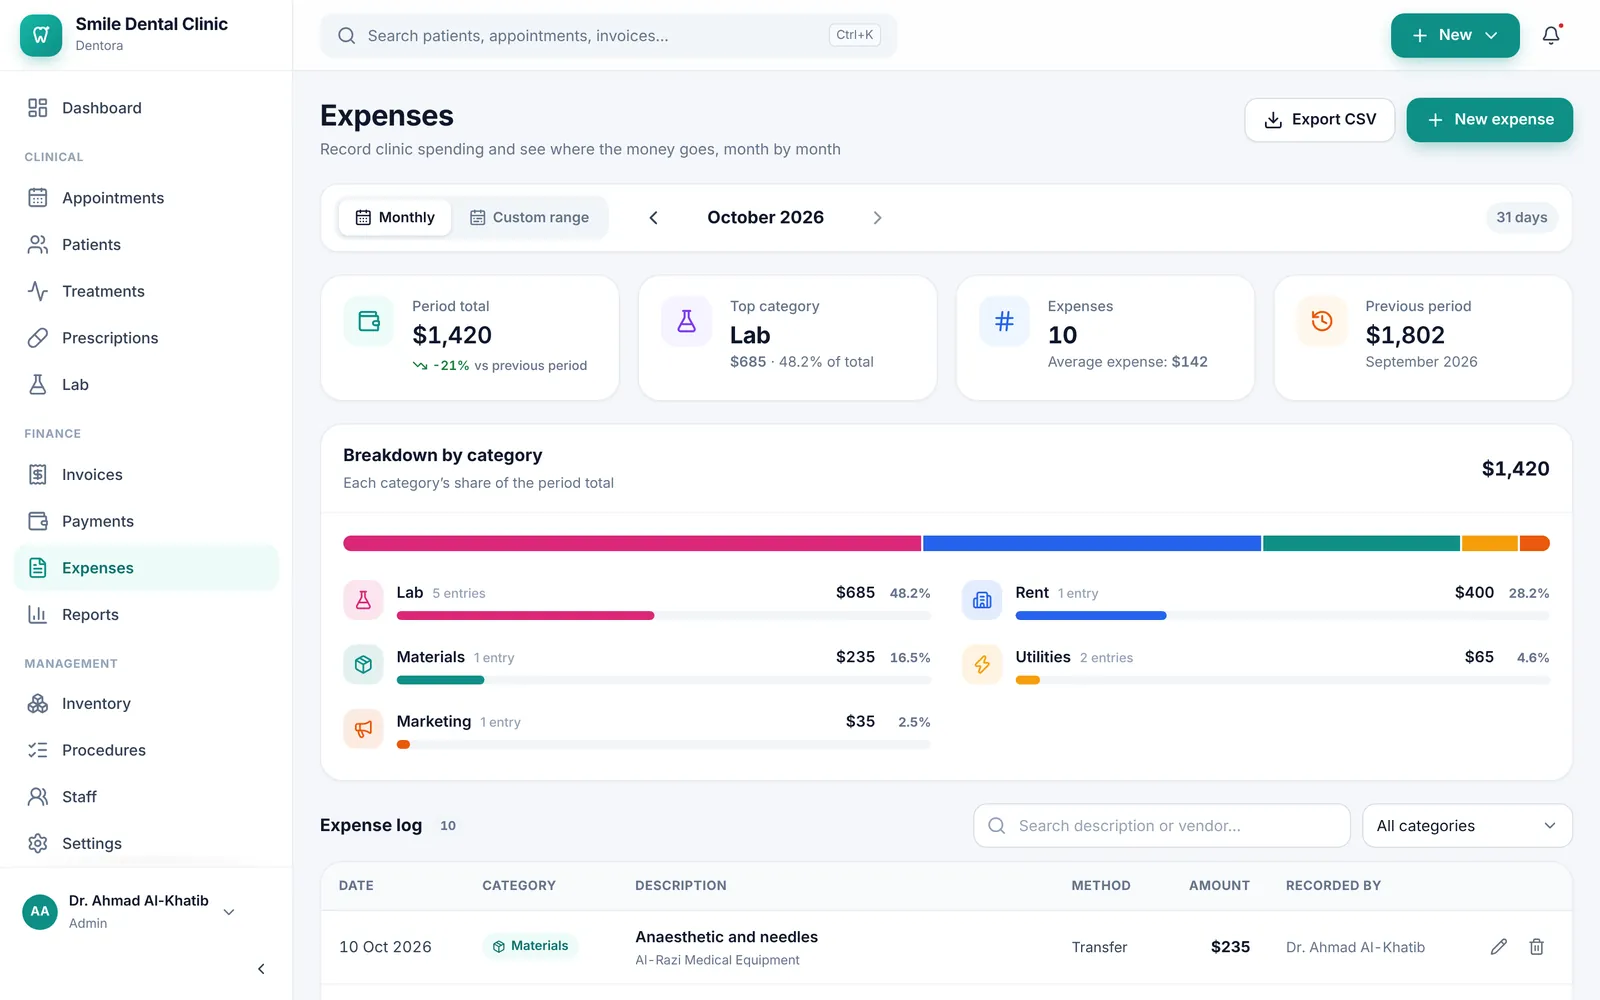
The Expenses page for October: the period bar, four cards and the breakdown by category with its coloured barsEnlarge the picture

Good to know

  • Expenses are for the clinic admin only: the page is left out of the other roles’ menu, and anyone else who opens its address sees “This page is not available for your role”. See Roles and permissions.
  • Dentora takes the expenses and net profit in the Financial reports from these records.
  • In read-only mode, after the trial ends, expenses stay visible but recording and editing stop. See Licence.

Recording an expense

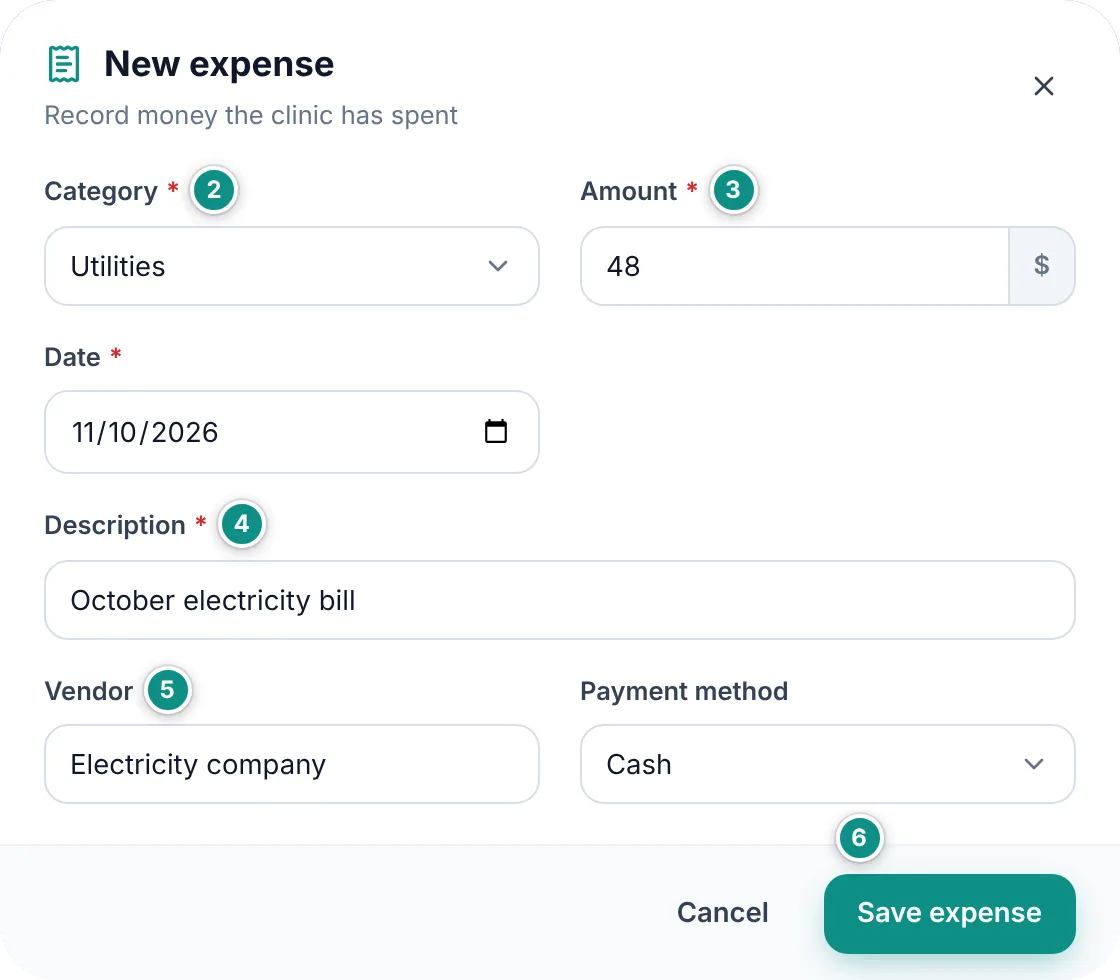
  1. Click New expense at the top of the page.
  2. Choose the Category: Rent, Salaries, Materials, Lab, Equipment, Utilities, Marketing, Maintenance, Taxes & fees or Other.
  3. Type the Amount and check the Date (today by default).
  4. Write a Description, for example: September electricity bill.
  5. Add the Vendor if you like, and choose the Payment method (Cash by default).
  6. Click Save expense.
The New expense dialog filled in: category Utilities, amount, date, description, vendor and payment method CashEnlarge the picture

Good to know

  • Category, amount, date and description are required, and the amount must be above zero. It is rounded to the clinic currency’s decimals.
  • Dentora suggests the vendors you typed before, so you do not retype the landlord or the power company every month.
  • You can record an expense with a future date, such as next month’s rent, and reach it later with the month arrows.
  • The name of whoever recorded the expense is kept and shows in the Recorded by column.

Choosing the period and comparing

The page works month by month: the month’s name sits in the middle of the bar, with the Previous month and Next month arrows on each side. The number of days in the period shows at the end of the bar.

The cards compare the month with the one before it. For a custom range they compare it with a range of the same length that ends the day before it starts.

  1. Click the arrows to move between months.
  2. For another stretch of time click Custom range and choose the start and end dates. It starts on the last 30 days.
  3. To go back to months click Monthly, then This month if you are on another month.
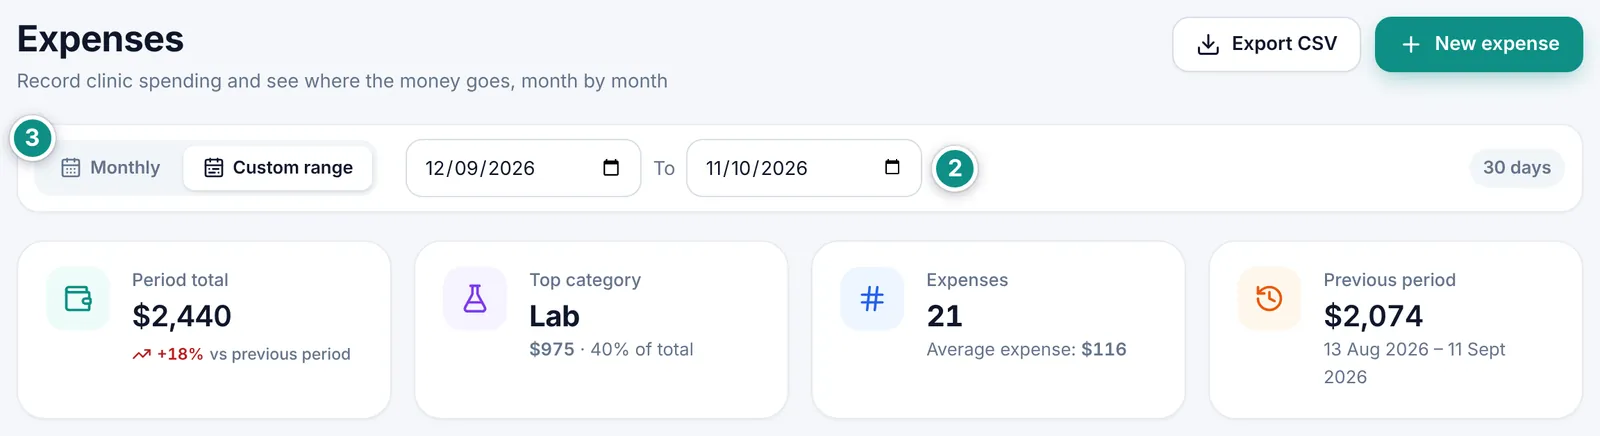
The period bar on a custom range: start and end dates for the last 30 days, and the number of days at the end of the barEnlarge the picture

Good to know

  • If the start is after the end, Dentora says “Pick a valid range (start before end)” and keeps the last valid range.
  • The next-month arrow stops at the current month, unless an expense is dated later.
  • The change figure is green when spending is lower than in the previous period.

Where does the money go? Breakdown and search

Breakdown by category starts with a coloured strip that splits the period total between the categories, then one line per category with its number of entries, its amount and its share of the total, largest first.

  1. Click a category line in the breakdown to show only its expenses in the log. Click it again to show everything. Clicking the Top category card works the same way.
  2. Type a word from the description or the vendor in the search box above the log.
  3. Or choose a category from the All categories list next to the search.
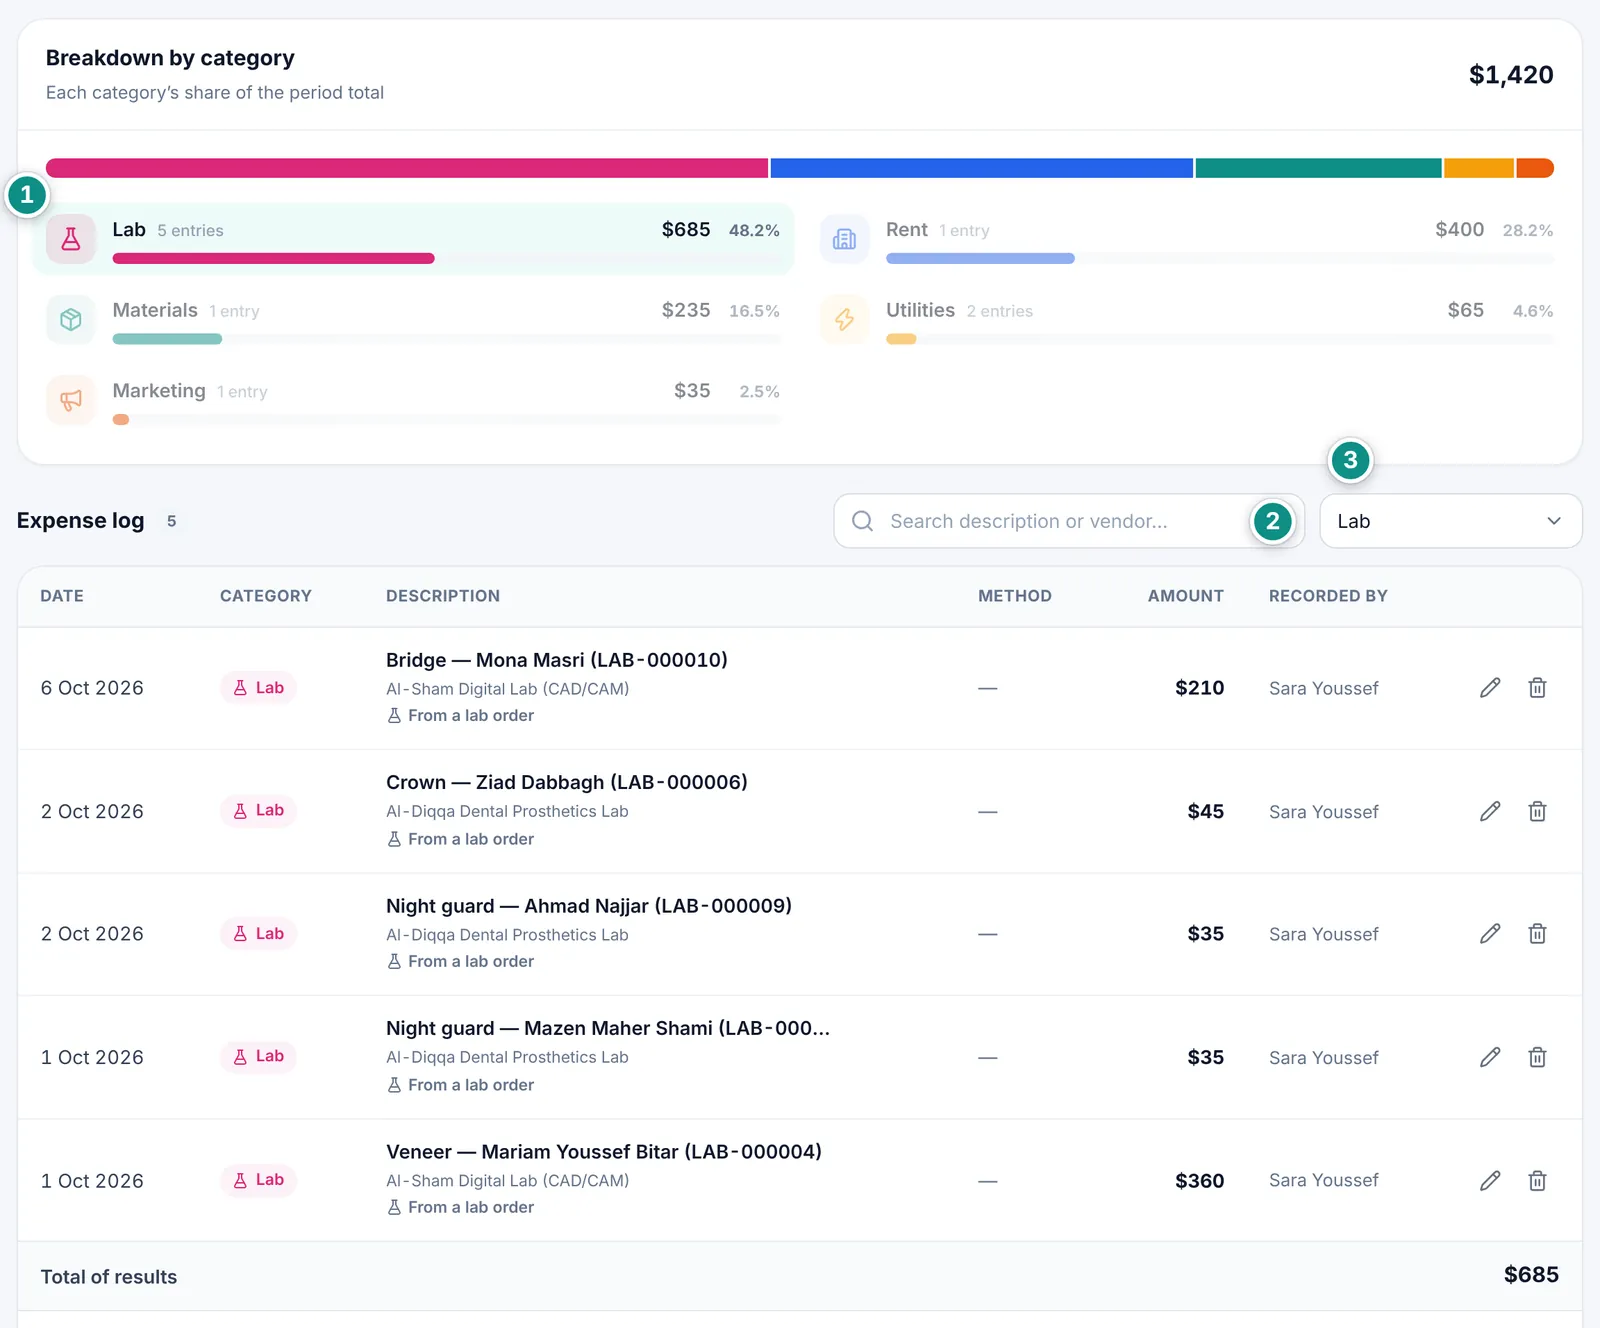
The breakdown by category with Lab selected, and the log below showing only lab expenses with the total of resultsEnlarge the picture

Good to know

  • When you search or filter, the Total line under the log becomes Total of results, so you know at once, say, how much went to the lab this month.
  • The log shows 20 expenses a page (15 on a phone), with the page buttons underneath.

Editing, deleting, automatic expenses and export

Click an expense’s row or its pencil button to open Edit expense, change what you need, then click Save changes. To delete it, click its bin button and confirm with Delete.

Some expenses are recorded by Dentora itself: when a lab order with a cost is received (or fitted), an expense is recorded under Lab and marked From a lab order; it follows the order’s cost, and is removed if the order is cancelled or deleted. When you record a stock purchase with the expense switch on, its total is recorded under Materials. See Lab and Recording a purchase.

The Export CSV button saves the log as you see it, with its period, search and category, as a spreadsheet file that Excel opens with Arabic intact.
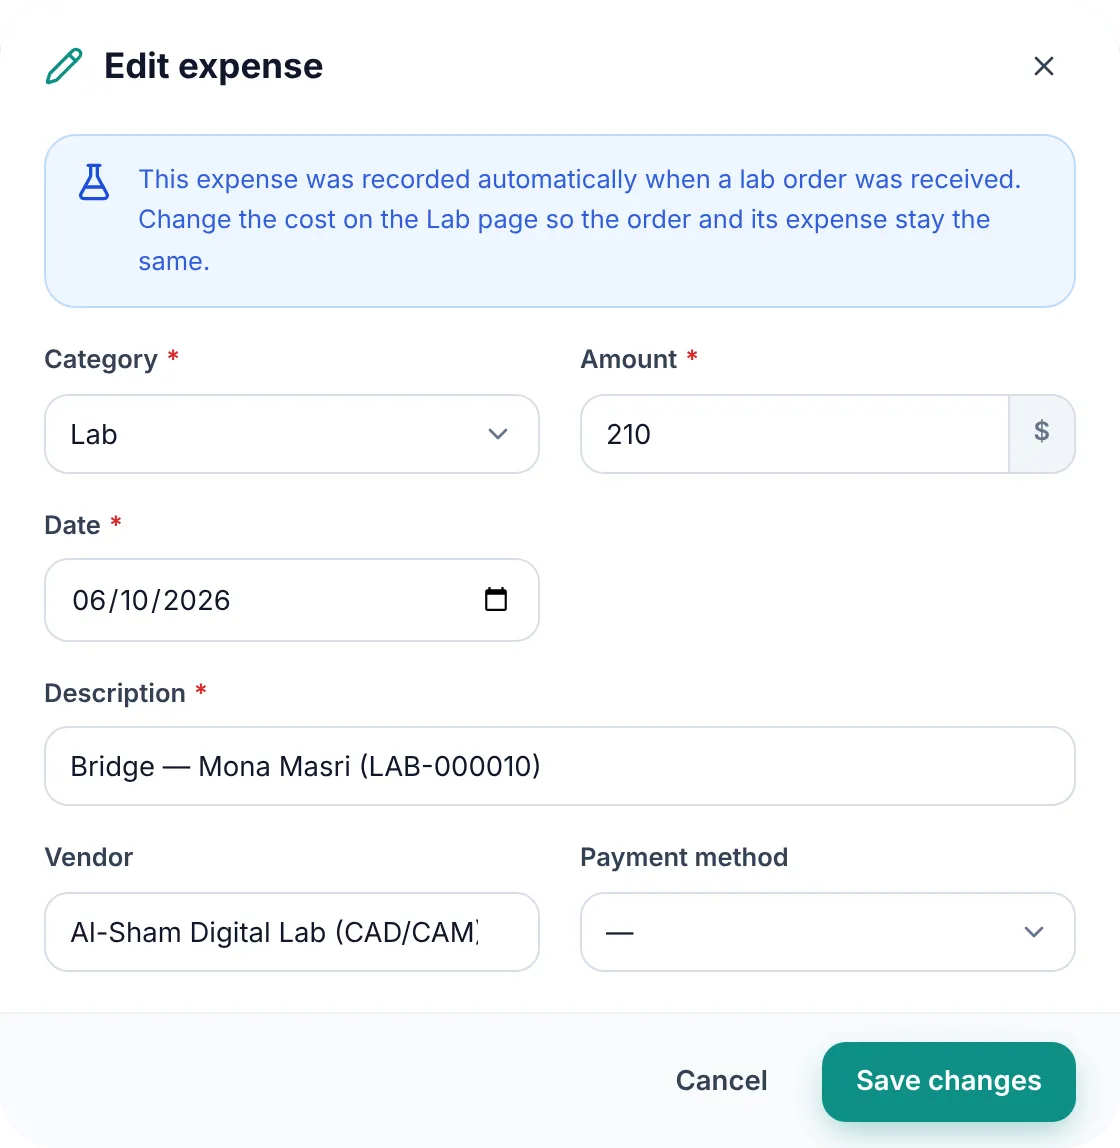
The edit window of an expense recorded from a lab order, with a note at the top asking to change the cost on the Lab pageEnlarge the picture

Good to know

  • Change a lab expense’s cost on the Lab page, not here, so the order and its expense stay the same. A note at the top of the edit window reminds you.
  • Deleting is permanent, so just edit the expense if the mistake is in the amount or the date.
  • On Windows a save window opens for you to choose where the CSV file goes; on Android the system’s save screen opens.

Expenses on the phone

On a phone the log is grouped by day: “Today” and “Yesterday”, then dates, each with the day’s total. Tap an expense to edit it, or the ⋮ button next to it for Edit or Delete. The period total closes the list.

The export button at the top of the page is the download-arrow icon.
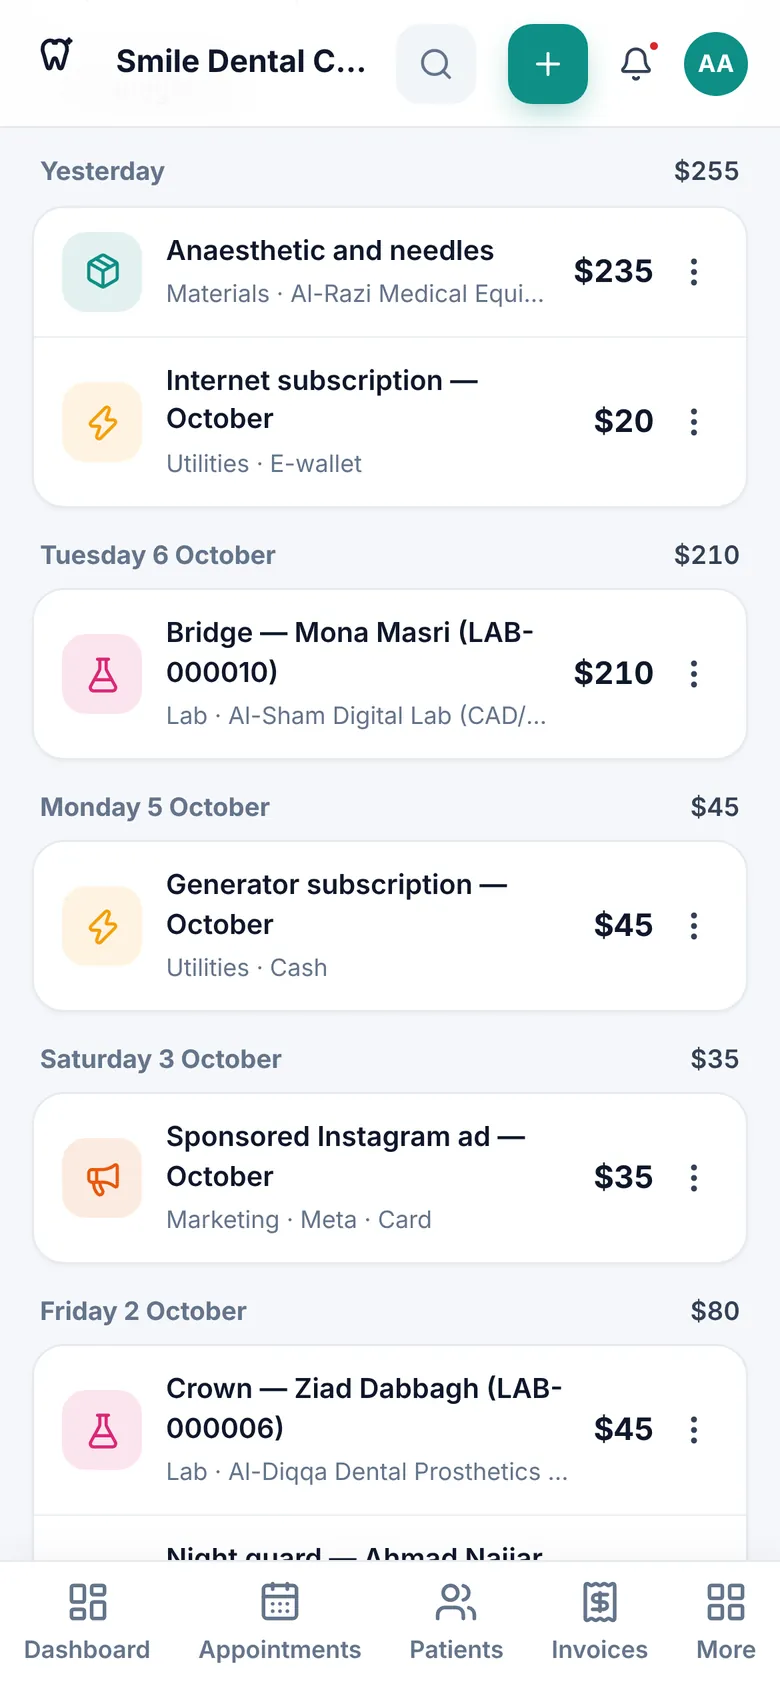
The expense log on a phone grouped by day, with each day’s total and an options button on every expenseEnlarge the picture
Previous topicInventoryNext topicReports

Need help?

If you did not find your answer here, message us on WhatsApp and we will help.

WhatsApp+963 996 489 504

On this page

  1. The Expenses page
  2. Recording an expense
  3. Choosing the period and comparing
  4. Where does the money go? Breakdown and search
  5. Editing, deleting, automatic expenses and export
  6. Expenses on the phone

Back to top

All topics

  1. Getting started
  2. Finding your way around
  3. The dashboard
  4. Patients
  5. Dental chart
  6. Appointments
  7. Treatments and treatment plans
  8. Invoices and payments
  9. Prescriptions
  10. Dental lab
  11. Inventory
  12. Expenses
  13. Reports
  14. Settings
  15. Staff and permissions
  16. Backup and moving your clinic
  17. Licence and activation
  18. Questions and answers

© 2026 Dentora. All rights reserved.

HomeUser guideVideosActivate a licencePrivacy policyTerms of use