Skip to content
Dentora
العربية
  1. Home
  2. User guide
  3. Patients

Patients

Create a patient file in seconds, record medical alerts, and follow the patient’s appointments, treatments, account and images in one place.

Watch this topic on video
On this page
  1. The patients list
  2. Adding a new patient
  3. Medical status and the medical alert
  4. Search, filter and sort
  5. The patient file
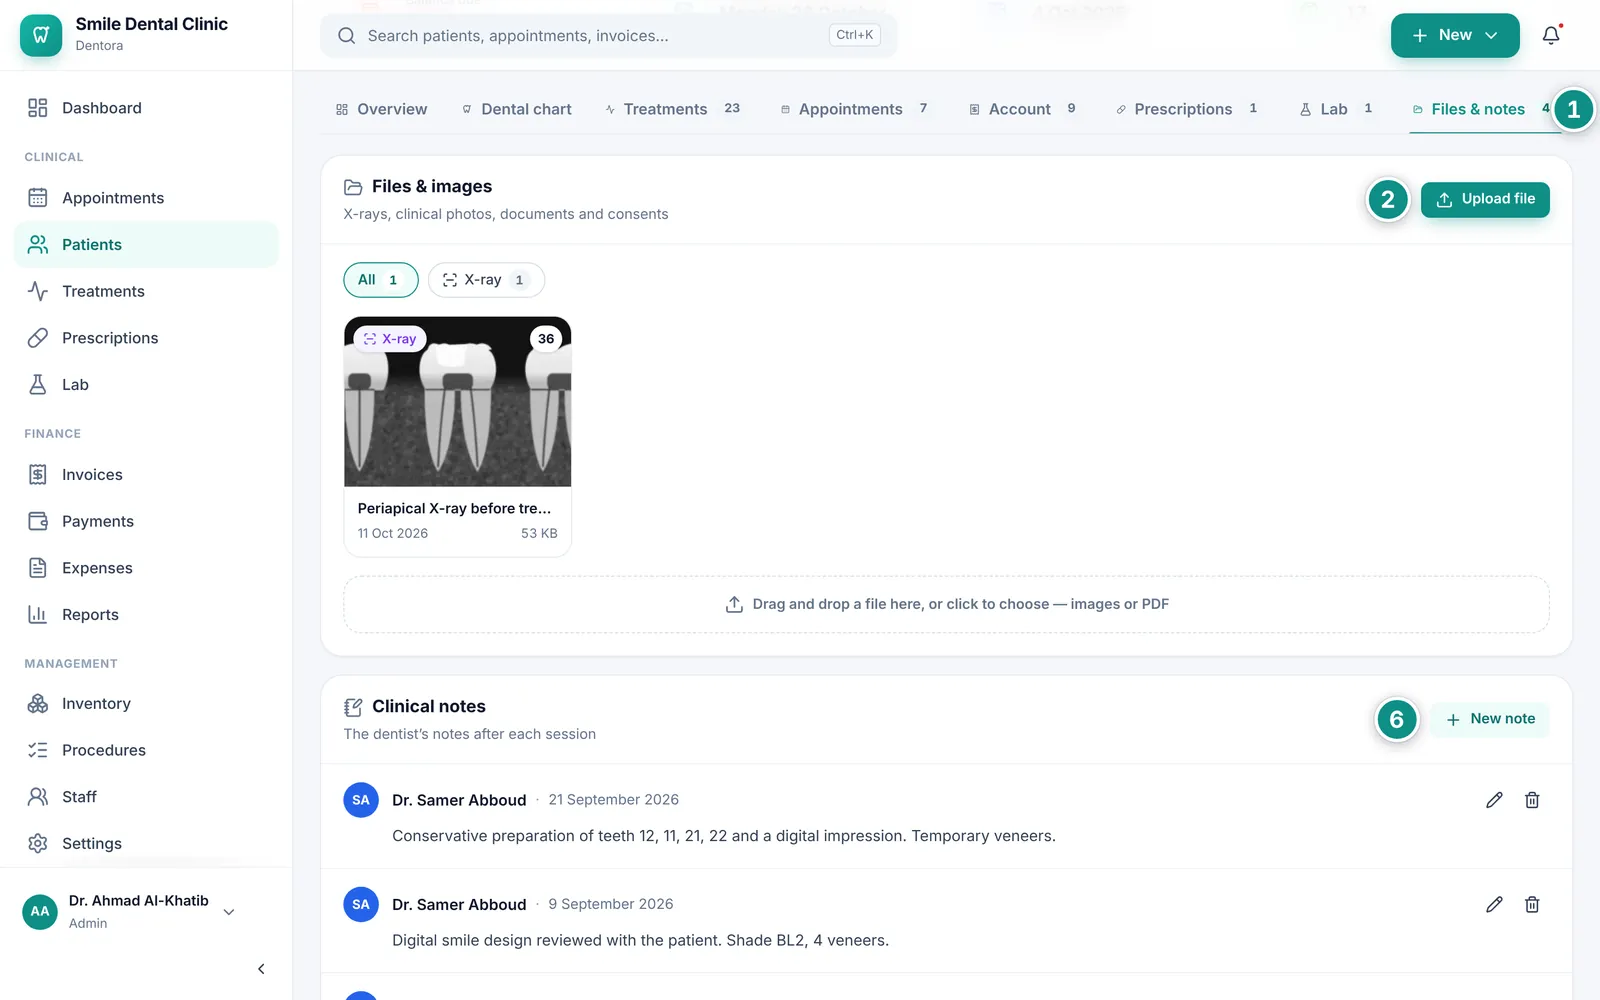
  6. Files, images and clinical notes
  7. Archiving and deleting

The patients list

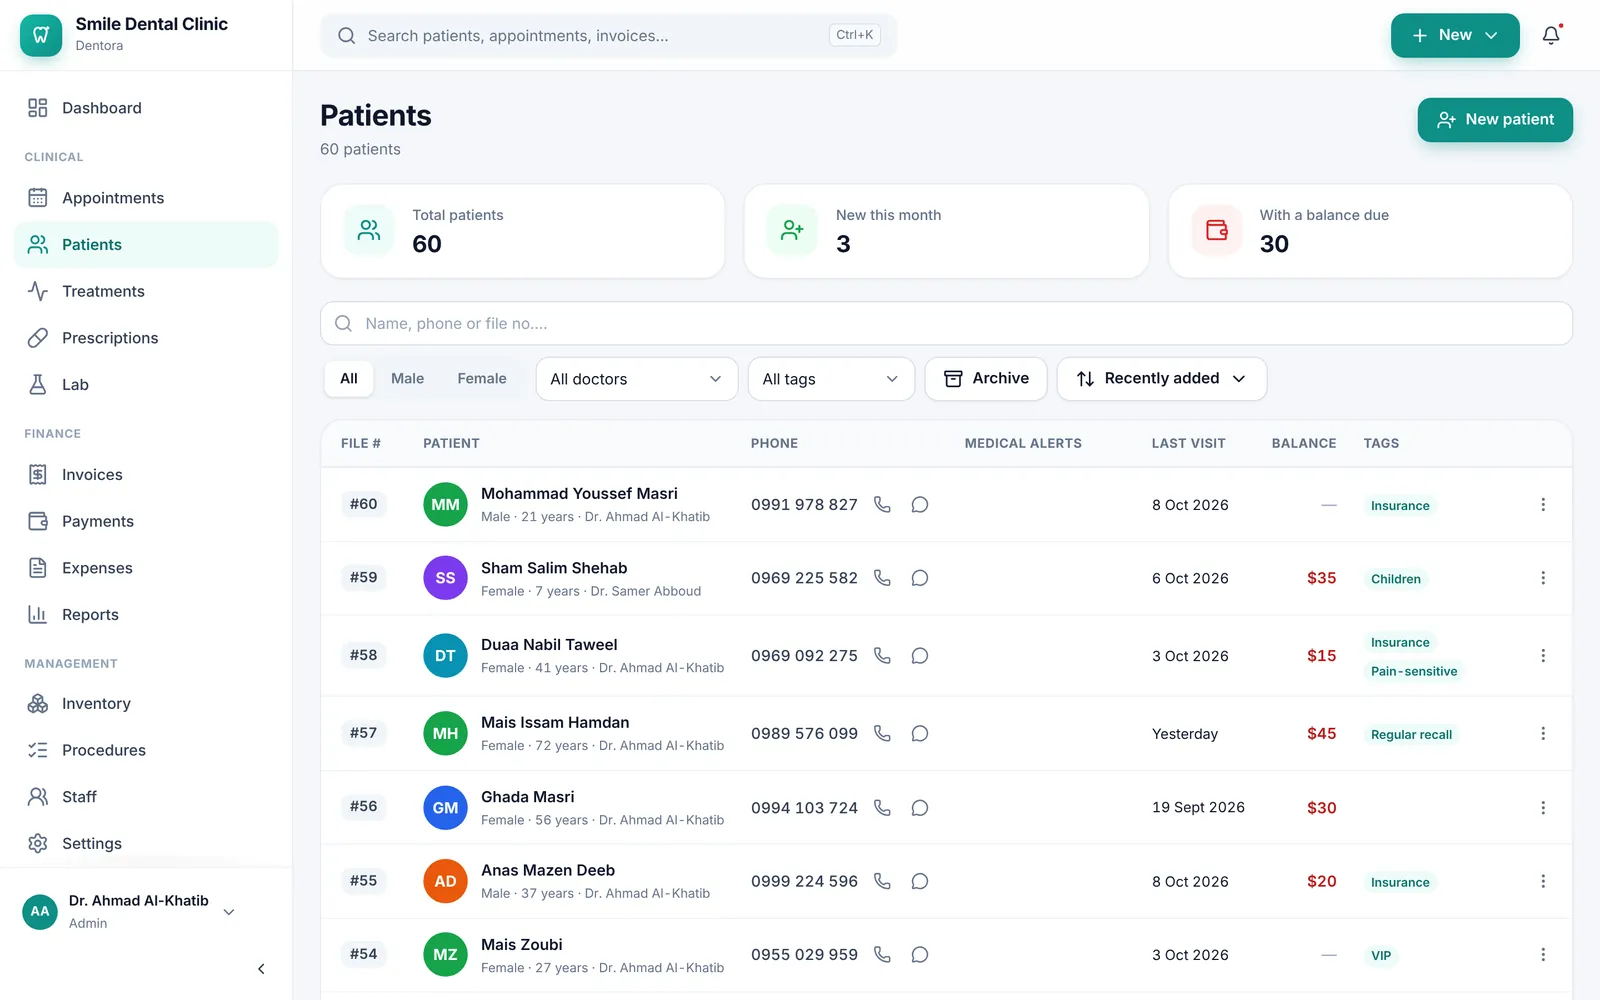
Open Patients from the sidebar, or from the bottom bar on a phone. Every file of the clinic is here: each patient has a row with the file number, name, gender, age and treating doctor, then the phone with call and WhatsApp buttons, medical alerts, last visit, balance and tags. On a phone each patient is a card with name, file number, gender, age, balance, phone and medical alerts.

Three cards sit above the list: Total patients, New this month and With a balance due. Click New this month or With a balance due to show only those patients; click the same card again, or Total patients, to see everyone.

Click any row to open the patient’s file.

The patients list: figure cards at the top, then search and filters, then the table of patientsEnlarge the picture

Good to know

  • The balance is red when the patient owes the clinic and green when the patient has credit.
  • The list shows 25 patients a page, with the page buttons under it.
  • On Android the call button opens the phone app and the WhatsApp button opens a chat in WhatsApp. On Windows the WhatsApp link opens in the browser, where you continue in WhatsApp Web or the WhatsApp desktop app.
  • Archived files are left out of the list and of the card figures. They are under the Archive button; see Archiving and deleting.
  • If the trial ends without activation, the app becomes read-only: you can open and read every file, but adding and editing stop. See Licence.

Adding a new patient

A name is all a new file needs; you can fill in the rest at any time later.

  1. Click New patient at the top of the Patients page (on a phone, the floating button at the bottom of the screen), pick it from the New button in the top bar on a computer, or press Ctrl+Shift+N on any screen.
  2. Type the Full name, the only required field.
  3. Choose the Gender (Male is picked by default, so change it for a female patient) and enter the Date of birth; the age appears right under it.
  4. Enter the Phone. It is optional, but without it the patient cannot get WhatsApp appointment reminders. A second number goes in Other phone.
  5. Fill in whatever else you have: Patient photo, Email, Treating doctor, Address, National ID and Occupation, then Medical status and Additional information further down (tags, insurance, referral and notes).
  6. Click Save patient. Dentora gives the patient the next file number and opens the new file.
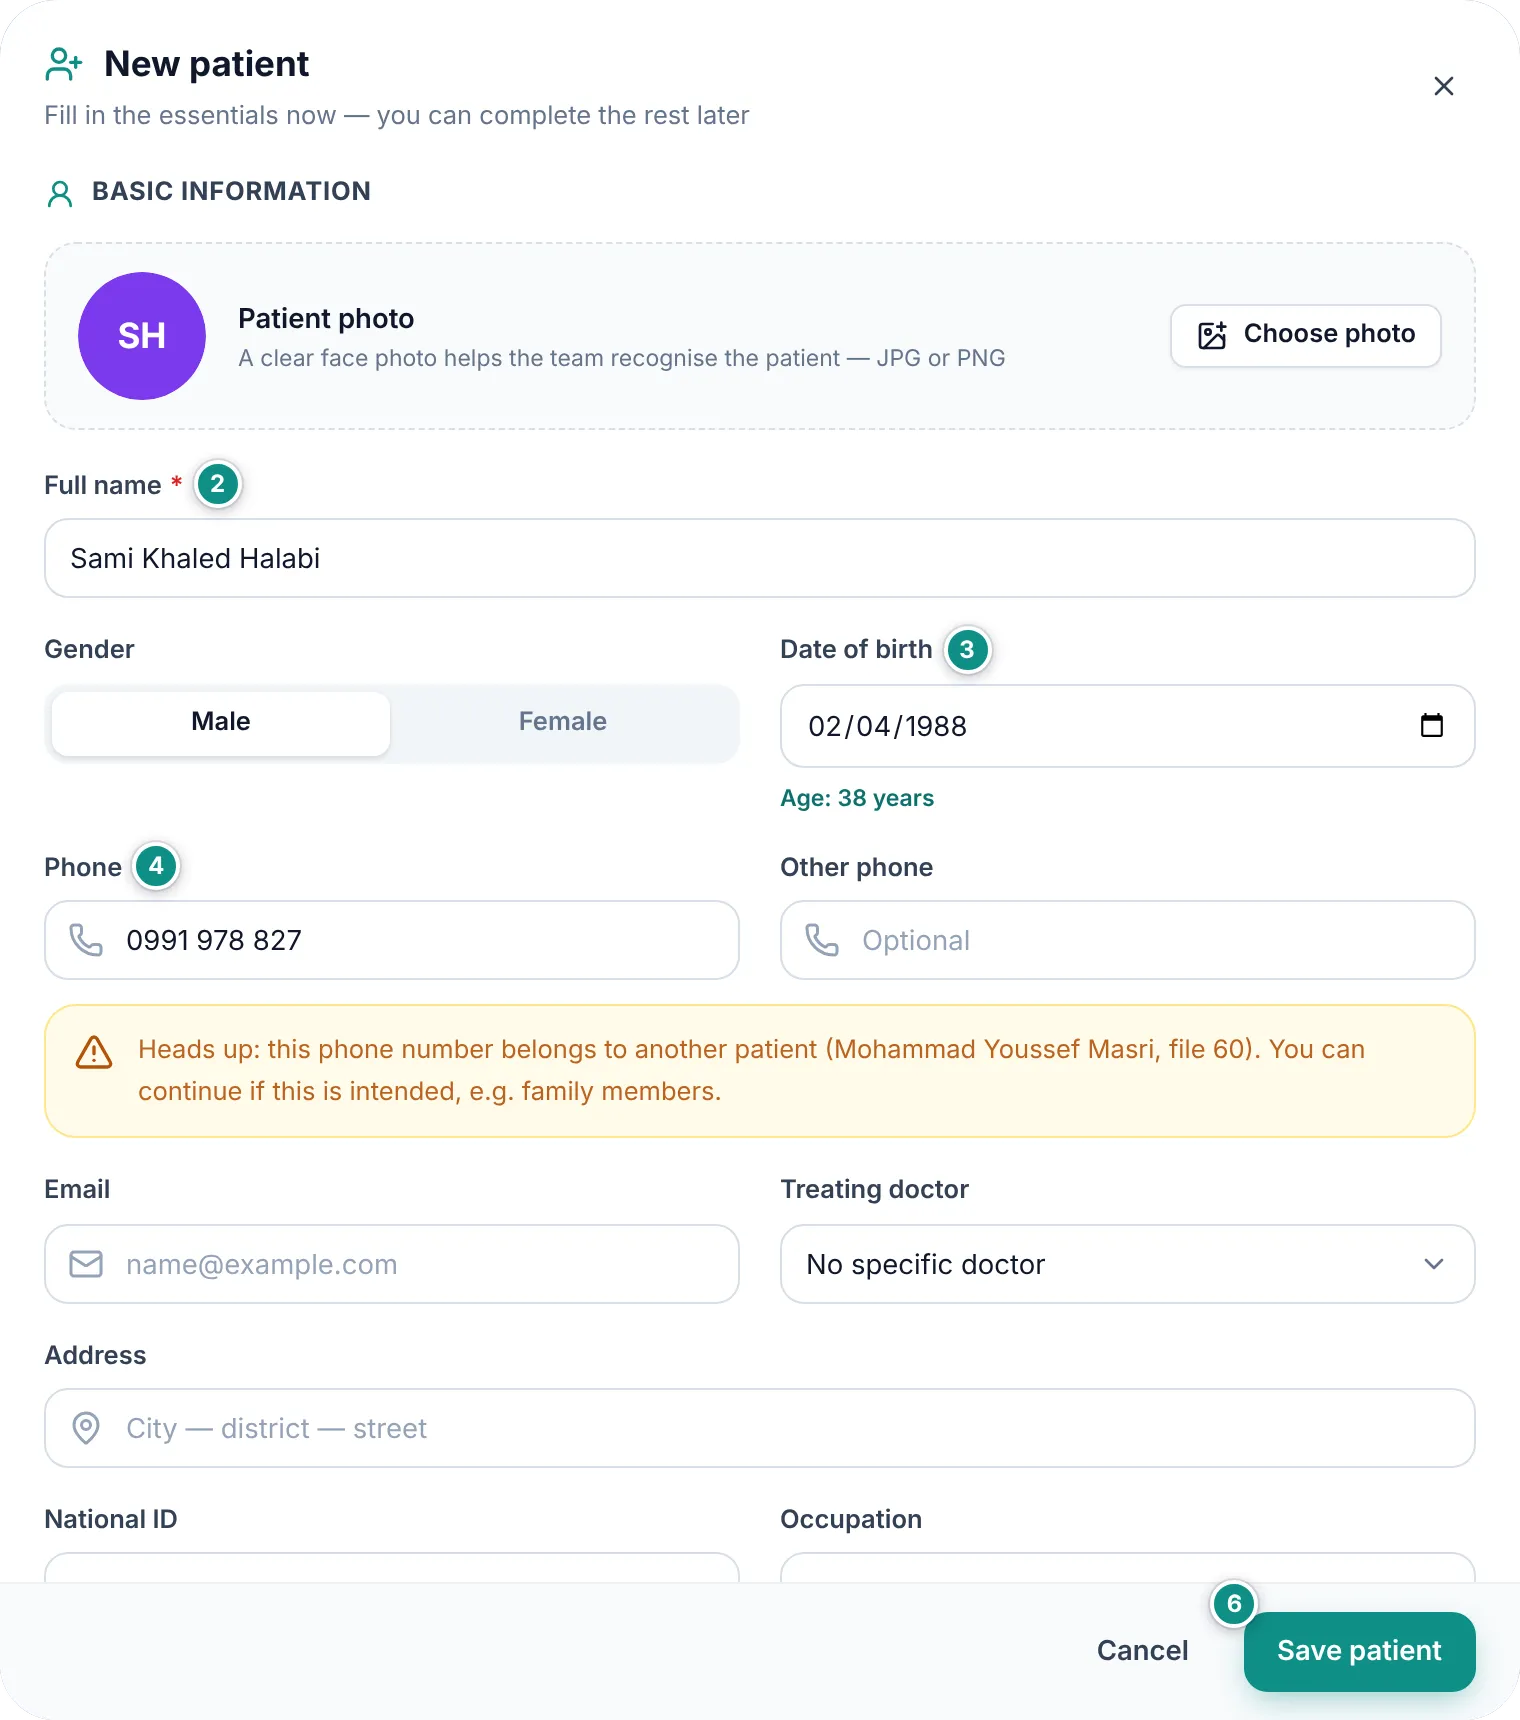
The new patient form with a name, date of birth and age, and a notice that the phone number belongs to another patientEnlarge the picture
A name is enough to save, and the duplicate-number notice does not stop you.

Good to know

  • If the phone number already belongs to another patient, a notice shows that patient’s name and file number. You can still save, for example for family members who share a number.
  • If you close the form before saving, Dentora asks Discard changes? so a stray click never loses your typing. Choose Keep editing to go back.
  • Pressing Enter in a single-line text field saves the form, except in the allergy, disease, medication and tag boxes, where it adds what you typed to the list.
  • On Android, Choose photo offers the phone’s camera next to your files, so you can photograph the patient right away.
  • You can also add a patient with just a name and phone while booking an appointment. See Booking an appointment.

Medical status and the medical alert

Record the patient’s allergies, chronic diseases and medications once, and everyone who opens the file sees them before any procedure.

  1. Open the patient’s file and click Edit, or fill in this section while adding the patient.
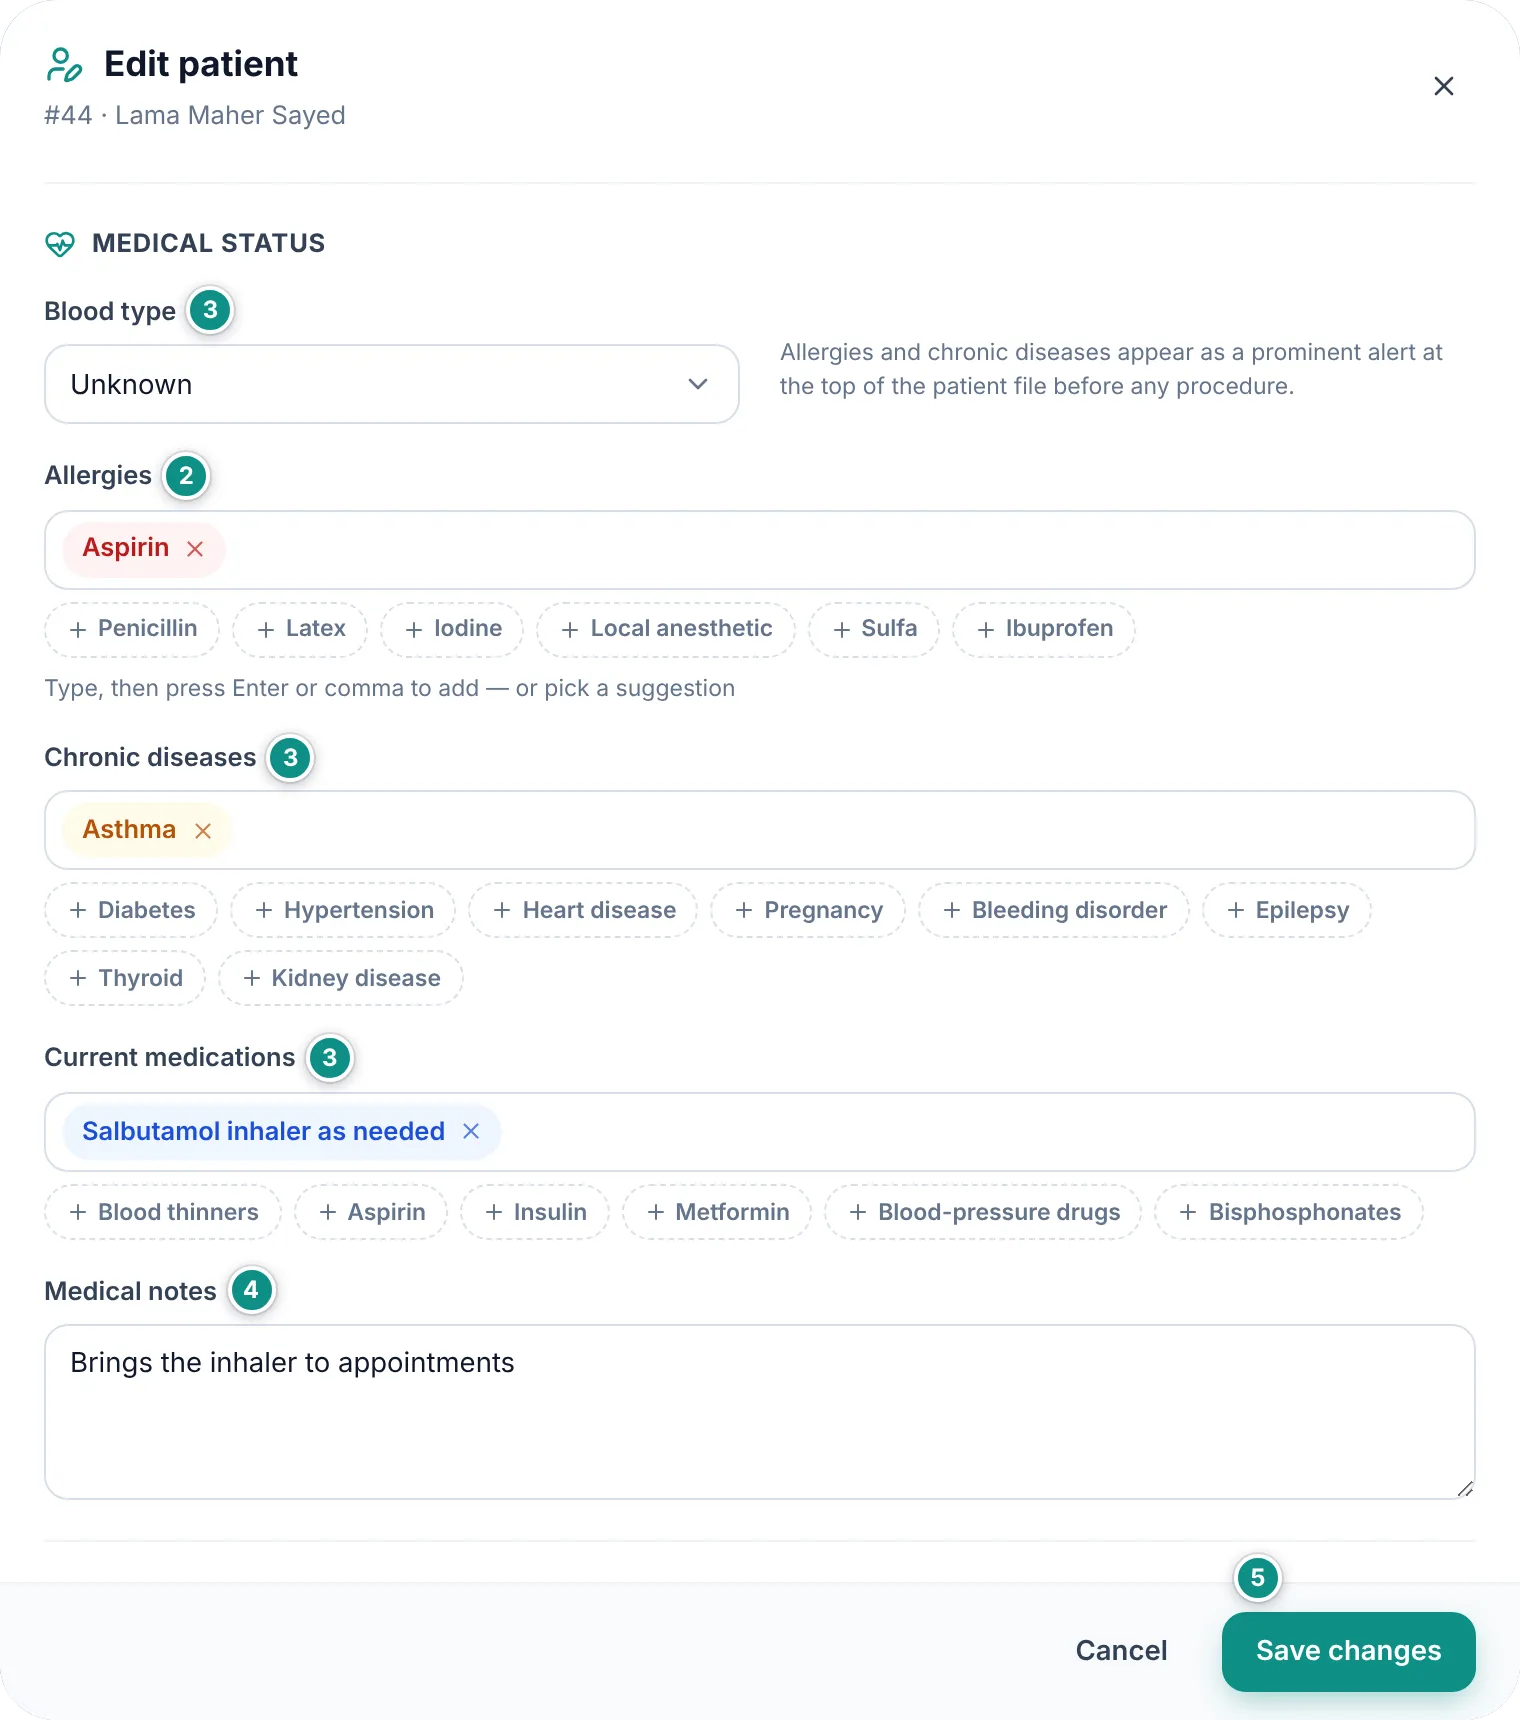
  2. Under Medical status, type an allergy in Allergies and press Enter or a comma, or click a ready suggestion such as Penicillin or Latex.
  3. Add Chronic diseases and Current medications the same way, and choose the Blood type if you know it.
  4. Use Medical notes for anything else the dentist must know before treatment.
  5. Click Save changes.
The medical status section of the patient form: blood type, allergies, chronic diseases and medications with ready suggestionsEnlarge the picture
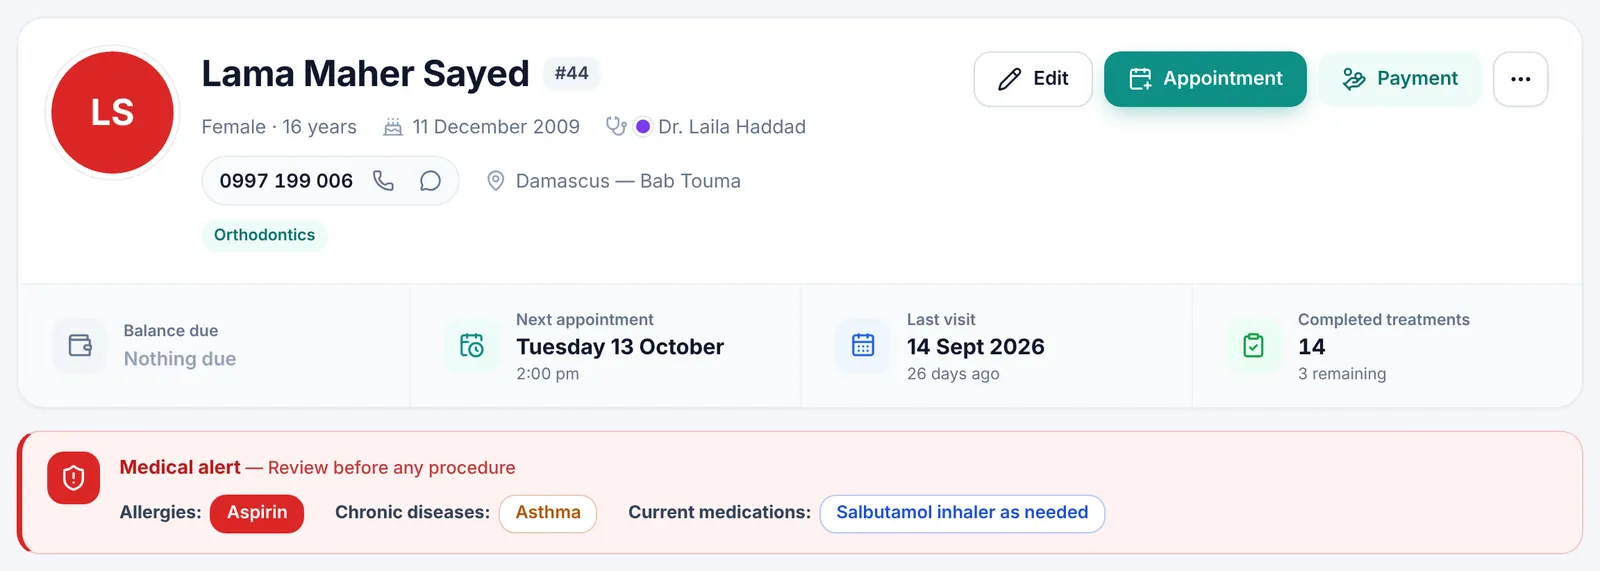
The top of a patient file with the red medical alert bar: allergies, chronic diseases and medicationsEnlarge the picture

Good to know

  • Allergies, chronic diseases and medications appear in a Medical alert bar at the top of the file: red when there is an allergy, orange otherwise. In the patients list an Allergy or Chronic badge shows in the Medical alerts column (on a phone, under the name next to the phone number).
  • To remove an item click the ✕ next to it, or press Backspace in the empty box to remove the last one.
  • Medical notes do not appear in the alert bar, only in the Medical information card of the Overview tab. Put every allergy, disease and medication in its own box, not in the notes.
  • The allergies recorded here also warn you when a prescription contains a drug that may clash with them. See Allergy warnings.

Search, filter and sort

However many files the clinic has, search and filters bring you to the patient in seconds.

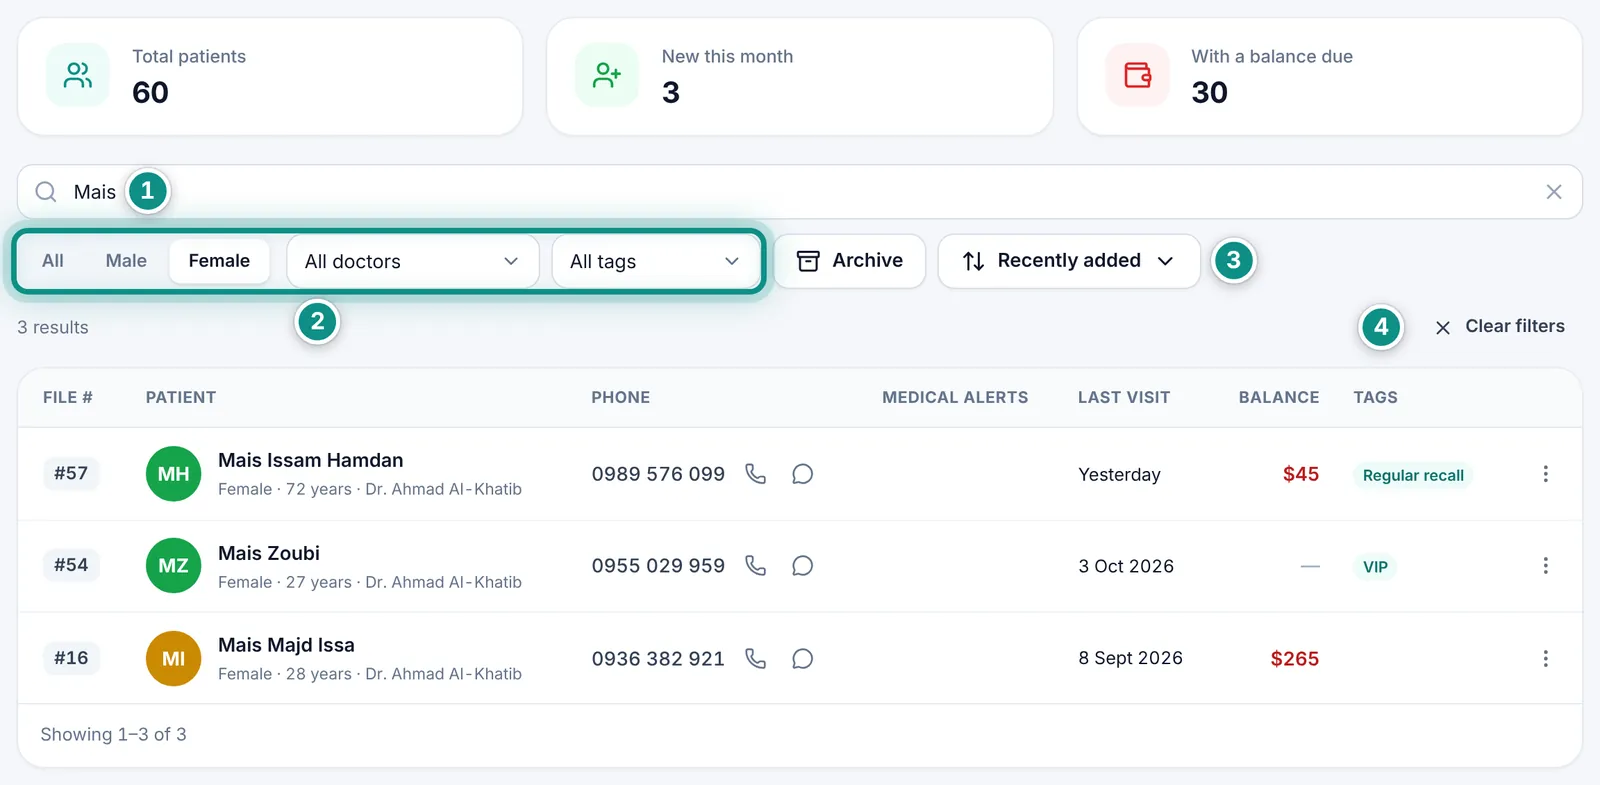
  1. Type part of a name, a phone number (first or other), a file number, a national ID or an email in the search box. The list updates as you type.
  2. Narrow it by gender (All, Male or Female), by treating doctor (All doctors) and by tag (All tags).
  3. Pick the order from the last button: Recently added, Name (A–Z), Last visit or Highest balance.
  4. The number of results shows above the table; click Clear filters to see everyone again.
Searching for “Mais” with the female filter, and the result count with Clear filters above the tableEnlarge the picture
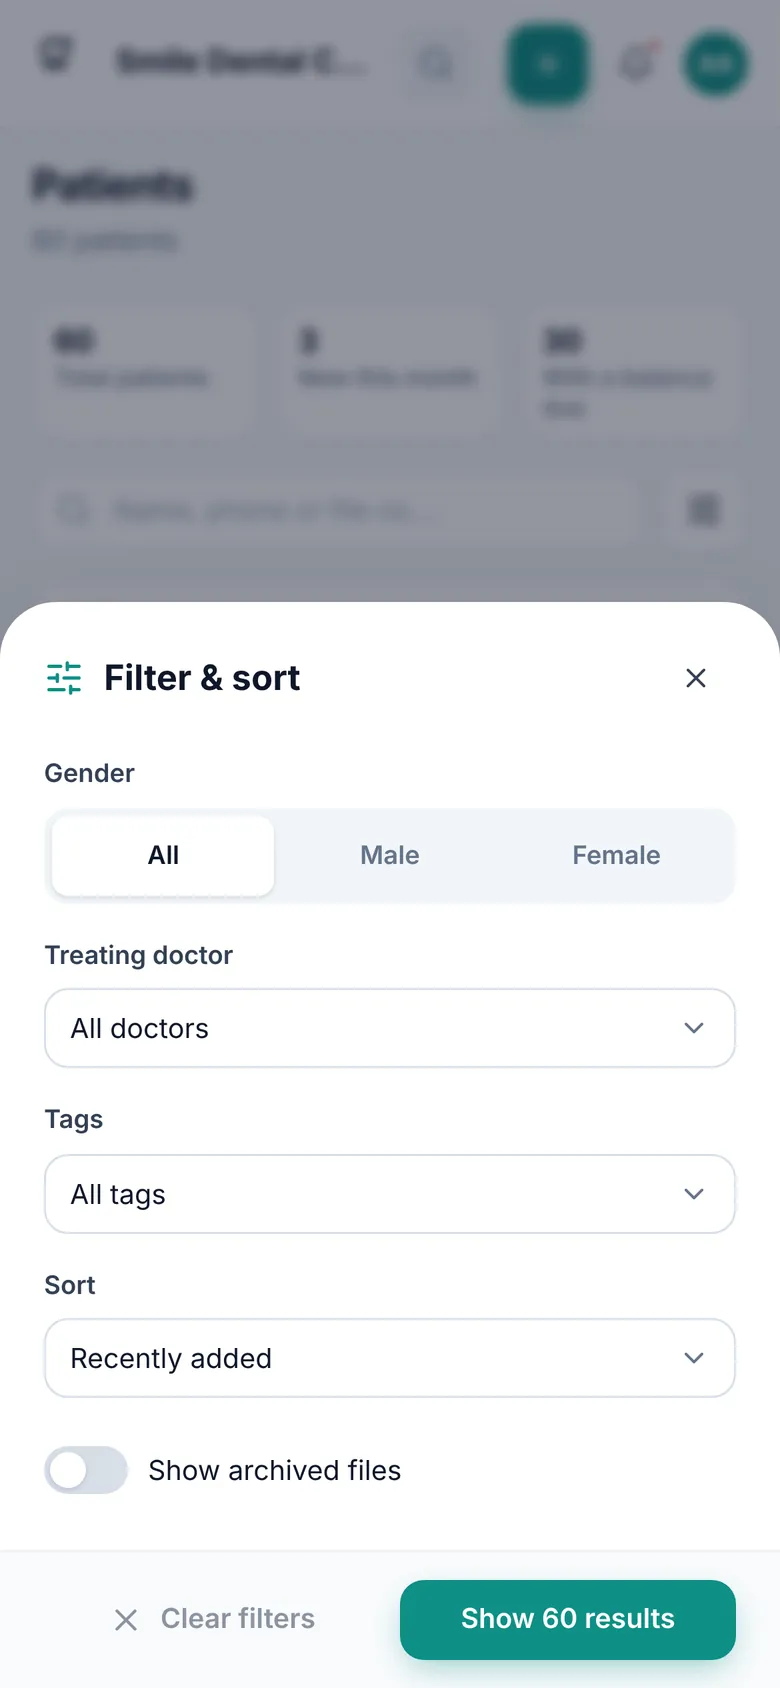
The Filter & sort window on a phone: gender, doctor, tags, order and show archived filesEnlarge the picture

Good to know

  • Search ignores the usual Arabic spelling variants (احمد finds أحمد, فاطمه finds فاطمة) and reads Arabic-Indic digits such as ٠٩٤٤ like 0944.
  • Combine words: “Ahmad 0944” finds the Ahmad whose phone contains 0944. Phone numbers match from three digits on; for a file number the first digits are enough.
  • The doctor list appears once the clinic has more than one doctor, and the tag list once patients have tags.
  • Your search, filters and order stay as they are while you visit other screens, until you close the app.
  • On a phone, the filter button next to the search box gathers all of this in a Filter & sort window and shows how many options are on.
  • To reach a patient from any screen, use the search box in the top bar (Ctrl+K). See Quick search.

The patient file

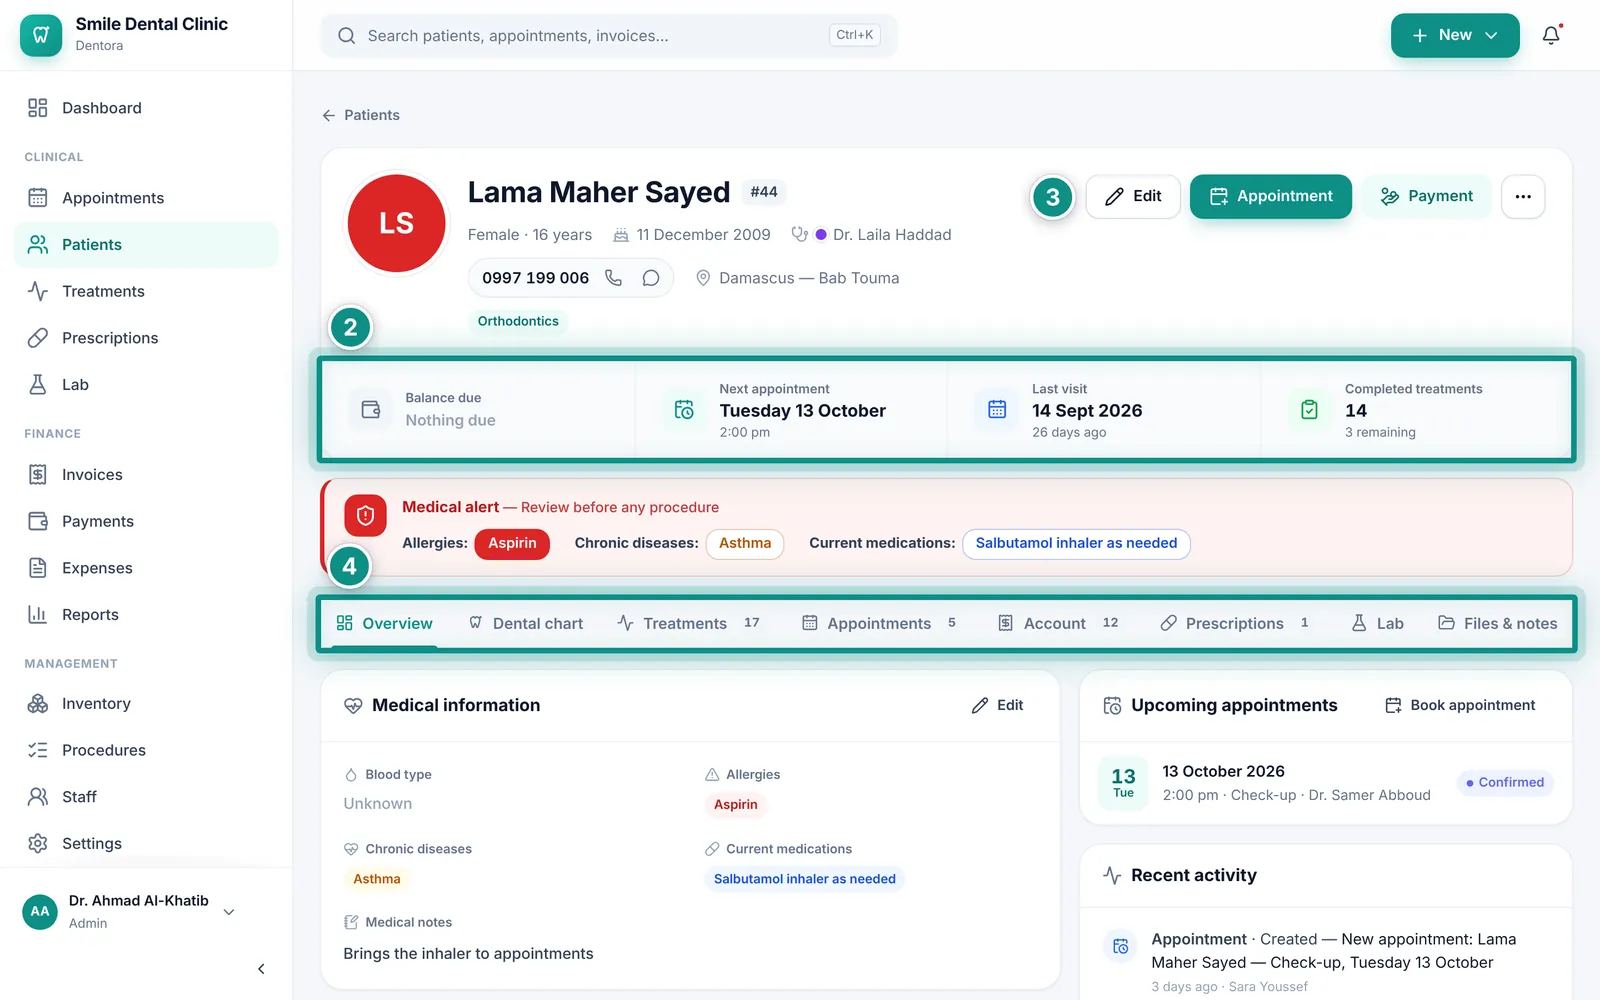
The patient file brings everything about the patient together. The top shows the photo, name, file number, age, date of birth, blood type, treating doctor, phones, email, address and tags.

  1. Open the file by clicking the patient’s row in the list, or find the patient from the top bar.
  2. Read the four figures under the name: Balance due, Next appointment, Last visit and Completed treatments with the number still to do. Click the balance, the appointment or the treatments to jump to their tab.
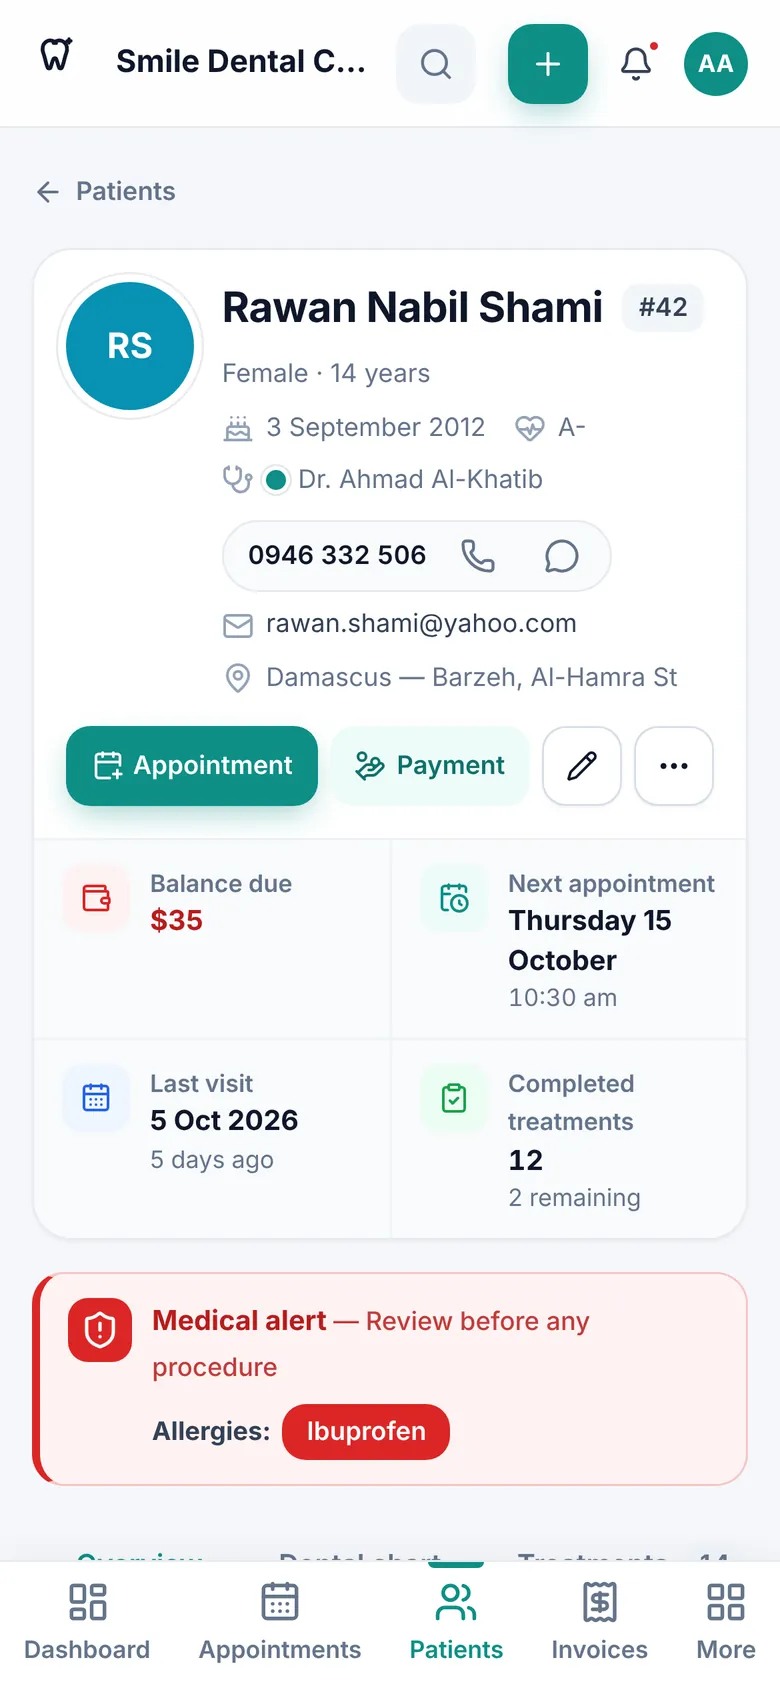
  3. Use the buttons: Edit to change details (on a phone Edit is a pencil icon only), Appointment to book a visit, Payment to record money received, and the three dots (⋯) to Archive the file or Delete patient.
  4. Move between the tabs. Overview shows the medical information, contact and insurance, notes, Upcoming appointments with a Book appointment button, and Recent activity on the file with who did what and when.
A patient file: details, the four figures, the buttons, the medical alert, the tabs and the overviewEnlarge the picture
A patient file on a phone: the buttons under the name and the figures in a gridEnlarge the picture

Good to know

  • The other tabs have their own pages: Dental chart, Treatments, Appointments, Account, Prescriptions, Lab. Each of these tabs except Dental chart shows how many items it holds when it is not empty; the Files & notes count adds files and clinical notes together.
  • Tabs and buttons depend on the user’s role: a receptionist does not see Dental chart, Treatments, Prescriptions or Lab; an assistant does not see Account or the Payment button; only an admin can delete a patient. See Roles and permissions.
  • On a phone the tab bar scrolls sideways: swipe it to reach the other tabs.

Files, images and clinical notes

Keep X-rays, clinical photos, documents and signed consents in the patient’s file, and write notes after each session for the next visit.

  1. Open the Files & notes tab of the patient’s file.
  2. Click Upload file and choose an image or a PDF. On a computer you can also drag the file onto the box under the files.
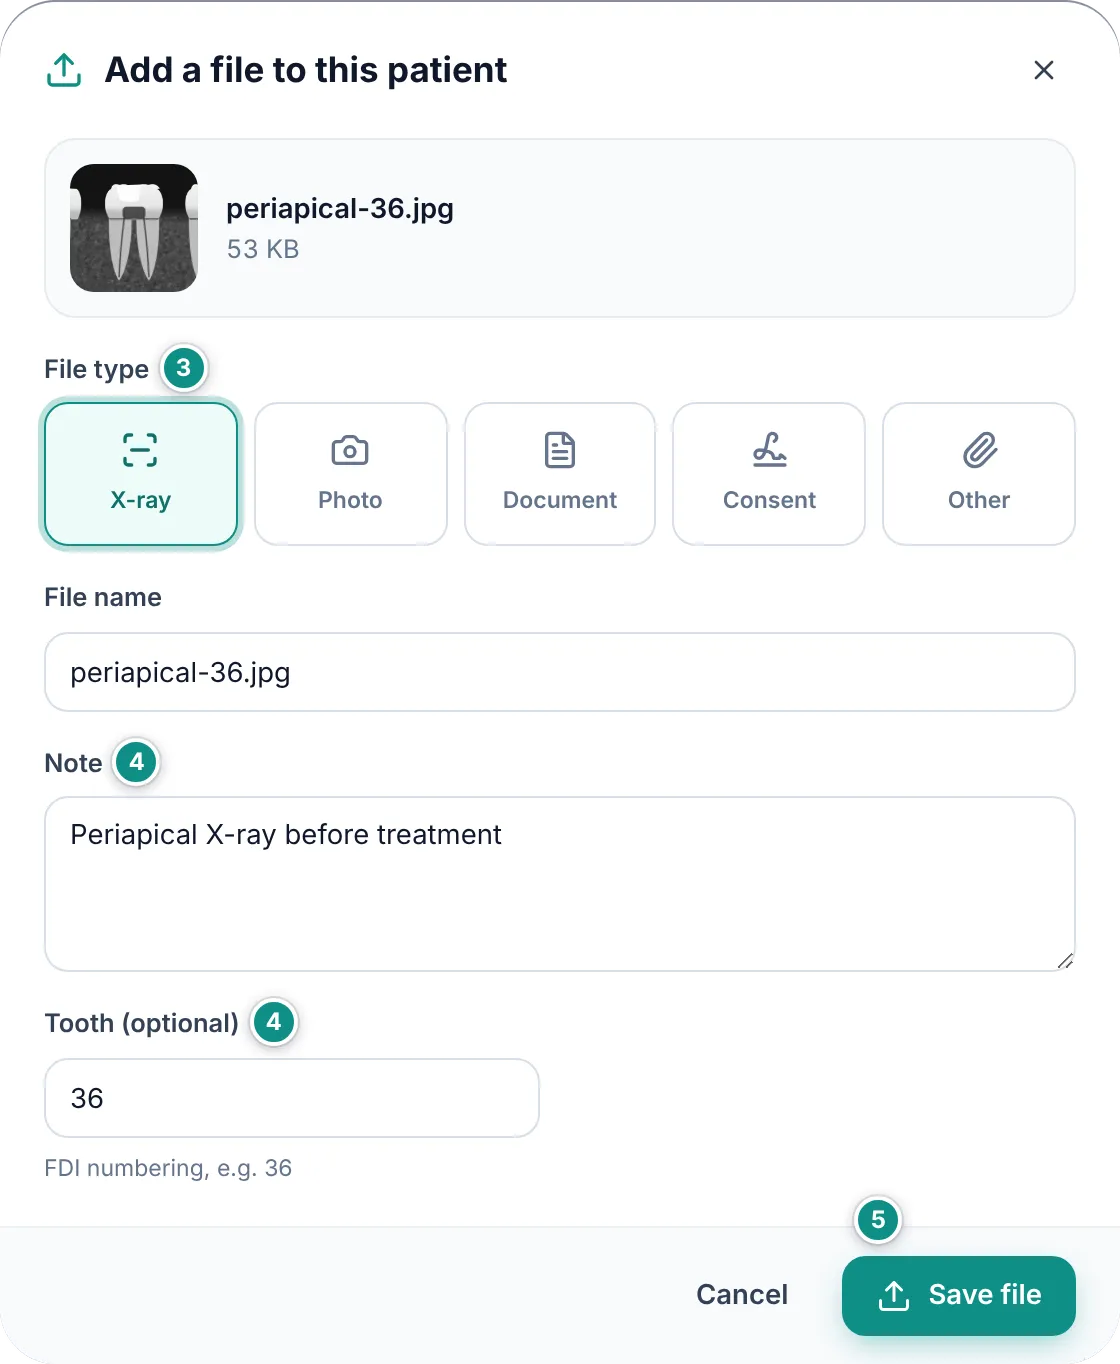
  3. Choose the File type: X-ray, Photo, Document, Consent or Other. Dentora suggests one from the file name.
  4. Rename it in File name if you like, add a Note describing the file (it shows under the thumbnail instead of the name), and the tooth in Tooth (optional) in FDI numbering, such as 36.
  5. Click Save file.
  6. For a clinical note, click New note, pick the date and the doctor, write what was done, then click Save or press Ctrl+Enter.
The Files & notes tab: an X-ray uploaded for tooth 36, the drop zone, and the clinical notesEnlarge the picture
The add-a-file window: file type, name, note and tooth numberEnlarge the picture

Good to know

  • Click a file to see it large. Move between files with the arrows on screen or on the keyboard, change the type, tooth or note and click Save changes, or use Download and Delete. The buttons above the files filter them by type.
  • Files can be up to 25 MB, and only images and PDFs are accepted.
  • On Android, Upload file offers the phone’s camera next to your files, so you can photograph an X-ray film or the patient’s mouth directly.
  • On Windows a PDF opens inside the app. On Android a Download button appears instead, so you can open it in another app.
  • Files are stored on this device and are part of the backup; Dentora warns you before an upload if the device is short of space. See Backup.
  • Clinical notes are listed newest first with the doctor’s name. Doctors, assistants and admins write, edit and delete them; receptionists can only read them. Images and files can be uploaded and deleted by everyone on the team, receptionists included.

Archiving and deleting

When a patient stops coming, archive the file rather than delete it: it leaves the list and the figures, its account and payments stay in the reports, and you can restore it at any time.

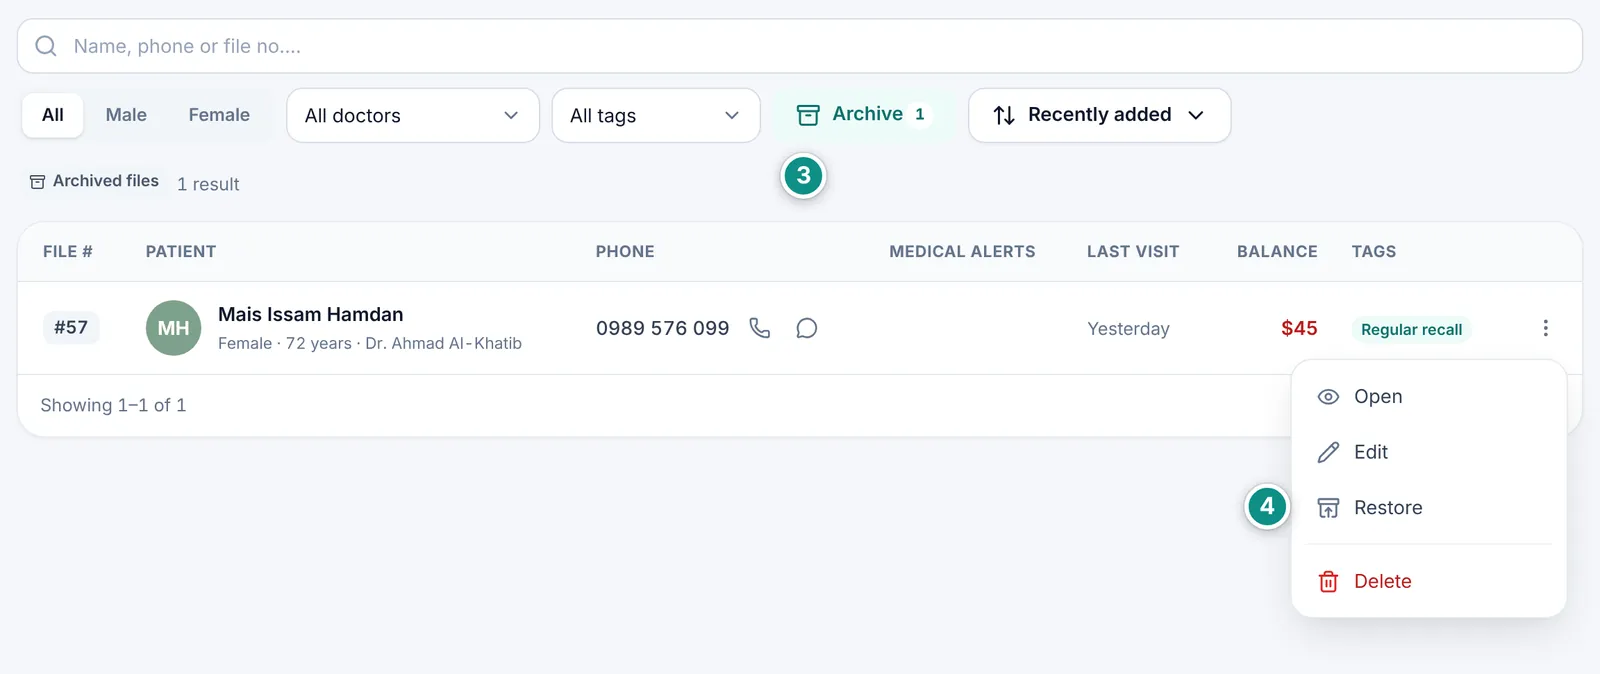
  1. Open the actions menu (⋮) at the end of the patient’s row, or the three dots (⋯) in the patient’s file.
  2. Choose Archive.
  3. To see archived files, click Archive above the list. On a phone, turn on Show archived files in the filter window.
  4. To bring a file back, choose Restore from the same actions menu.

The archived files view with the actions menu open on RestoreEnlarge the picture
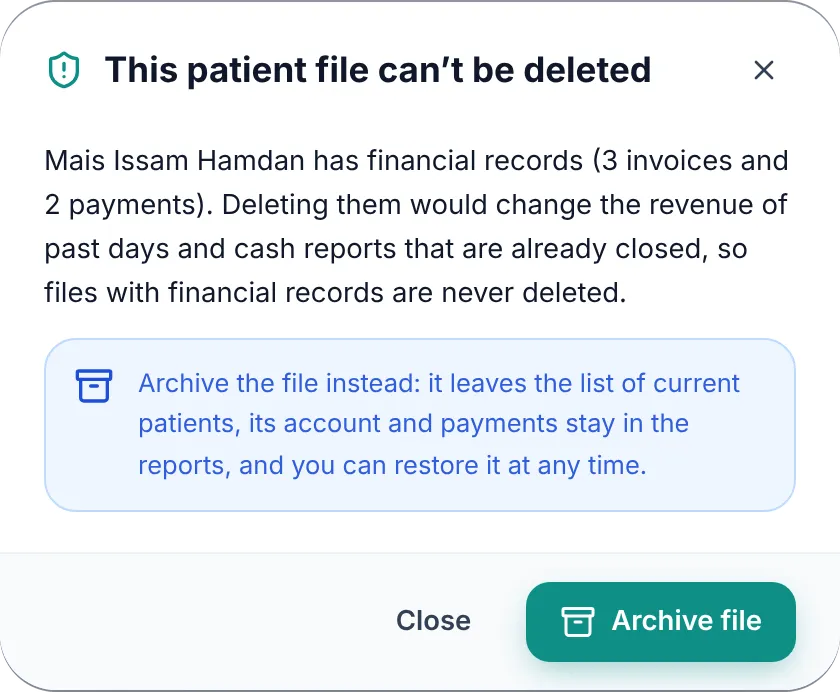
The “This patient file can’t be deleted” message, because the patient has invoices and payments, with the Archive file buttonEnlarge the picture

Good to know

  • An archived file carries an Archived file badge next to the name, and you can still open and read it.
  • An archived file does not appear when you choose the patient in the appointment form, so do not add the patient again as new (that would make a second file): book from the Appointment button in the file, or restore it first. It still shows in quick search (Ctrl+K) with an Archived badge.
  • Only an admin can delete. Deleting removes the file for good with everything in it: appointments, treatment plans and treatments, dental chart, prescriptions, lab orders, images and files, clinical notes, draft invoices and its activity log; it cannot be undone.
  • A file with invoices or payments is never deleted, because that would change the revenue of days already closed. You see This patient file can’t be deleted with an Archive file button instead.
  • Make a backup before deleting anything. See Saving a backup.
Previous topicThe dashboardNext topicDental chart

Need help?

If you did not find your answer here, message us on WhatsApp and we will help.

WhatsApp+963 996 489 504

On this page

  1. The patients list
  2. Adding a new patient
  3. Medical status and the medical alert
  4. Search, filter and sort
  5. The patient file
  6. Files, images and clinical notes
  7. Archiving and deleting

Back to top

All topics

  1. Getting started
  2. Finding your way around
  3. The dashboard
  4. Patients
  5. Dental chart
  6. Appointments
  7. Treatments and treatment plans
  8. Invoices and payments
  9. Prescriptions
  10. Dental lab
  11. Inventory
  12. Expenses
  13. Reports
  14. Settings
  15. Staff and permissions
  16. Backup and moving your clinic
  17. Licence and activation
  18. Questions and answers

© 2026 Dentora. All rights reserved.

HomeUser guideVideosActivate a licencePrivacy policyTerms of use