Skip to content
Dentora
العربية
  1. Home
  2. User guide
  3. Dental chart

Dental chart

Record caries, fillings, crowns and every other finding on a tooth or its surfaces, with a click or with quick paint; keep a full history of every change, and print the chart when you need it.

Watch this topic on video
On this page
  1. The chart at a glance
  2. Recording a finding on a tooth
  3. Quick paint
  4. Chart history
  5. Printing the chart
  6. The chart on a phone

The chart at a glance

Open the patient’s file, then the Dental chart tab. The teeth are drawn in the usual FDI numbering: upper jaw on top, lower jaw below, and the patient’s right on your left as on a paper chart, with each quadrant named and numbered.

Quick figures sit above the chart: Caries, Fillings, Crowns, Missing, Implants and Root canal, then the DMFT index, which adds up the decayed, missing and filled teeth.

Under the chart, the Legend shows every condition’s colour and how many teeth carry it.
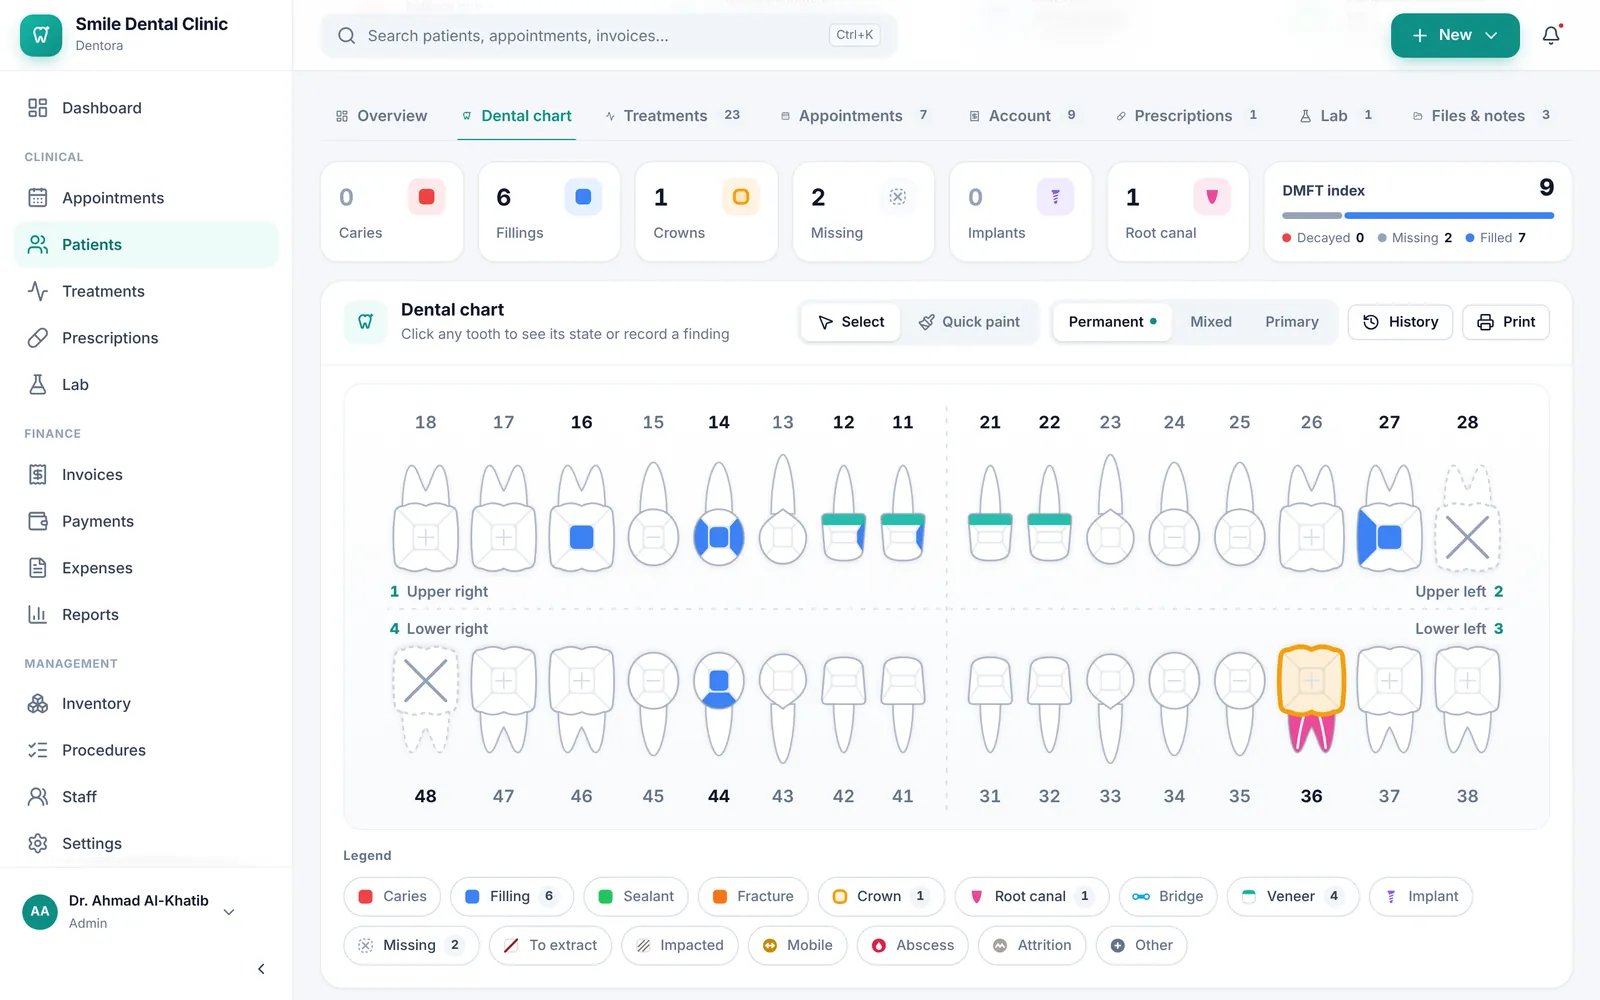
The Dental chart tab: quick figures and the DMFT index, then the chart with its four quadrants, then the legendEnlarge the picture

Good to know

  • Choose the dentition with Permanent, Mixed and Primary. Dentora suggests the one that suits the patient’s age and marks it with a dot: primary under 6, mixed from 6 to 12, permanent after that.
  • If findings are recorded on teeth the chosen dentition does not show, Dentora says so and offers Show mixed dentition.
  • On a computer, hover over a tooth to see its full name and findings, such as “Lower left first molar”.
  • An empty chart means nothing has been recorded yet, so every tooth is drawn as healthy until you examine the patient and record findings. It offers Start quick paint to fill it in quickly.
  • Doctors, assistants and admins record findings. Receptionists do not see this tab. See Roles and permissions.

Recording a finding on a tooth

In Select mode, clicking a tooth opens its panel: a large drawing of the tooth and its surfaces, its current state, and a form to record a new finding.

  1. Make sure the mode is Select, then click the tooth on the chart.
  2. Check the Current state: every finding on the tooth with its surfaces, date and who recorded it.
  3. Under Record a finding, choose the condition: On surfaces (Caries, Filling, Sealant, Fracture) or Whole tooth, such as Crown, Root canal, Bridge, Implant, Missing or To extract.
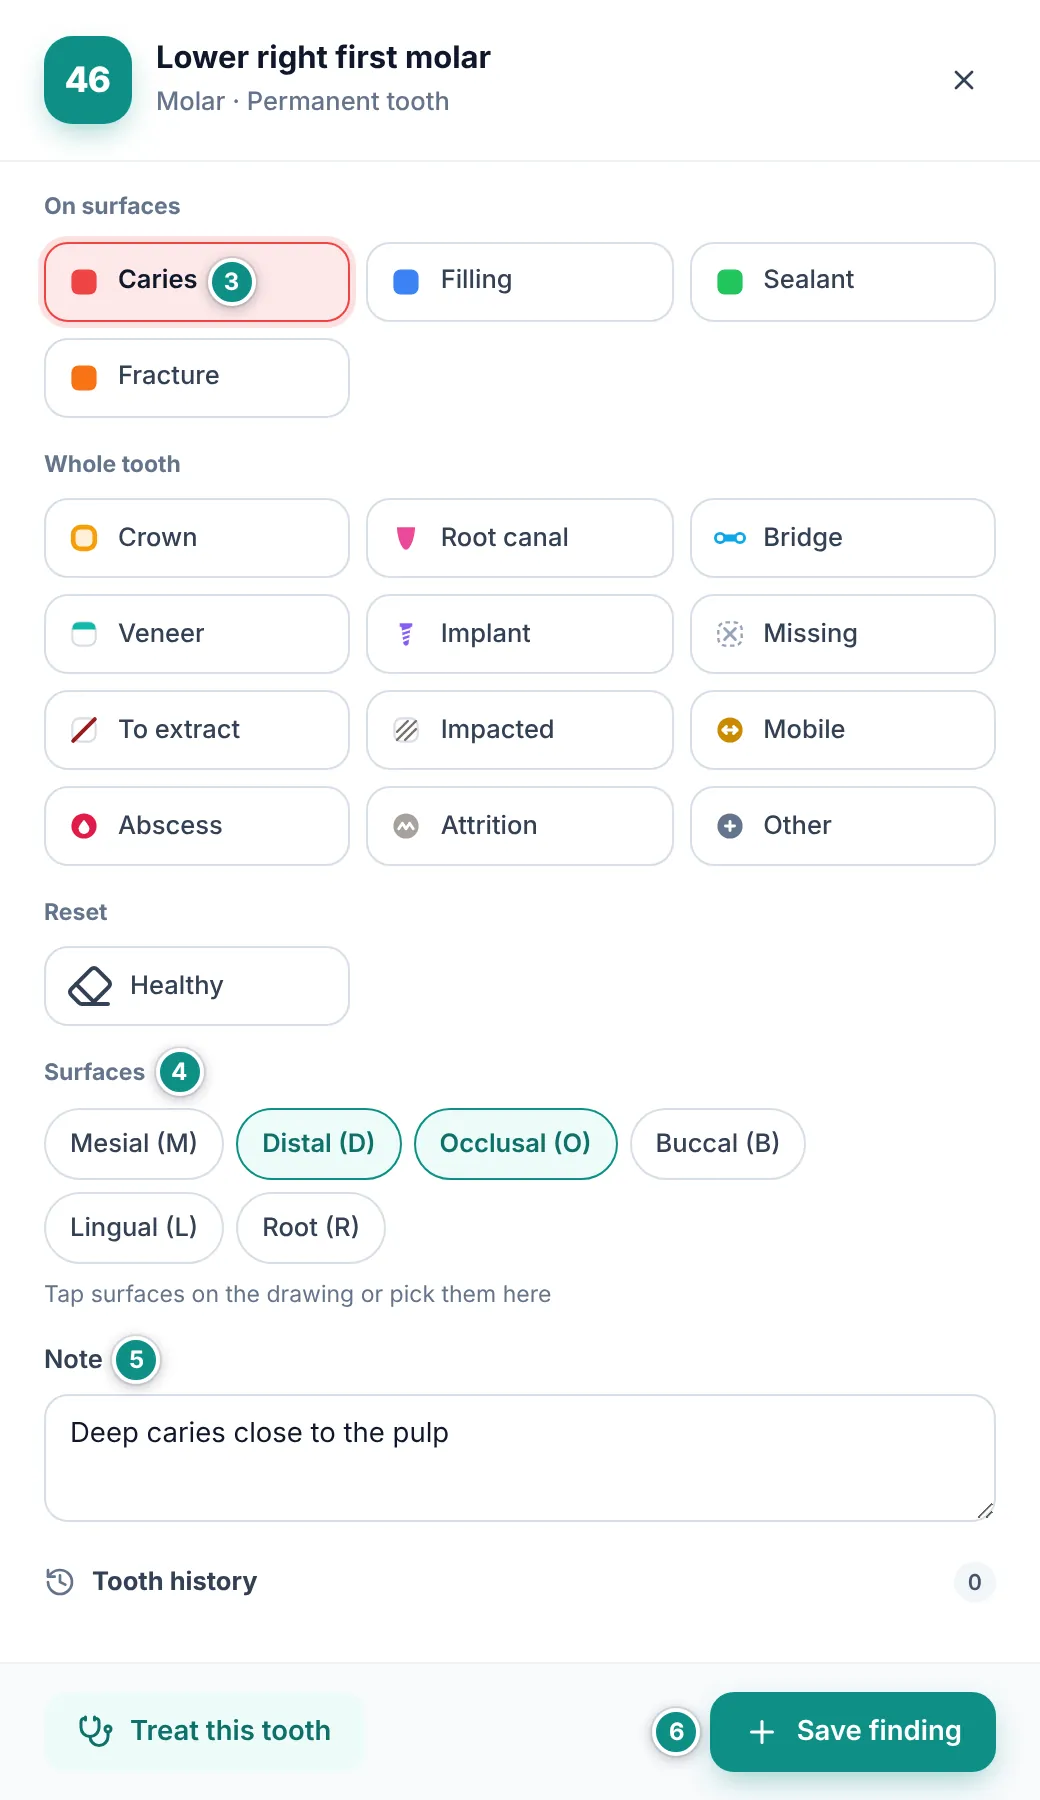
  4. For a surface condition pick at least one surface: click it on the drawing at the top of the panel, or use the Surfaces buttons: Mesial (M), Distal (D), Occlusal (O) (Incisal (I) on front teeth), Buccal (B), Lingual (L) and Root (R).
  5. Add a Note if you like, such as “deep caries close to the pulp”.
  6. Click Save finding, or press Ctrl+Enter in the note. The tooth changes colour on the chart at once, and the panel stays open for the next finding.
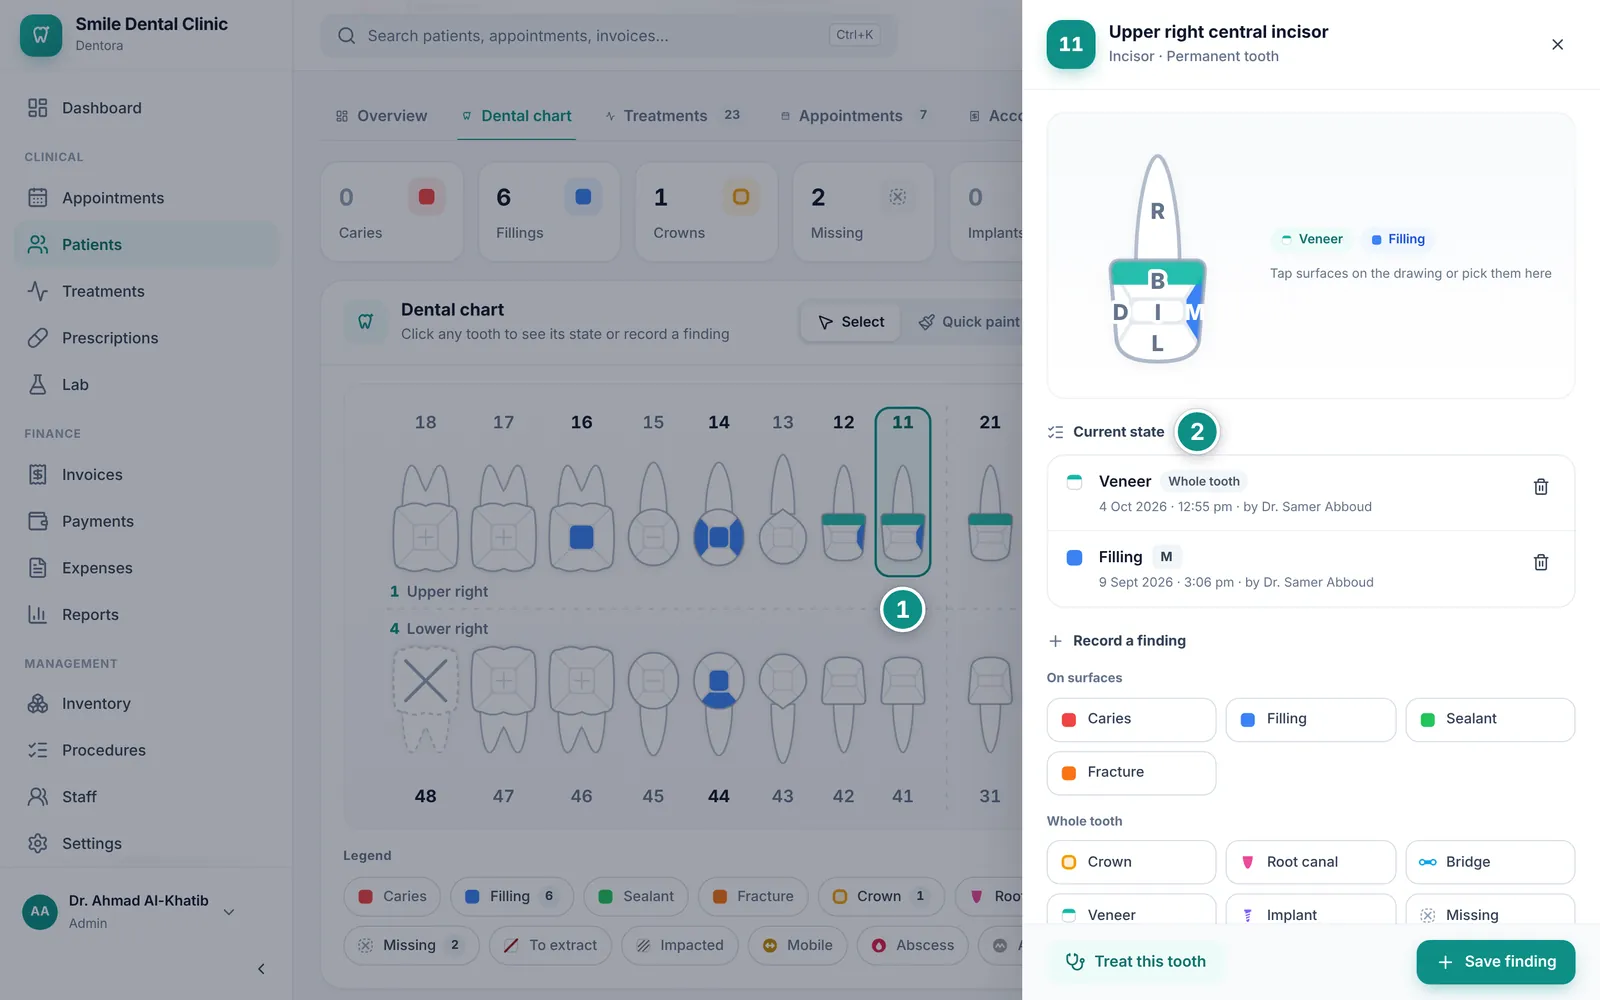
The panel of tooth 11 open beside the chart: the tooth drawing and its current state (veneer and filling)Enlarge the picture
Recording caries on surfaces O and D of tooth 46 with a note, before clicking Save findingEnlarge the picture

Good to know

  • A new finding replaces only what it covers: a filling on O over caries on MOD leaves the caries on M and D. A crown covers old fillings but keeps the root canal, while To extract, Mobile, Abscess, Attrition and Other are added on top of whatever the tooth already has.
  • To clear a condition after treatment, choose Healthy under Reset: pick the treated surfaces to clear only those, or pick none to make the whole tooth healthy again.
  • To remove a finding recorded by mistake, click the bin icon next to it under Current state and confirm. It is removed from the chart and from the history for good, so do not use it for a condition that was treated: choose Healthy, which keeps it in the history.
  • For a bridge, record Bridge on every unit (abutments and pontic); the chart joins neighbouring bridged teeth with a bar.
  • Treat this tooth takes you to the Treatments tab with a new treatment item for this tooth. When you mark treatment on a tooth done there, such as a filling, a crown or a root canal, Dentora asks Update the dental chart? so the chart matches what was done. See Treatments.
  • Close the panel with ✕ or Esc. On a phone the panel slides up from the bottom of the screen.

Quick paint

To fill in a new patient’s chart in minutes, pick a condition once, then click teeth or surfaces to apply it straight away, without opening a panel for each tooth.

  1. Click Quick paint above the chart, or click a condition in the Legend directly.
  2. Choose the condition under Pick a condition to paint below the chart. Quick paint first starts with Caries already picked, so check the condition before you click a tooth. A bar above the chart reminds you what you are painting with.
  3. Click the surface for a surface condition, or anywhere on the tooth for a whole-tooth condition such as Crown or Missing. Clicking the same place again removes it.
  4. To fix a mistake choose Eraser (healthy): click a surface to clear it, or the tooth number to make the whole tooth healthy.
  5. Click Done painting to go back to Select mode.
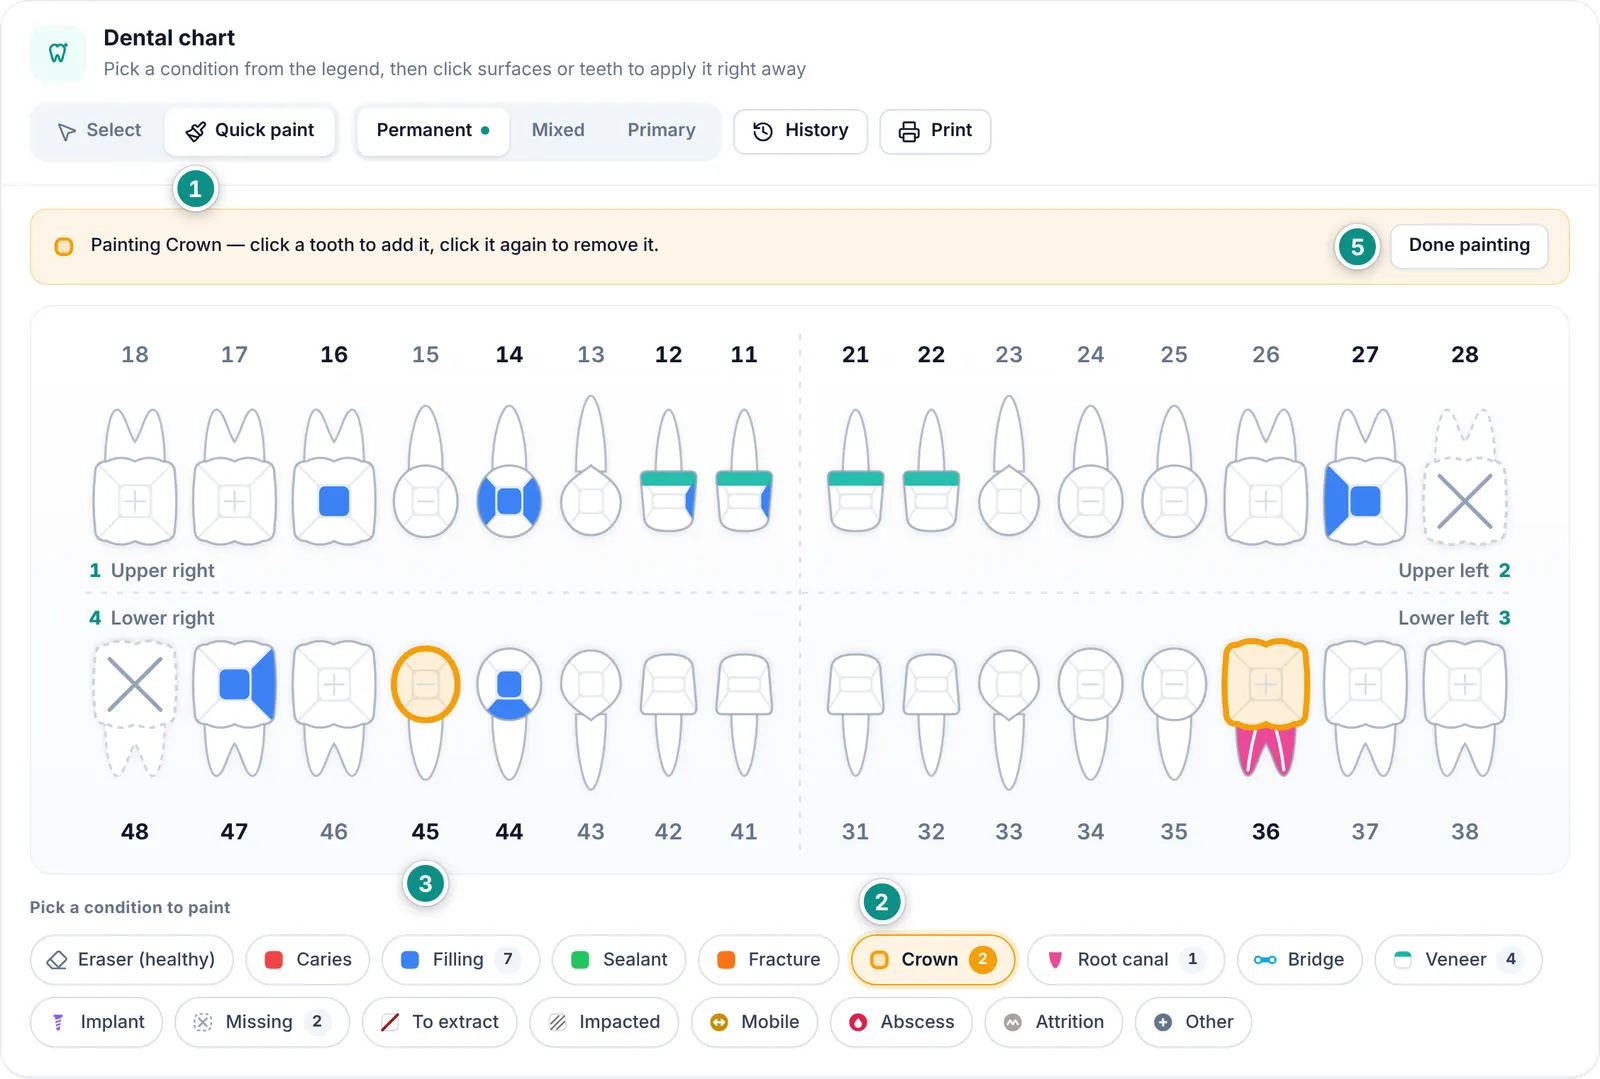
Quick paint: a filling on tooth 47 and a crown on tooth 45, with the “Painting Crown” bar above the chartEnlarge the picture

Good to know

  • Every click is saved at once, so there is no Save button. What you add appears in the chart history with your name and the date; what you remove with a second click stays in the history marked Superseded, and the change is logged under your name in Recent activity in the patient’s file.
  • Quick paint adds no notes. To add a note to a finding, use the tooth panel in Select mode.
  • On a phone the chart opens zoomed in so surfaces are easy to tap; swipe it sideways to reach the other teeth.

Chart history

No finding is lost unless you delete it yourself: when a new one replaces an older one, the older one stays in the history, so you know when each tooth changed and who recorded it.

  1. Click History above the chart. Every finding is listed newest first, grouped by day, with the time and who recorded it.
  2. Read the badges: Current for a finding in place, Superseded for one that a newer finding replaced, and Marked healthy when the tooth was reset to healthy.
  3. To see the history of one tooth, click it on the chart to open its panel, then click Tooth history at the bottom of the panel.
  4. To bring back a Superseded finding click the restore icon next to it; to delete a line for good click the bin.
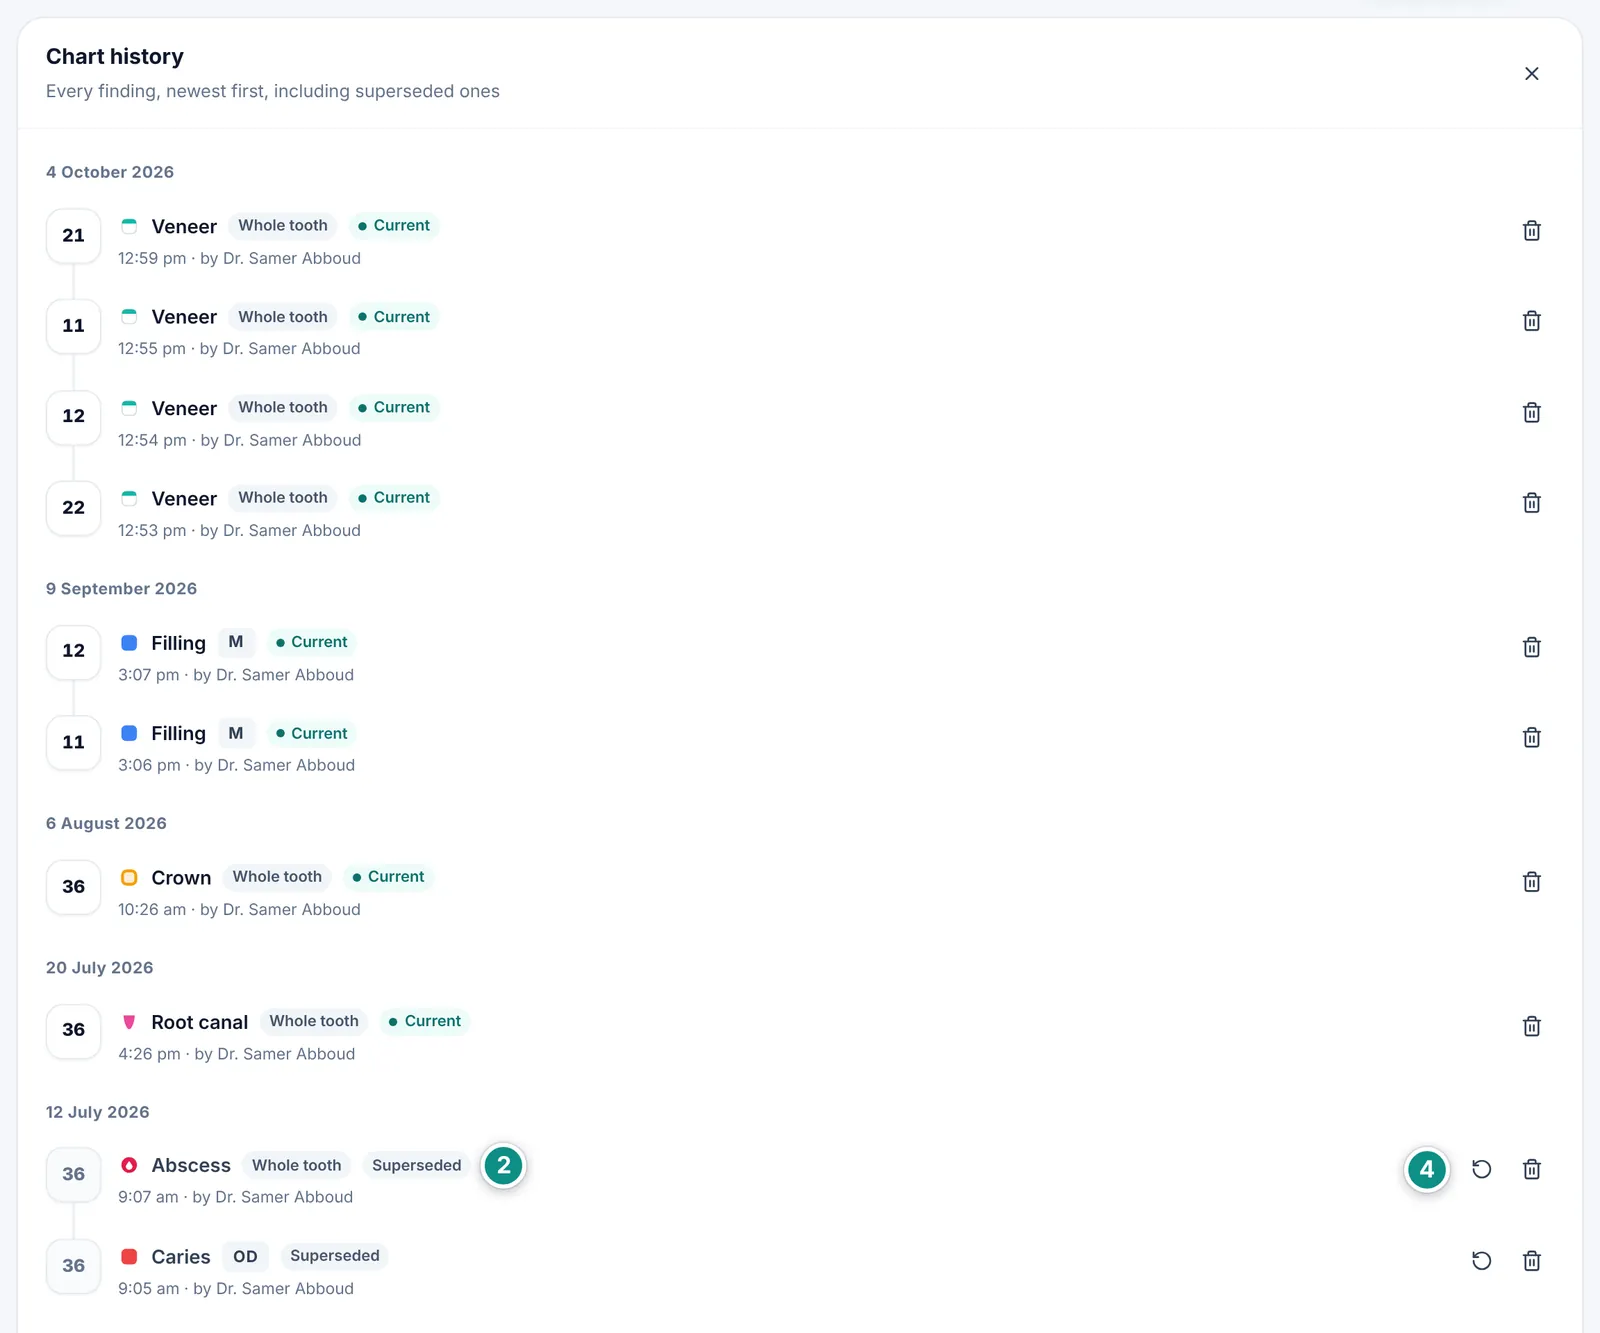
The chart history: findings grouped by day with Current and Superseded badges and the restore and delete buttonsEnlarge the picture

Good to know

  • Click a tooth number in the history to open that tooth’s panel.
  • Deleting from the history is permanent, and Dentora asks you to confirm first.
  • Chart changes also appear under Recent activity in the Overview tab of the patient’s file.

Printing the chart

Print the chart to hand to the patient or attach to a referral, or save it as a PDF.

The page carries the clinic’s header (logo, name, address and phone), the patient’s name, file number and age, and the print date, then the chart with its colours and legend, then a Findings summary: a table of every current finding with tooth, surfaces, note, date and who recorded it.

  1. Choose the dentition to print: Permanent, Mixed or Primary.
  2. Click Print above the chart.
  3. In the print window choose your printer, or choose to save as PDF.
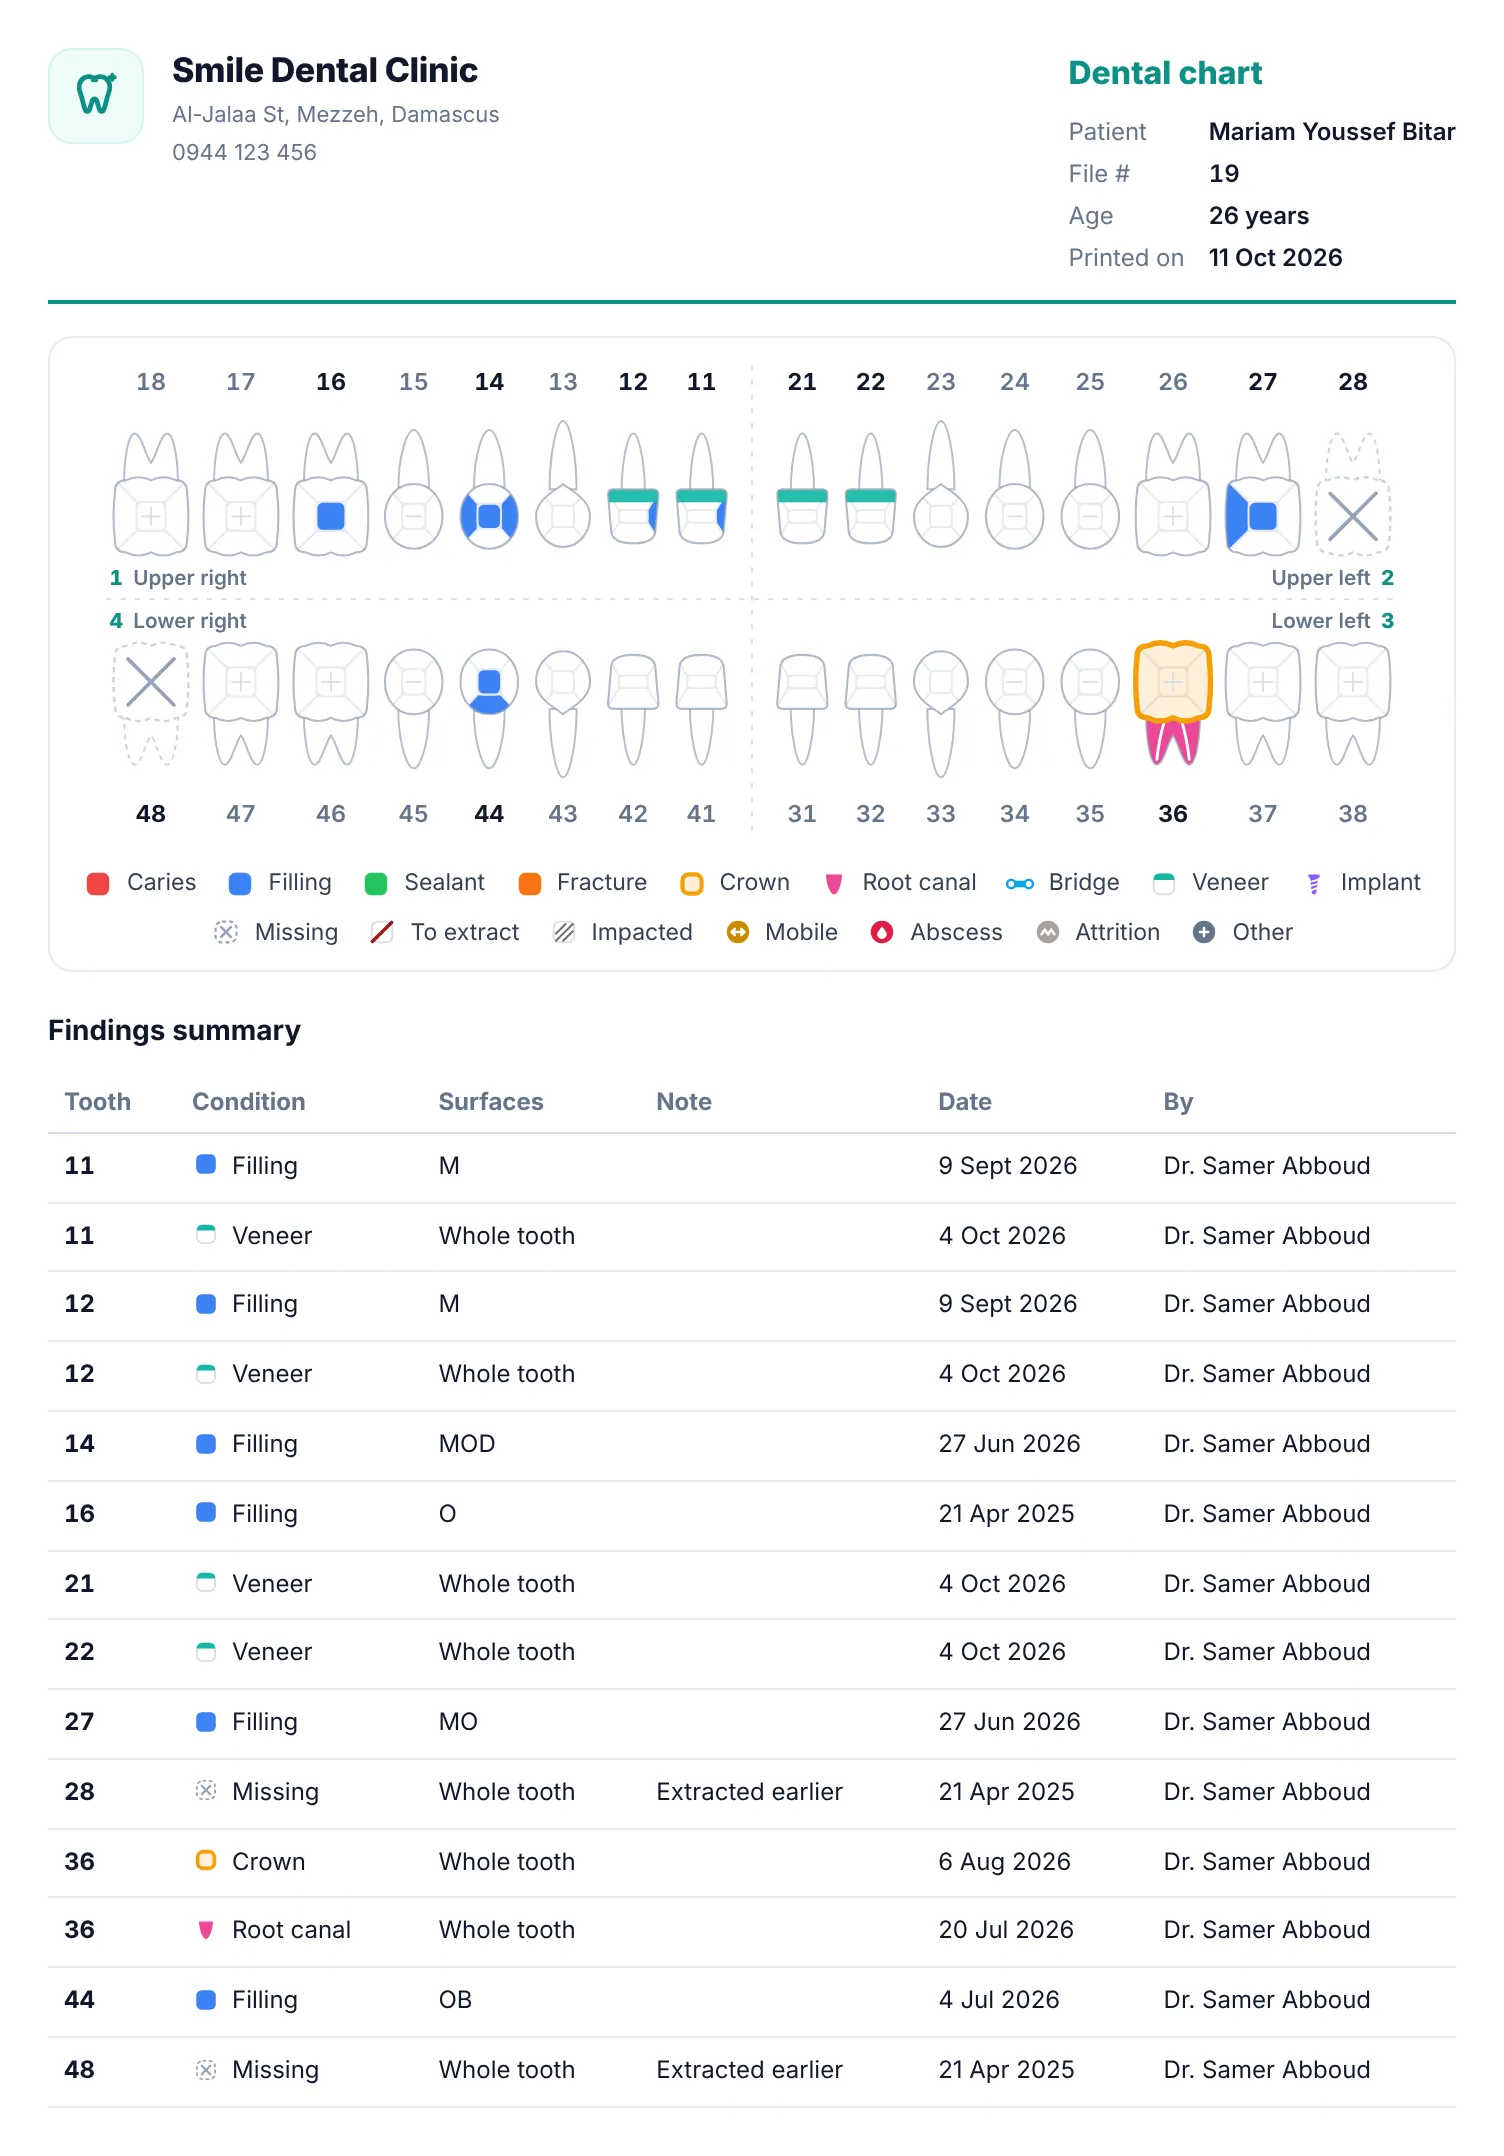
The printed dental chart: clinic header, patient details, the chart and the findings summary tableEnlarge the picture

Good to know

  • On Windows the Windows print dialog opens: choose your printer, or “Microsoft Print to PDF” to save a PDF file.
  • On Android the system print screen opens: choose a printer the phone can reach, or the save-as-PDF option.
  • The print job is named after the chart and the patient, such as “Dental chart - Mariam Youssef Bitar”, so it is easy to recognise when you save it.

The chart on a phone

The chart works on a phone just as on a computer, with a few changes that make it easy to use with a finger.
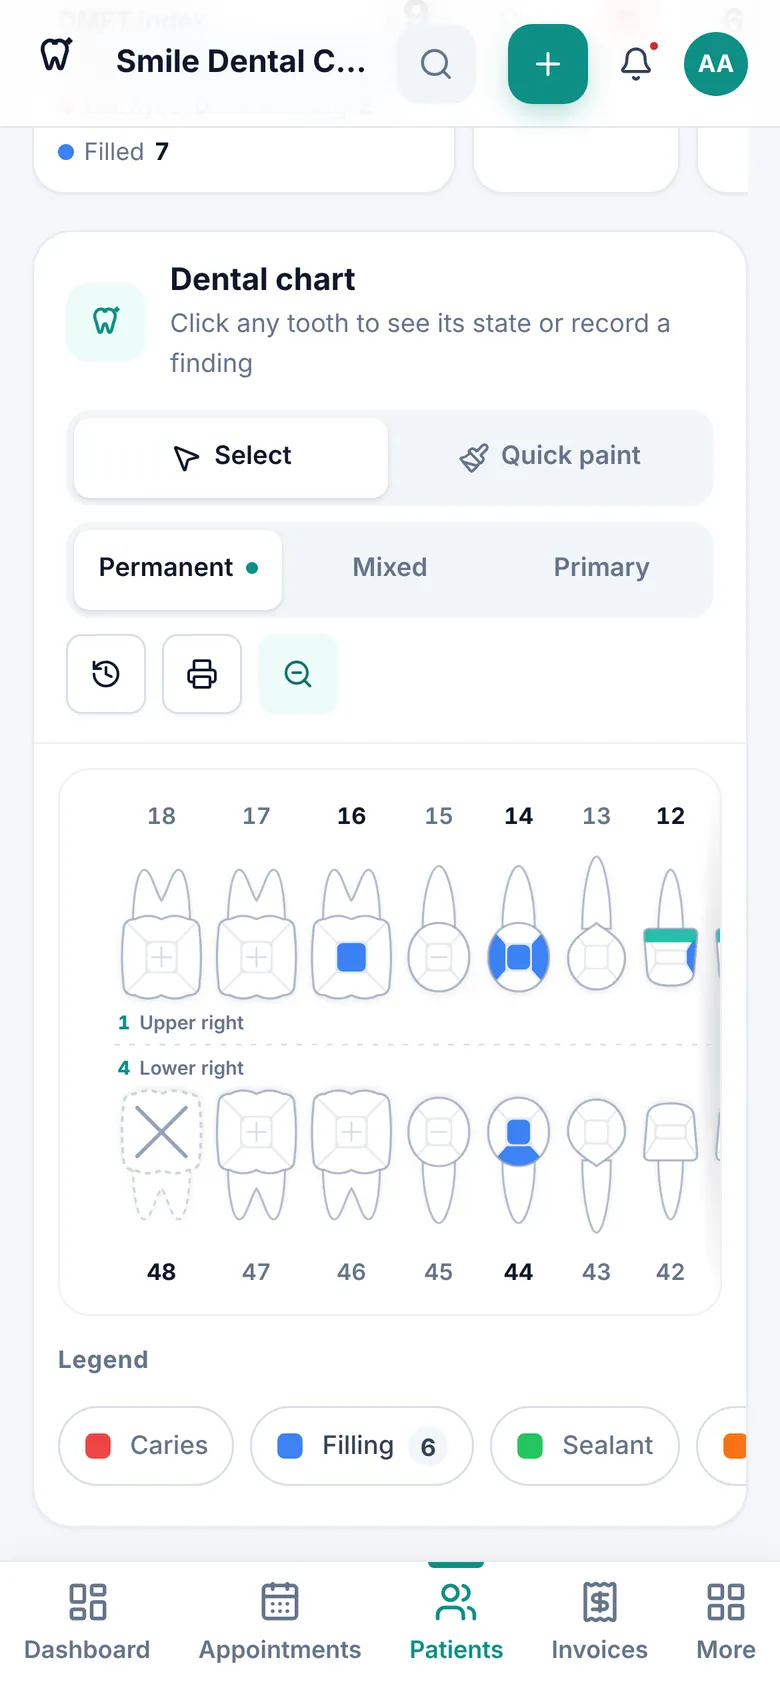
The dental chart on a phone, zoomed in, with the select, quick paint, dentition, history, print and zoom buttonsEnlarge the picture
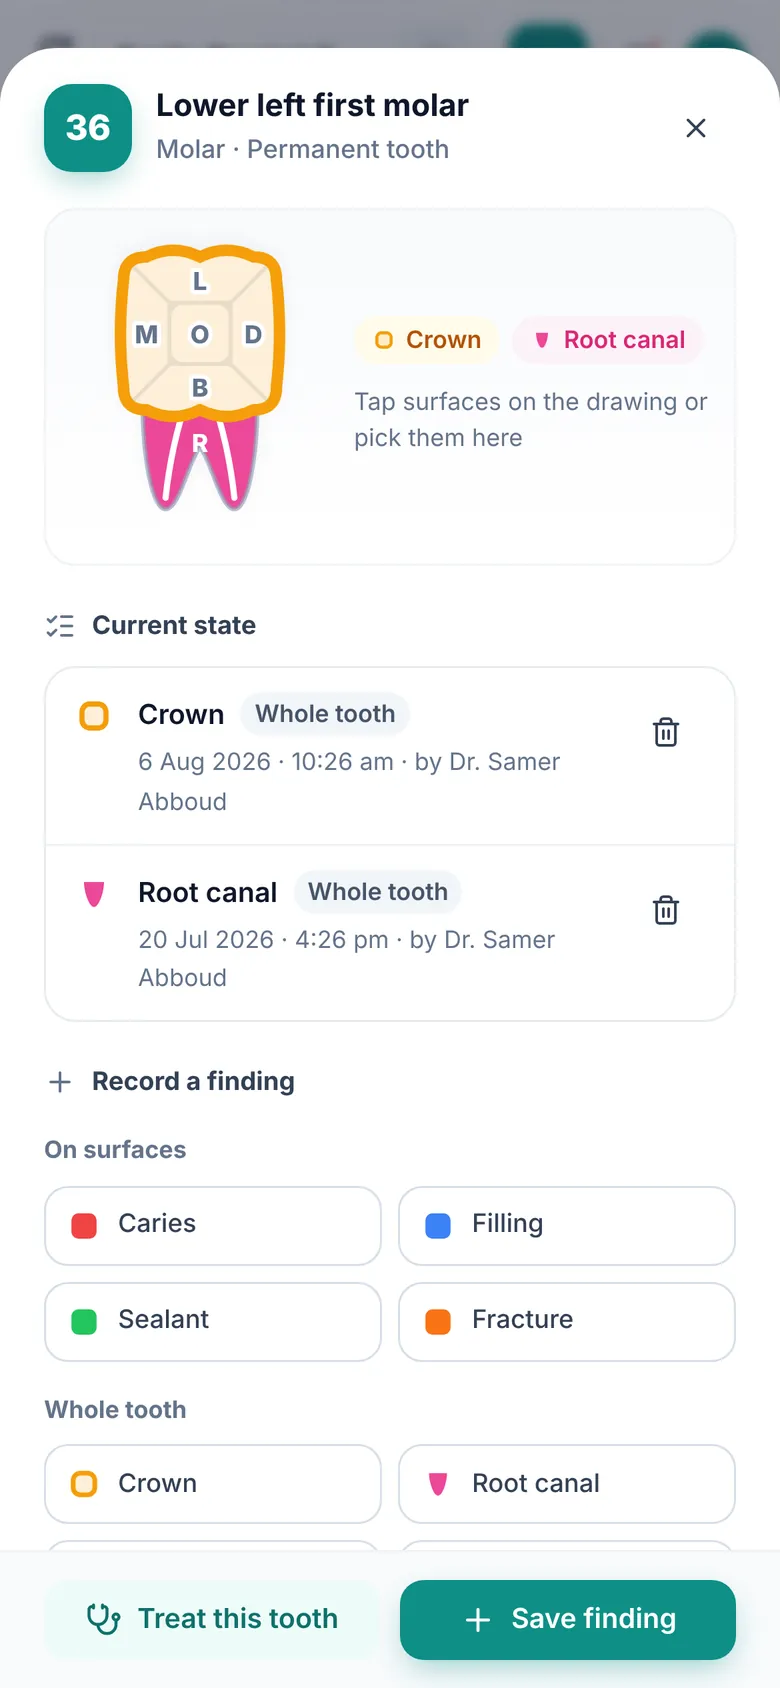
The panel of tooth 36 on a phone, opened from the bottom of the screenEnlarge the picture

Good to know

  • The chart opens zoomed in so the teeth are big enough to tap. Swipe it left and right, or tap the magnifier (Fit to screen) to see the whole mouth, and Zoom chart to go back. Dentora remembers your choice on this device.
  • The tooth panel slides up from the bottom, with Treat this tooth and Save finding always at its foot.
  • History and Print appear as icons only, next to the dentition buttons.
  • The Android Back button closes the tooth panel first, before leaving the screen.
Previous topicPatientsNext topicAppointments

Need help?

If you did not find your answer here, message us on WhatsApp and we will help.

WhatsApp+963 996 489 504

On this page

  1. The chart at a glance
  2. Recording a finding on a tooth
  3. Quick paint
  4. Chart history
  5. Printing the chart
  6. The chart on a phone

Back to top

All topics

  1. Getting started
  2. Finding your way around
  3. The dashboard
  4. Patients
  5. Dental chart
  6. Appointments
  7. Treatments and treatment plans
  8. Invoices and payments
  9. Prescriptions
  10. Dental lab
  11. Inventory
  12. Expenses
  13. Reports
  14. Settings
  15. Staff and permissions
  16. Backup and moving your clinic
  17. Licence and activation
  18. Questions and answers

© 2026 Dentora. All rights reserved.

HomeUser guideVideosActivate a licencePrivacy policyTerms of use